Bill Welch has been up to his Xxtreme Modeler activities with recent projects. Bill sent the following update from his home planet.
I am currently on a styrene kit kick working on eleven different steel box car kits. One of them is an Atlas model of the Erie’s version of the ARA 1932 Standard box car, notable for its singular use of Buckeye ends along with a Viking roof.
For this blog entry I upgraded details for the “B” end of my model, stretching my skills in an attempt to do so as finely as possible. My source is a photo on page 138 of Speedwitch Media’s “The American Railway Association Standard Box Car of 1932.”

Here’s an overall view. I did not think the molded-on bolt details were large enough so a sliced them off and replaced them with rivets harvested from a classic Athearn Blue Box 40-foot box car carcass. These bolts were present on the prototype to fasten the interior wood lining.
These cars used a fairly unusual C&O Geared Brake and I stewed on how to do this for a couple of weeks until I found I could order a bag of watch parts by weight on eBay. I ordered 1.5 grams of parts and when my order came immediately sorted through the bag removing everything but the little gears.

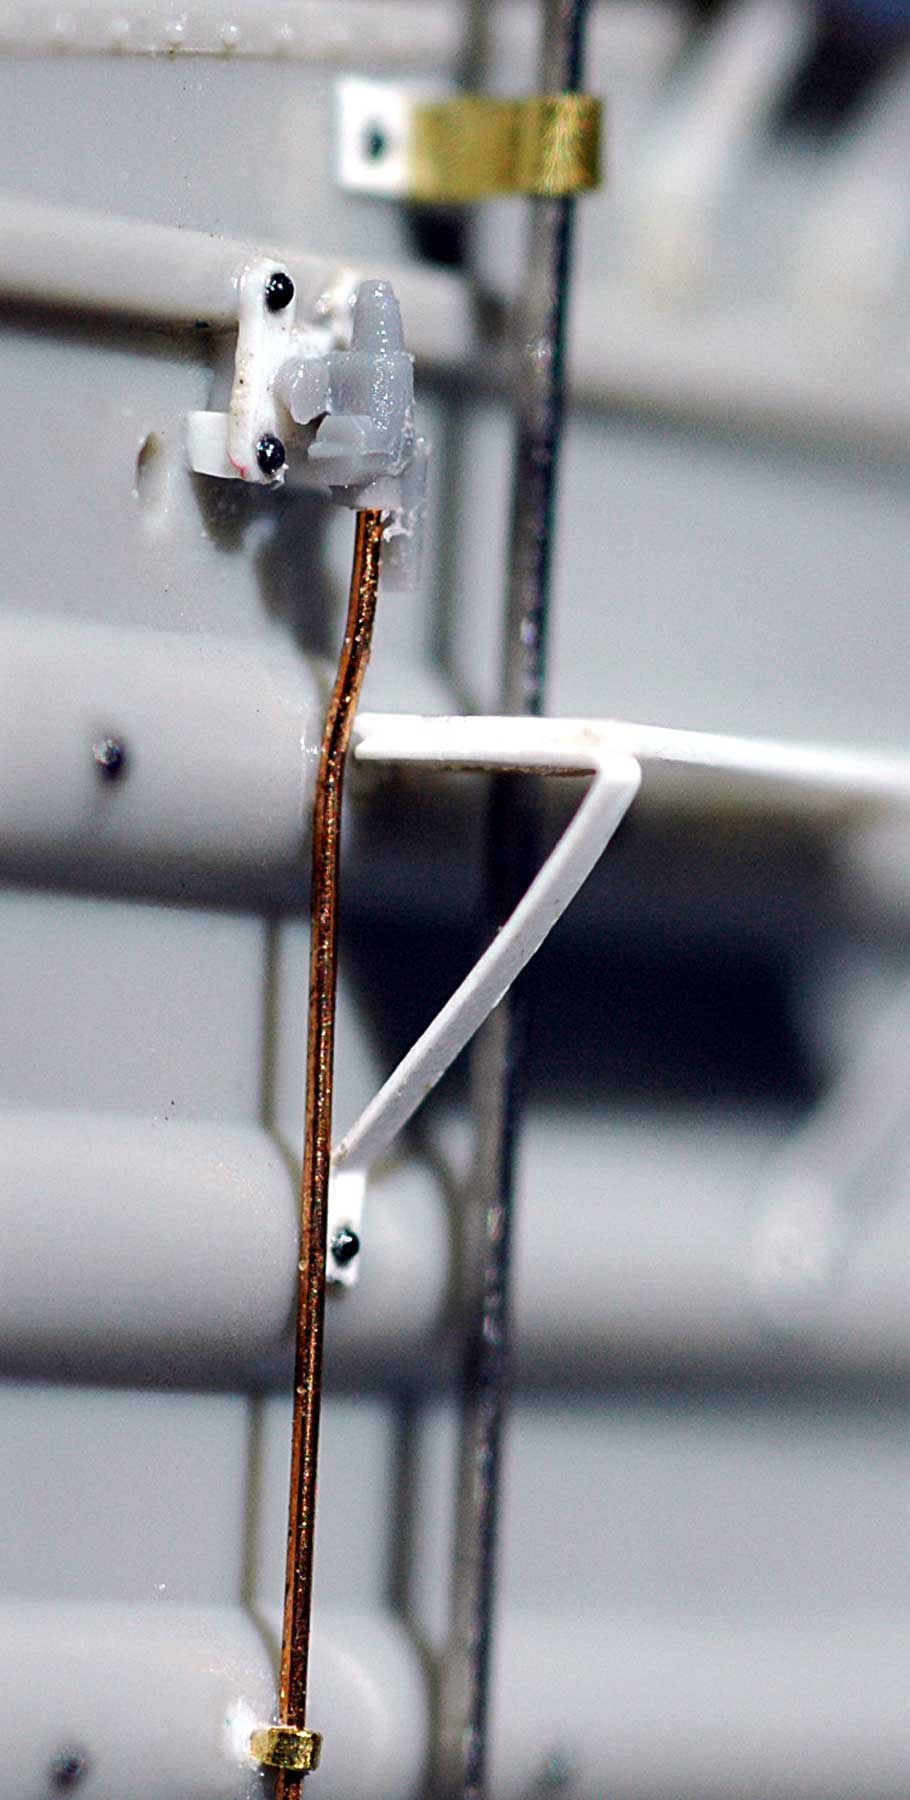
The two gears in this photo are mechanically attached; the very small one with 0.012-inch section of wire peened on one end to form a rivet while a 0.030-inch Tichy styrene rivet secures the larger gear. This is mounted to the bottom of the end sill of the “B” end.
These are attached to a piece of 0.020-inch styrene. The base for the square vertical brake staff is made from two very small Grandt Line styrene lift rings sandwiched together.
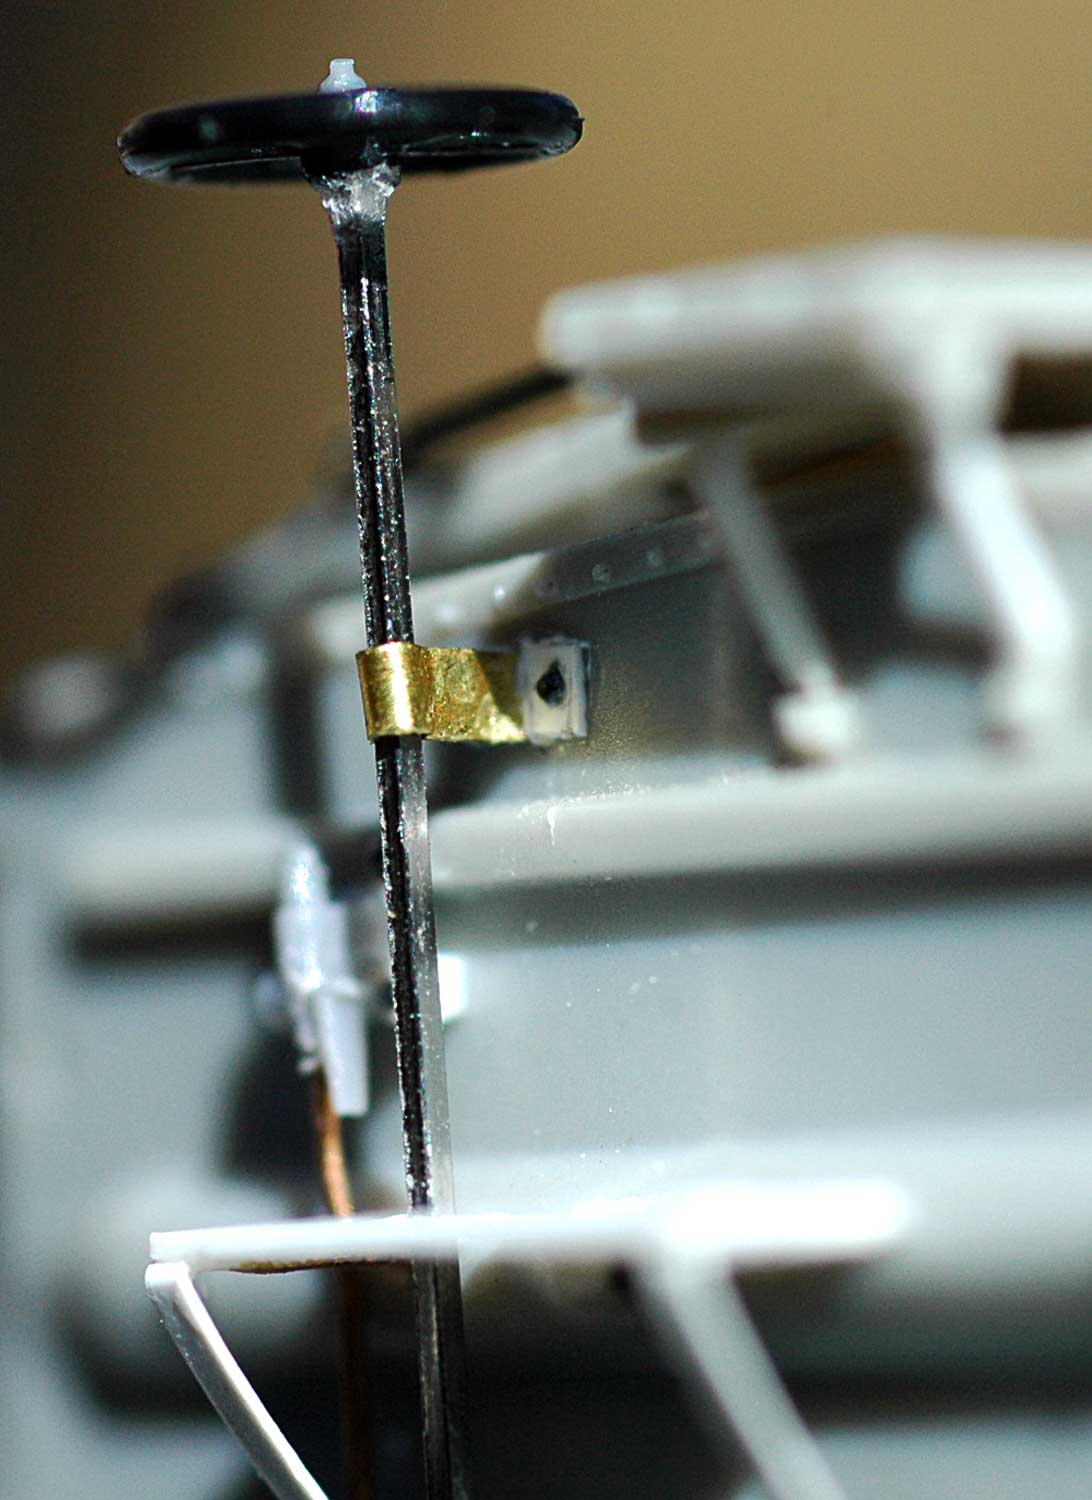
Continuing with my theme to build parts as finely as possible, I used my small metal shears to cut a section of thin brass sheet and tightened it around the shank of a drill bit large enough to allow the brake staff to pass through. I used 0.020-inch square wire for the brake staff. The thin brass part formed the brace at the top at the car end.
I used a #79 drill bit to drill two holes in the end and then a #11 blade to form a slot. Then I nudged the brass part into the slot using a section of wire to seat it to the proper depth. Shims of 0.005-inch thick styrene were inserted to fill the slot and tighten the brass part. Tester’s Liquid glue locked every thing in place. Once this area was cured, I made little squares of 0.005-inch styrene to fabricate the flanges for the brace, hopefully creating the illusion that the brace is bolted or riveted to the face of the end.

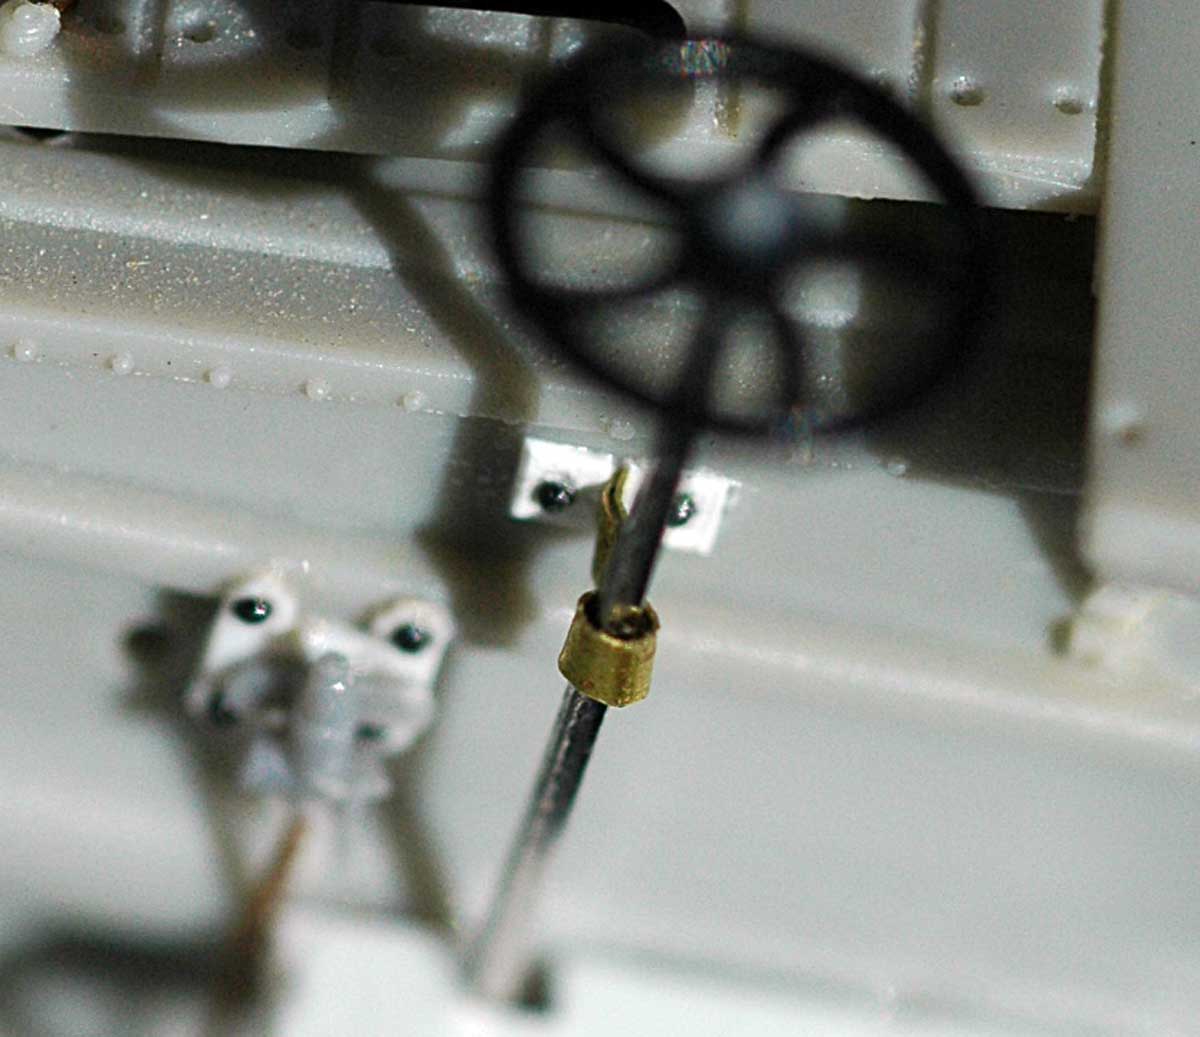
I used the kit supplied brake wheel but thought the detail on the top was exaggerated. I clipped off that detail and added a Grandt Line NBW to the center of the brake wheel.
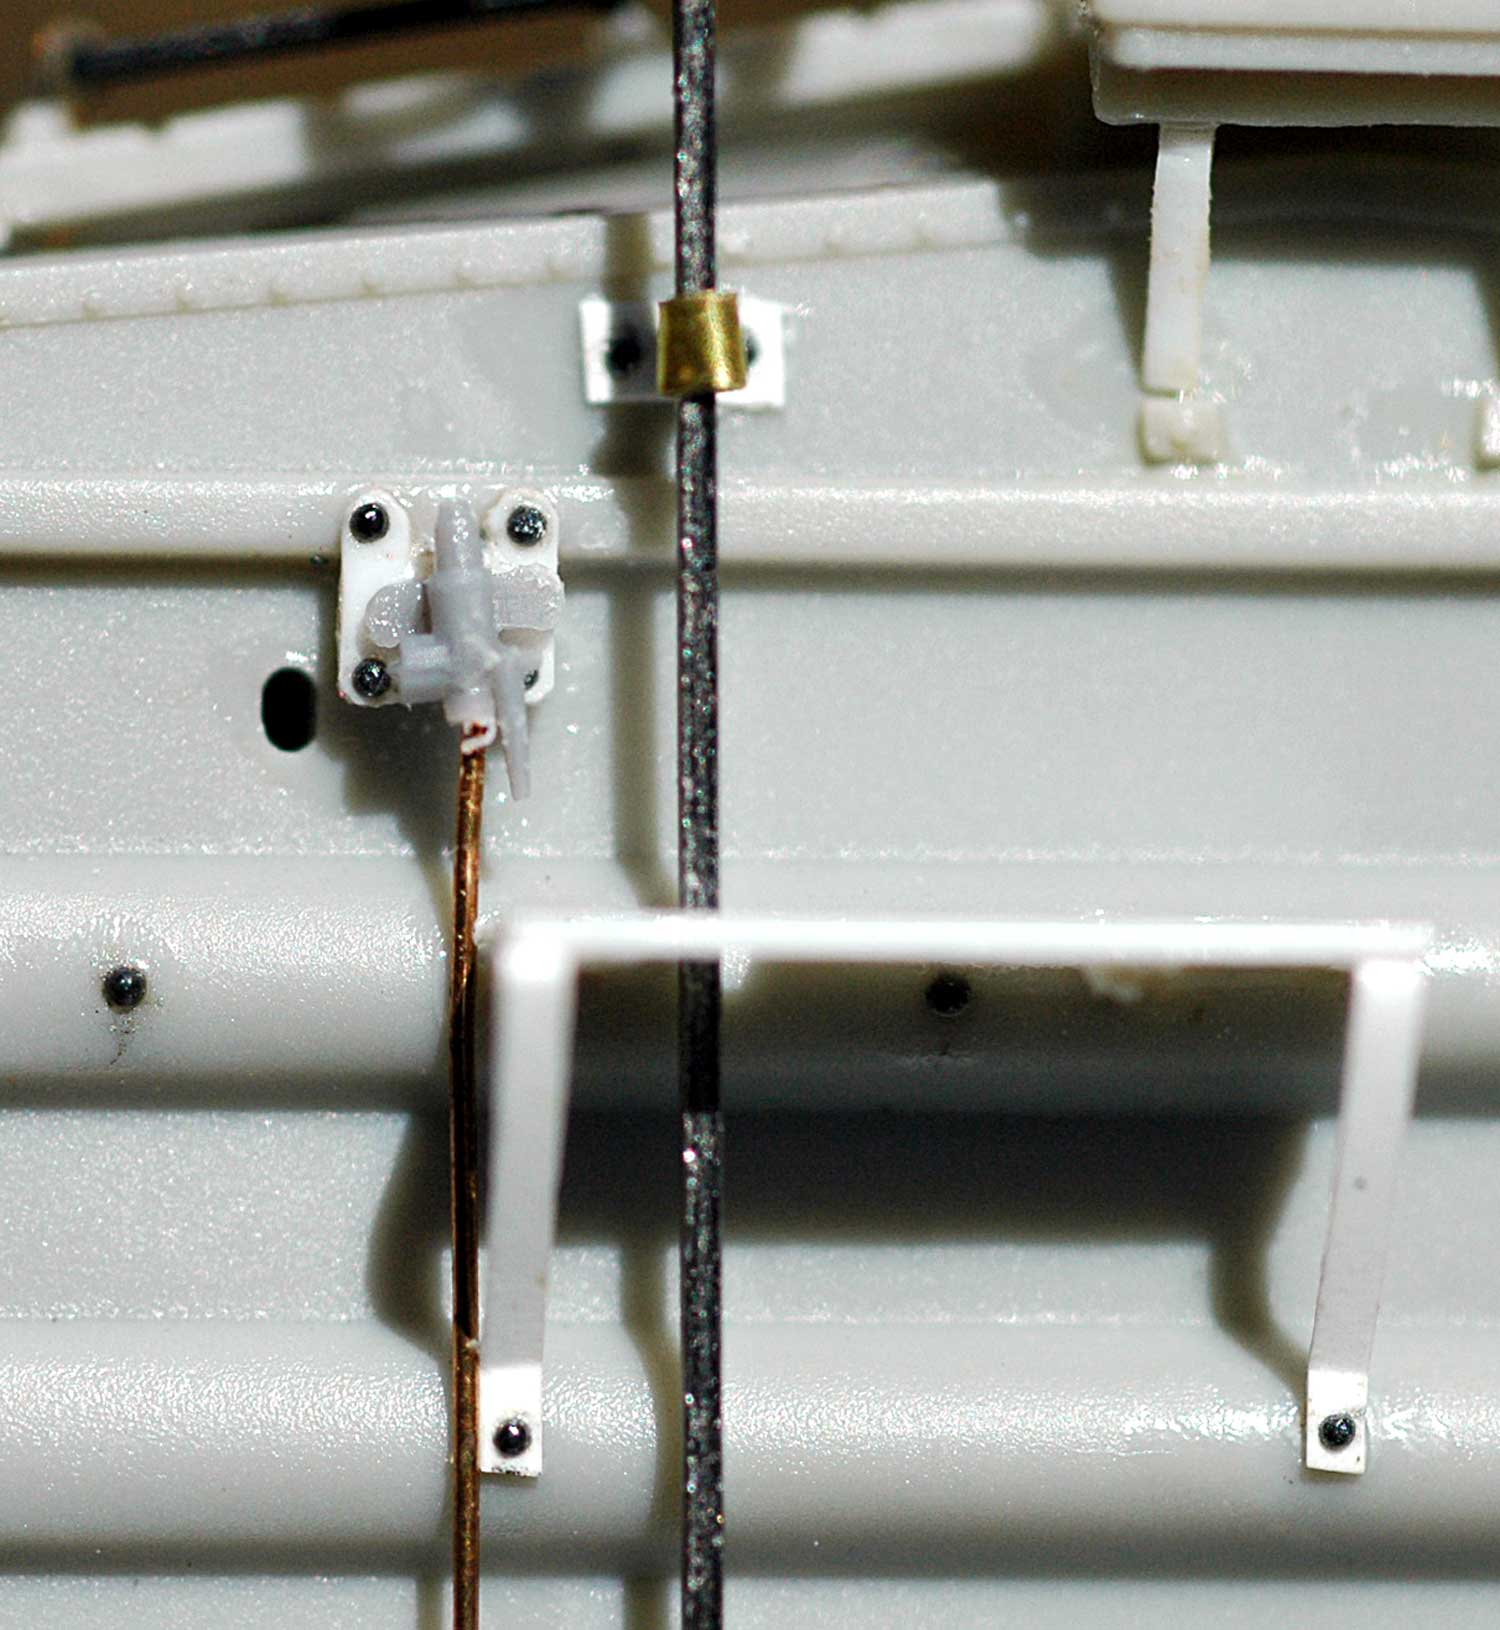
Because the hand brake gears are at the base of the shaft, the brake step was devoid of detail. I made a simple brake step from 0.010-inch styrene with a notch cut into it for the brake shaft.
The brake step is actually supported by two flattened sections of 0.012-inch brass wire. One is hardly visible in this photo. To install these I drilled two #79 holes at the same height. The flattened 0.012-inch brass wires were inserted into the holes to support the brake step. A tiny bit of Cyanoacrylate cement (CA) was used to secure these. After the CA cured, I made thin strips of 0.005-inch styrene and bent them to form the brake step braces. These provide a nice thin section look for the two braces. The bolt heads are more harvested rivets.
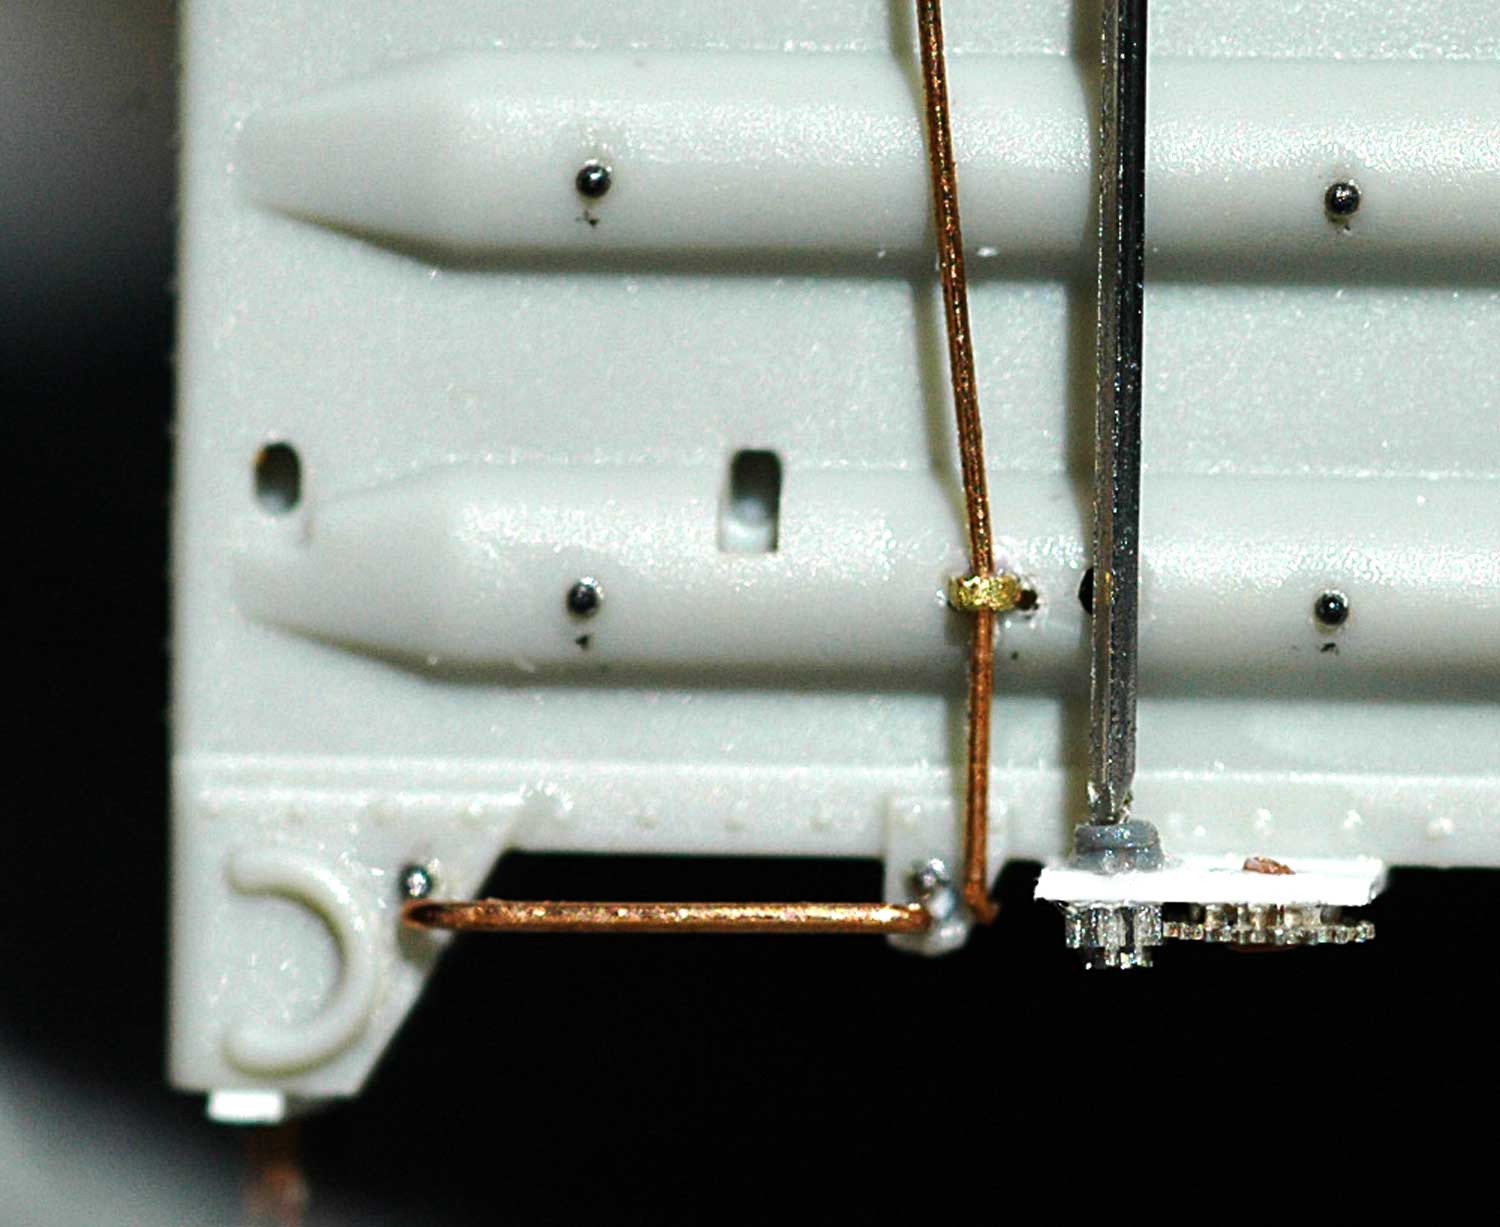
I used my favored Precision Scale “Retainer Valve” (part #31796) on this model. From the prototype photo I could tell this valve was mounted on a distinctive base. I attempted to replicate it using a small piece of styrene with more harvested rivets to model how it was secured. I think many modelers may use 0.008-inch wire for the retainer pipe but I prefer 0.010-inch as it is easier for me to work with. I flatted the mid-section of short lengths of 0.012-inch brass wire to form the brackets to secure this pipe. These are bent in the middle and inserted into a pair of holes I had drilled on each side of the pipe. I pressed these into place and used CA inside the end to lock the pipe brackets in place. Photos 1, 3 and 7 give a good view of these brackets.
Here’s another look at the car end again to review the details. Next, I am scratch building the placard boards to reflect those used by the Erie and that will mostly finish the end detailing. Note too I used more harvested rivets above the end grabs.
Please let me know what you think or if you have any questions.
It’s always exciting to receive an update from Bill Welch. We thank him for sharing these detail techniques that elevate the appearance of an Atlas plastic box car.
Questions and comments can be posted below. Please follow the instructions so your comment can be posted. All comments are reviewed and approved before they appear. To subscribe to this blog, enter your info for a comment and check the last box to notify of new posts by email. Share the blog link with other model railroaders.
Very nice work indeed! You are a craftsman.
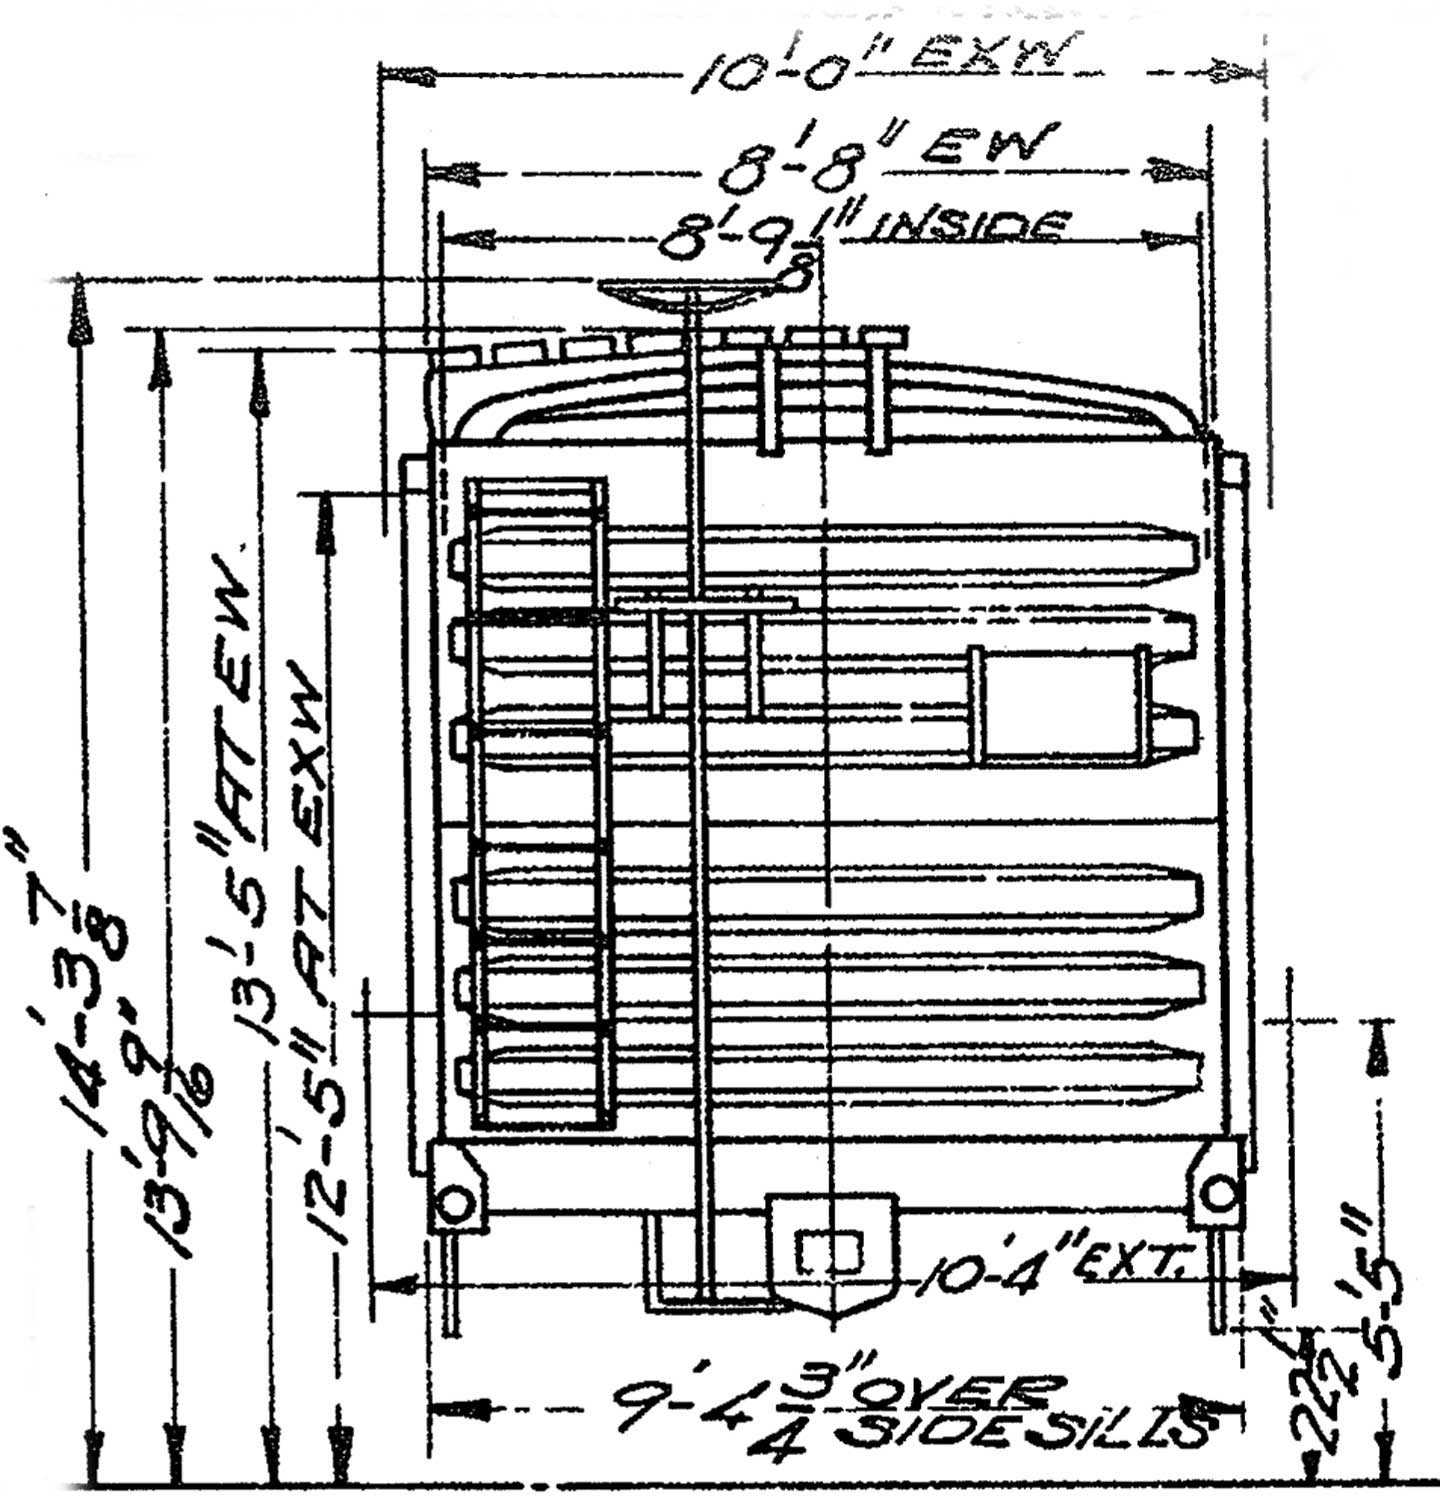
I would still be tiring to figure out how to build this car given the EW and Inside dimensions.
Exquisite modeling Bill.
I am curious, do you intend to remove the mounting lugs for placard boards when you apply yours?
Bob Witt
I am not sure Bob, I want to see how well the Placard Boards I am making cover the lugs.
Bill,
Great work on upgrading this Atlas car. You are tempting me to pull mine out of service and give it some upgrades. Looks like a good project in which to hone my skills.
Thank for sharing your techniques with us.
Jim
Work like this makes me feel sorry for those who think model railroading is just buying ready to run locos and rolling stock, then upgrading the electronics.
Incredible work, Bill. Could you share with us your technique for harvesting the Athearn blue box rivets?
I have been thinking I need to do a “Why and How” on this subject Spen and will make it my next entry here. I will take photos and write something up over the next several days. Stay tuned.
Bill your patience and attention to detail is absolutely amazing
Amazing work Bill. Your attention to detail is, as always, is incredible.
This series of Erie cars had a long and varied use history. One could present a clinic on this series car alone.
What can be said other than Extremely nice Bill. I agree with the your slicing off the bolt detail and replacing with harvested rivets. I am doing this on some resin ends as well.
You make great use of stryene, brass and other materials to build truly realistic models
Thanks for sharing your work
George Toman
Once again Bill shows why he is a craftsman par excellance
Fenton