Lester Breuer returns to the RCW blog with a model that reflects an interesting prototype. Here’s Lester with the details.
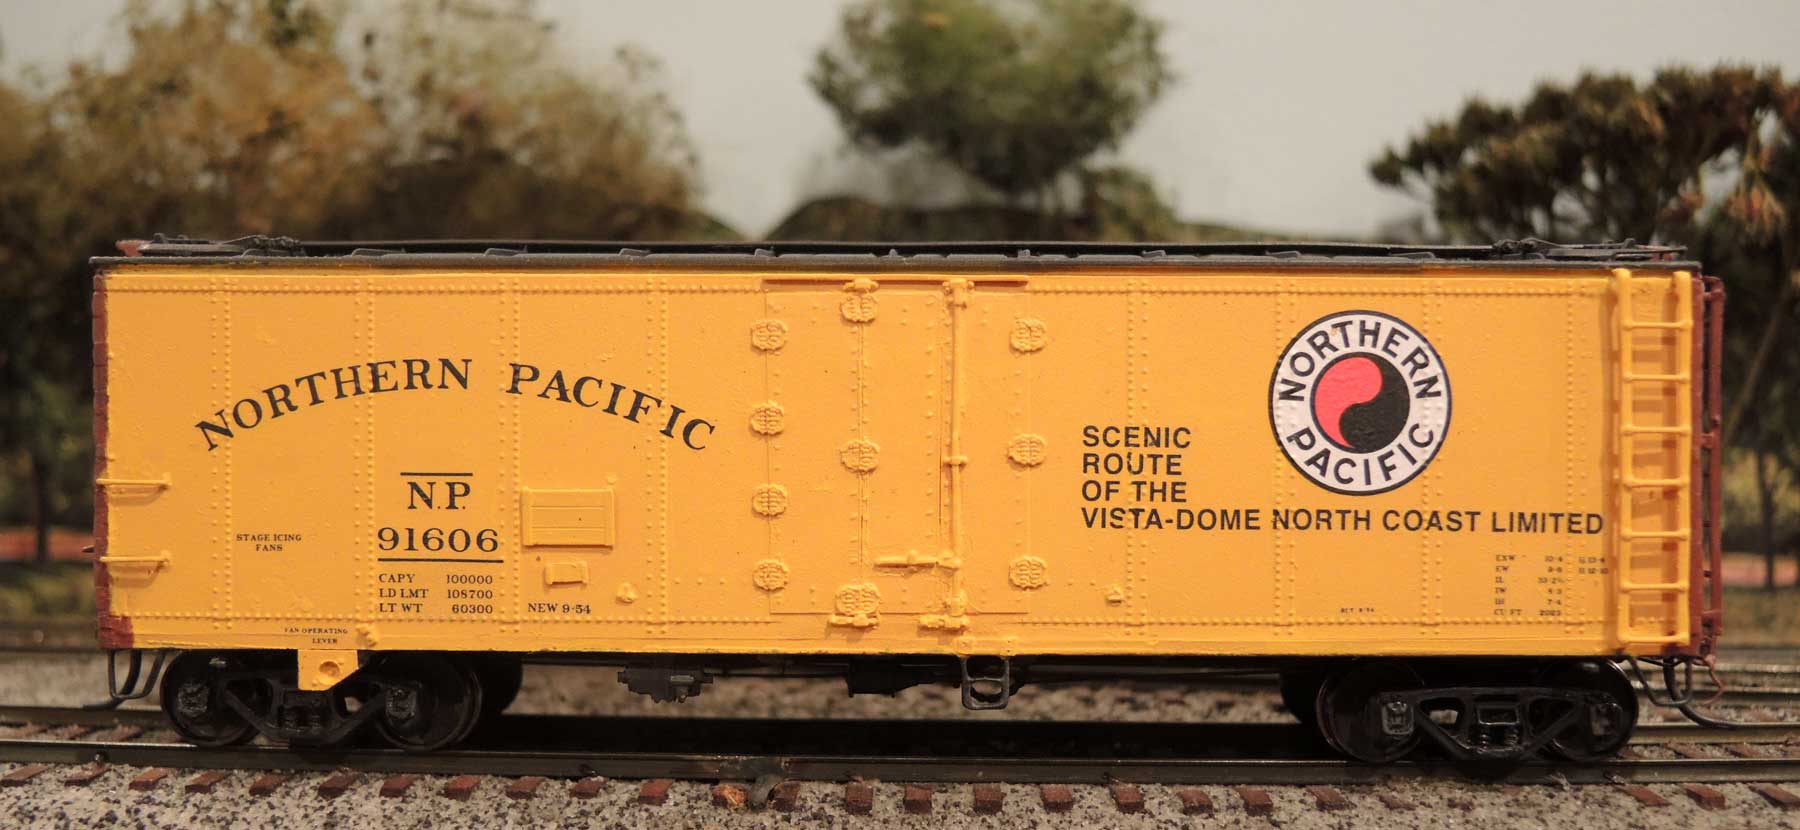
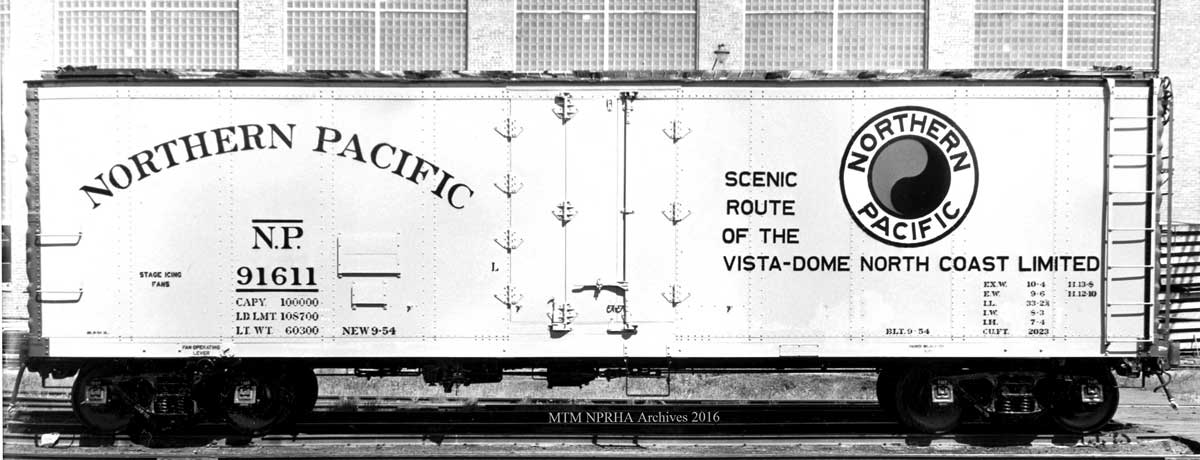
Once again I am pleased to have the opportunity to share a build with you here on the Resin Car Works blog. A Northern Pacific Railway double hinged door refrigerator car has been the current project. Car 91606 was built in 1954 as one of the 91500 to 91999 series, Lot 1015, in the Brainerd NP Shops. The kit is mix of a resin parts kit by Stan Rydarowicz (Resin Parts) and an InterMountain (IM) PFE R-40-23 refrigerator. The Resin Parts sides and ends replace portions of the plastic model.
The plastic sides of the IM PFE car body had been removed by Resin Parts leaving an underframe with false ends; however, you are required to completely remove the molded on side sill from the underframe to fit the resin sides. The removal of the side sill from the underframe is challenging but with care and patience it can be done neatly. I used a very fine tooth saw blade mounted on a Dremel tool mandrel to remove the side sill. After removing the sill, the IM roof and resin ends were glued to the false ends on the IM underframe. To properly fit the resin sides between the installed roof and resin ends about 1/16-inch had to be sanded from each end of both sides. Before attaching the sides I drilled and tapped the bolsters and coupler pads for 2-56 screws to mount trucks and couplers and added the weight in the kit, which brought the car weight to an acceptable 3.8 ounces. Once these tasks were completed the sides were glued on completing the car body.
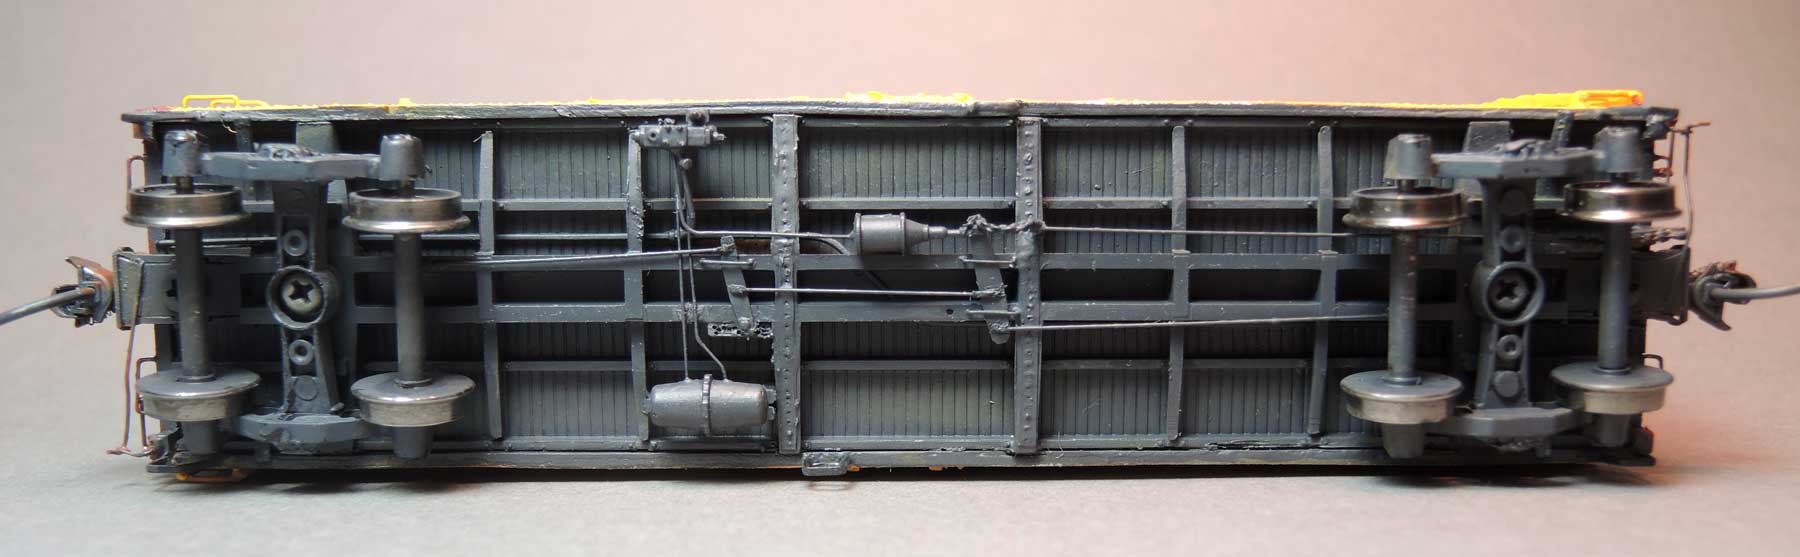
I now turned to the work needed on the underframe. Kadee #262 narrow coupler boxes with Kadee #148 couplers were installed. The kit brake components were cut from the plastic piping and rod, drilled to receive wire piping, and installed. Brake levers were fabricated from Evergreen strip styrene: 1×8-inch for the cylinder lever, and 1×6-inch for the floating lever. A slack adjuster was made from a piece of a Morton running board from the scrap box. Half a Tichy Train Group turnbuckle #8021 was added to the brake cylinder piston rod to attach the clevis to the brake lever. Tichy Train Group #1101 0.010-inch and # 1106 0.0125-inch diameter phosphor bronze wire was used for the piping, rods, and brake lever hangers. The black chain used to connect the cylinder brake lever and brake rod was Campbell Scale Models, 42 links per inch. The plastic IM kit parts for the train line, dirt collector and branch pipe were installed, along with the IM kit ice bunker drains. On the B-end, a Cal-Scale #190-293 9c Ajax bell crank was installed. I added styrene made rivet strips to the cross bearers with poor results due to too much liquid cement applied to attach them. Athearn ASF-3 ride control trucks with IM 33-inch metal wheels were installed. With underframe complete I now added the car body details.
First I added the roof details. A Morton running board included in the kit is correct if you are building a 1947 built car. However, my focus is 1954 so a correct Kadee Apex running board was installed. Prior to installing the running board, extension brackets were removed and new running board extension brackets in the shape of the number seven were fabricated from Evergreen 0.010-inch sheet styrene to match the NP Shops prototype style. IM ice hatches with hinges made from Tichy Train Group #1106 0.0125-inch wire were installed. Roof grab irons were bent from Tichy Train Group #1106 0.0125-inch dia. phosphor bronze wire with Yarmouth Model Works eyebolts #YMW 355 installed as corner brackets to complete the roof.

IM ladders and placard boards were installed on sides and ends, followed by side and end grab irons bent from Detail Associates #2504 0.012-inch brass wire. A-Line #29001, style B, stirrup steps were installed on ends of sides. The middle double step was fabricated by installing an A-Line #29000, style A, stirrup step into which was inserted a U-shaped step bent from scrap brass, turned upside down and glued.
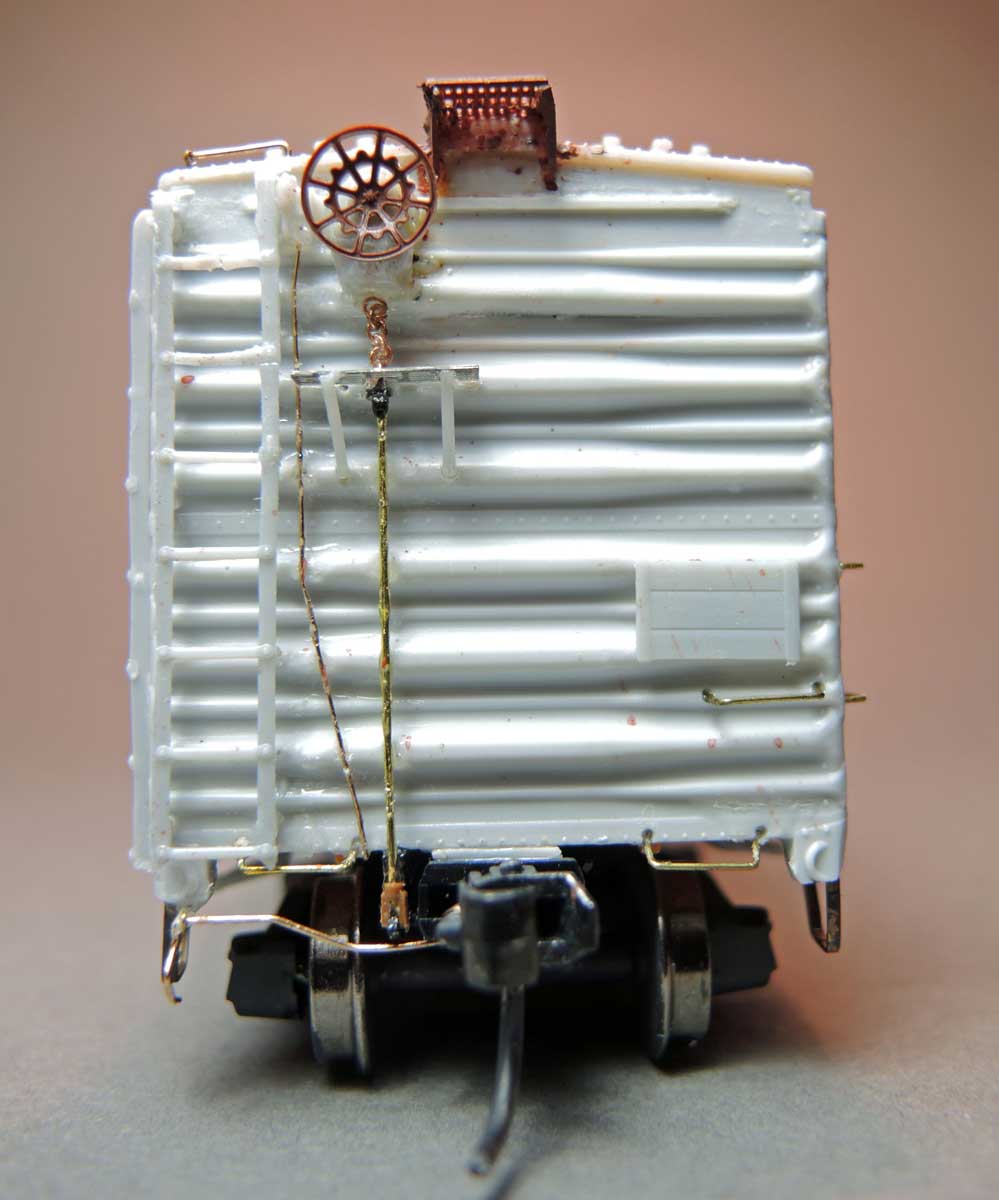
On the B-end, IM brake gear and retainer valve with plastic parts cut off were installed. The brake gear chain is Precision Scale #48472, 32 links per inch, and connected to the brake rod cut from Tichy #1102 0.015-inch phosphor bronze wire. Half a Tichy turnbuckle #8102 was glued for the clevis to attach the brake rod to the previously installed Cal-Scale #190-293 9c Ajax bell crank. A retainer line made from Tichy #1100 0.008-inch phosphor bronze wire, a Plano Ajax tread pattern brake step, #11322 set, and a Kadee Ajax #2020 brake wheel, were installed next using prototype photos as a guide. Finally, uncoupling levers were fabricated from Tichy #1106 0.0125-inch phosphor bronze wire. Eyebolt brackets were made from Detail Associates #2503 0.010-inch brass wire. These were installed to complete the car body details.
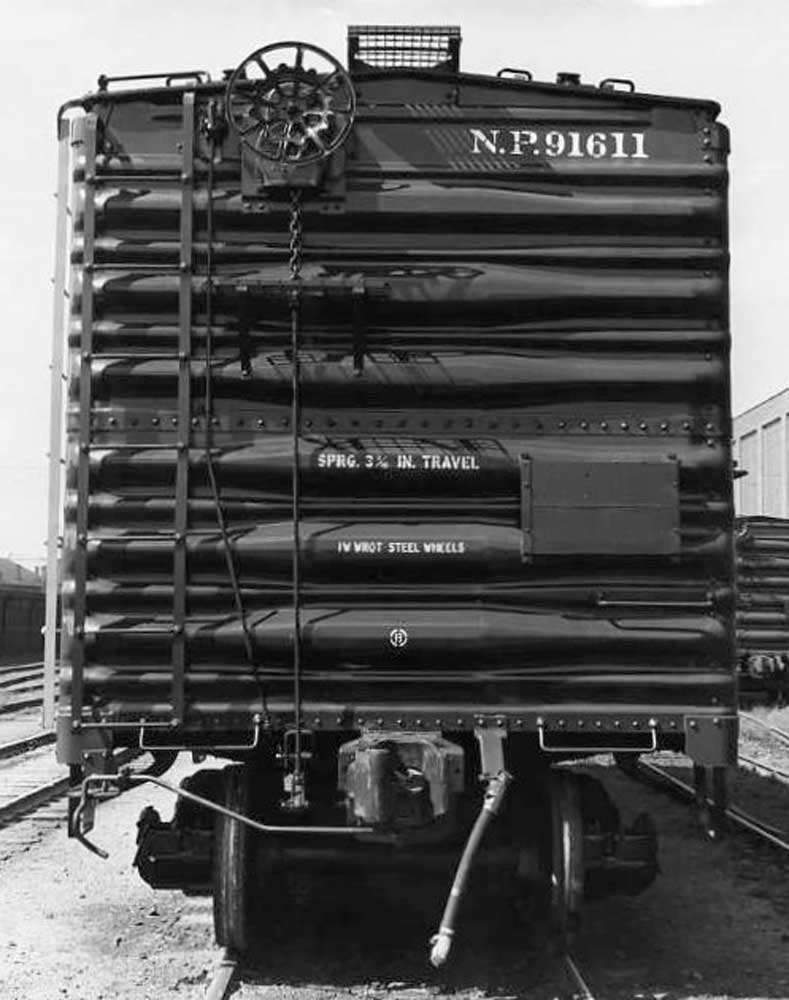
The unpainted, assembled car was moved to the Minneapolis & Northland Railroad Company paint shops for finishing. The underframe was sprayed Vallejo Tarnished Black # 29022. The car body sides received PollyScale Reefer Yellow #F414122, while the car body ends were sprayed with Model Master Oxide Red Flat #4882. The roof was painted with PollyScale Engine Black #F414290. After the paint dried thoroughly, the entire car body was sprayed with Model Master #4638 Gloss Clear Acrylic as a decal application base.

Car lettering for the 1954 build was done with Microscale Decals set 87-488 purchased on E-Bay and Champ Decal set HR-39. Nearly all of the lettering came from the Microscale set, except for the middle lines “IW WROT steel wheels” on the ends which were available only in the Champ set. These decal sets can also be used for the 1947 or 1949 build. After the lettering was completed and dry, I sprayed the car body with Model Master #4636 Flat Clear Acrylic. The NP double hinged door refrigerator car, number 91606, was now ready for service.
I had a grand time with this build except for removing the molded on side sill from the underframe. Cutting out the number seven shaped running board brackets did cause some frustration, but not as much as the side sill removal. The enjoyable build was aided by photos, car colors and other data that made adherence to prototype possible. Thank You for the help provided by the following individuals: Gary Wildund for his photo help, Jim Dick for his research and MTM-NPRHA photos, Tim O’Connor for his photos, Gene Deimling for running board data, Rodger Hinman and Matt Herson for data, and Eric Hansmann with the RCW website and blog. Prototype photos used in this build and presentation came from the Northern Pacific Railway Historical Association (MTM-NPRHA) archives located in the Minnesota Transportation Museum, St. Paul, MN.
Now I look forward to experiencing the satisfaction and fun each time this refrigerator car is running on the Minneapolis & Northland Railroad Company during an operating session.
Thanks to Lester for sharing his work on building this NP reefer. Your work is certainly a fine tribute to Stan Rydarowicz, who developed the parts for this kit conversion.
Questions and comments can be posted below. Please follow the instructions so your comment can be posted. All comments are reviewed and approved before they appear. To subscribe to this blog, enter your info for a comment and check the last box to notify of new posts by email. Share the blog link with other model railroaders.
I really enjoyed this article – not to mention the end result. Thanks for sharing!
Stan R is out of business?
David, thanks for your comments. Sadly, Stan has passed away and his product line is in limbo.
Great job! I know just what you mean about the side sills. I have the same problem with Westfield kits that have blobs of resin added to the underframe so it will mate up to the new thinner walls. All I can do is relax and look on it as a challenge. A way to enhance my modeling skills.
Mr. Rydarowicz is, and will be, much missed. Can anyone comment on what might become of his product line?
Lester,
That is a very attractive car. Thank you for the very detailed description on what went into building it. It certainly was worth the effort.
Lester this is a very nicely done reefer. I see you added a slack adjuster . Should make a nice addition to your other cars.
George Toman