
We issued a call for images of your latest modeling a couple of weeks ago. Prototype Rails at Cocoa Beach was about to get underway and we thought it would be fun to coordinate a Virtual RPM here on the blog for those who were unable to attend The Beach. The response was strong and we hope to do this again in a few months. The presentation may not be as impressive as entering a display room filled with railroad models, but it’s a great way to share and inspire others to move a project forward. Click on any image here to review a larger size.
Ken Roth sent in a couple of images. Here’s Ken with the scoop.
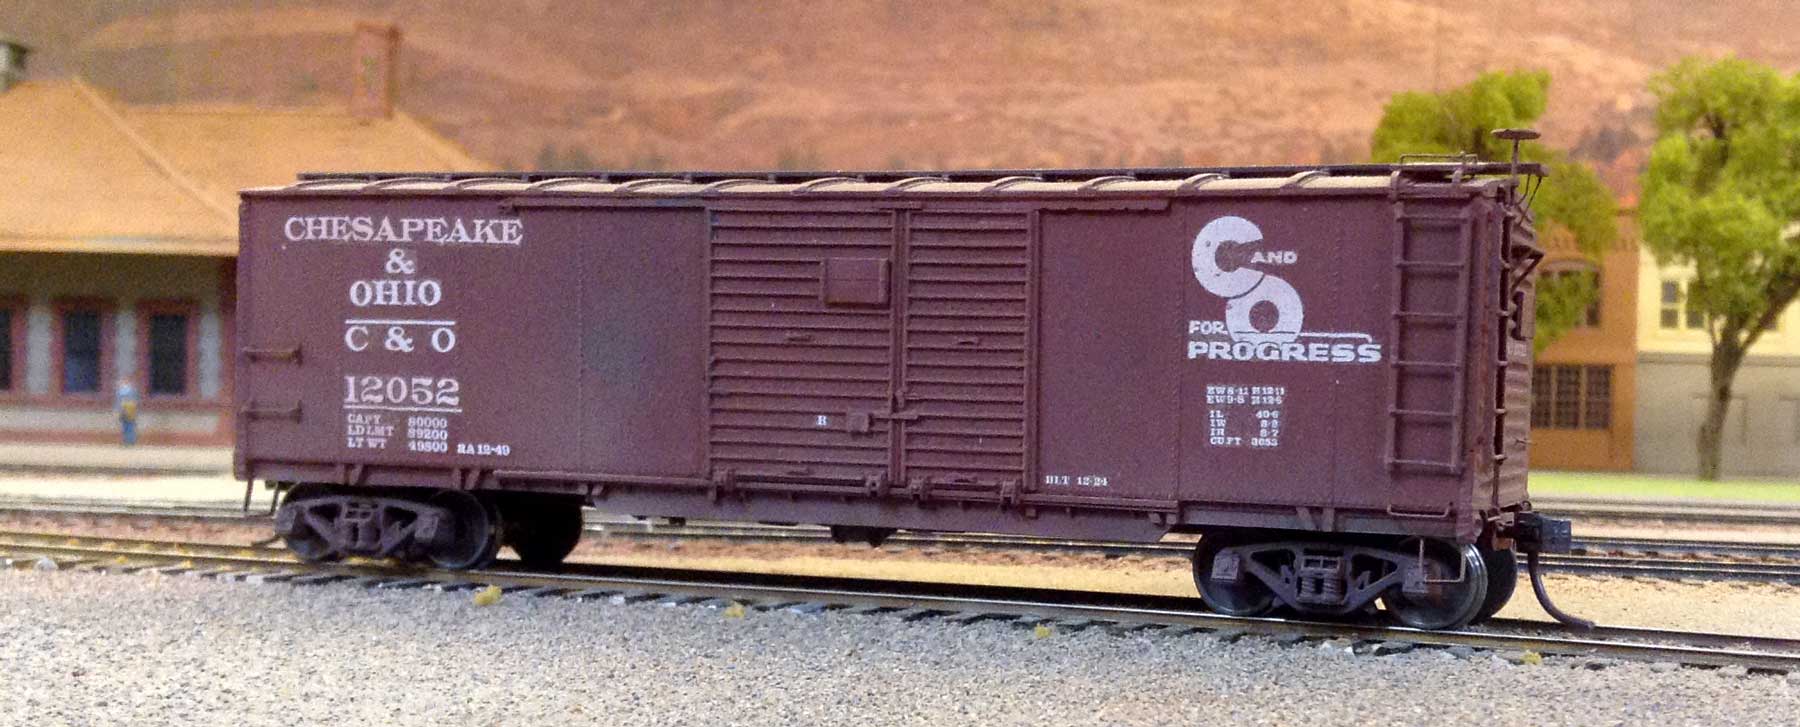
I model the SP’s Siskiyou Line from Grants Pass, Oregon to Hornbrook, CA, circa 1949-50. I was given some conductor’s wheel reports for trains out of Ashland, OR from that period and I have been focusing my modeling efforts on freight cars contained in those logs. Many of the cars making up these trains are easily modeled with available kits with little or no additional work, but others have to be scratch-built or kit-bashed. Such is the case with these two HO scale models represent cars that were carrying lumber out of Southern Oregon in these trains.
The first model is a homemade resin “kit” from scratchbuilt patterns C&O 12052 is a model of the Chessie’s steel rebuild of some old Hocking Valley single-sheathed cars. It is a fascinating car because of the unusual construction features: door-and-a-half with the half door on the “wrong” side, reverse Murphy ends, and original side trusses exposed below the side sheathing. Thanks to Al Kresse for sharing prototype info on this car.
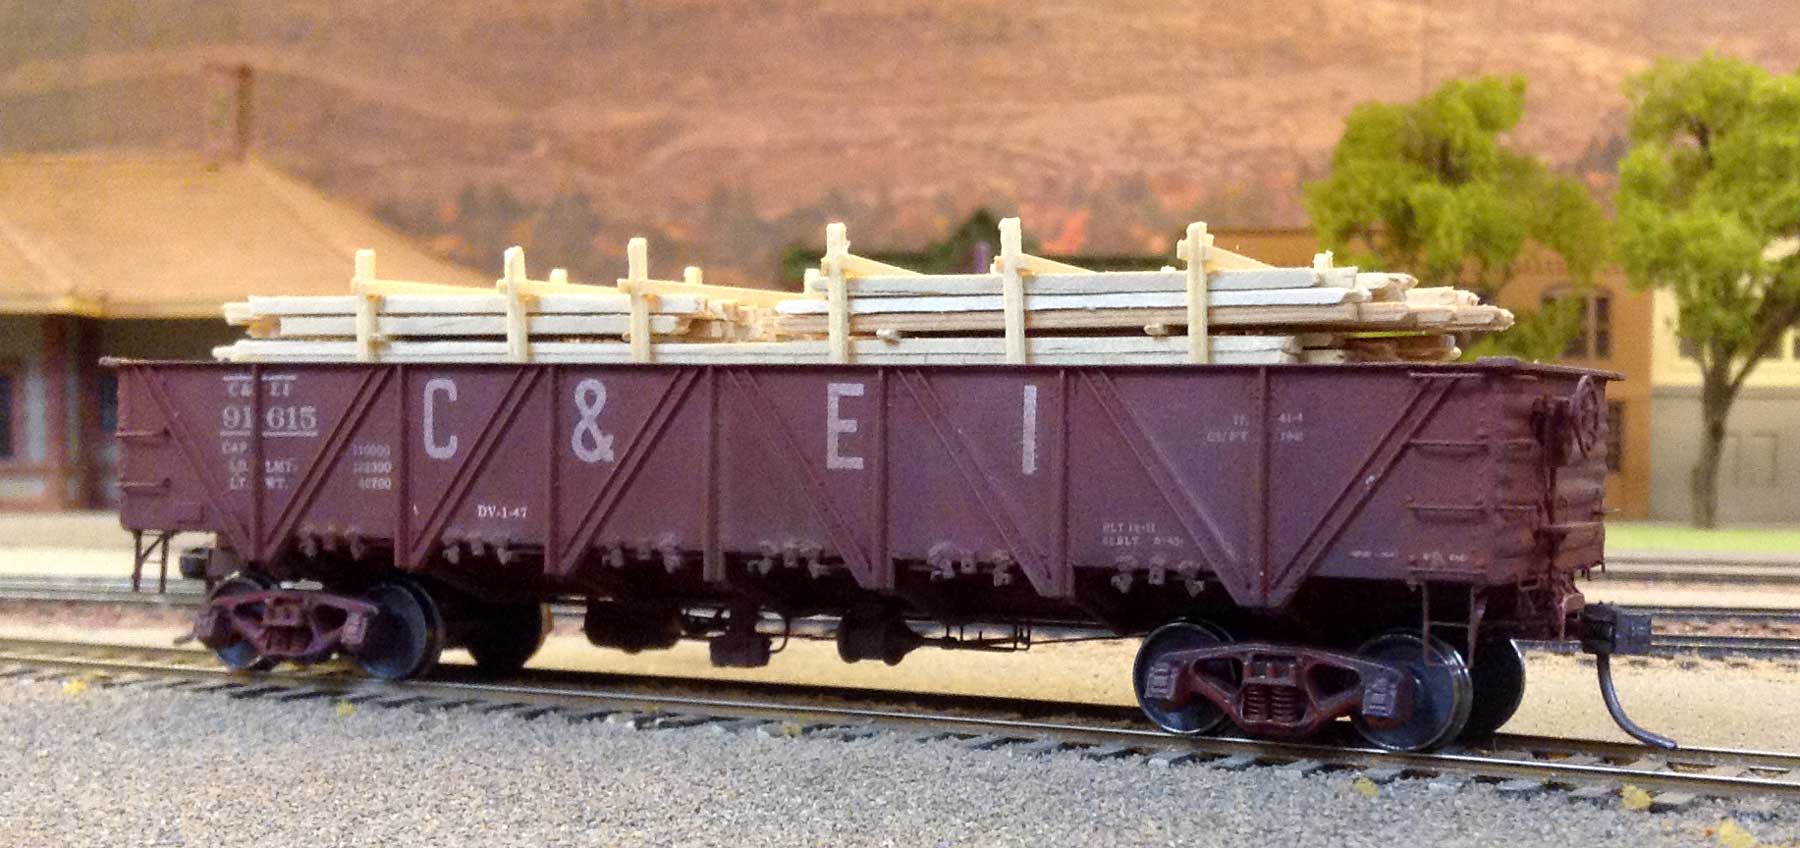
The second car is a C&EI gon. This is a company rebuild of their Caswell gons with steel sides and dreadnaught ends. The railroad also replaced the original Caswell door lock with Wine door-locks. This kitbash is based on the Intermountain Caswell kit with the wood sides puttied and sanded. I replaced the original ends with Details Associates dreadnaught ends from their SP GS gon kits and used Westerfield castings for the door locks. Decals were pieced together from all sorts of things including the large C&EI from a Westerfield decal set.
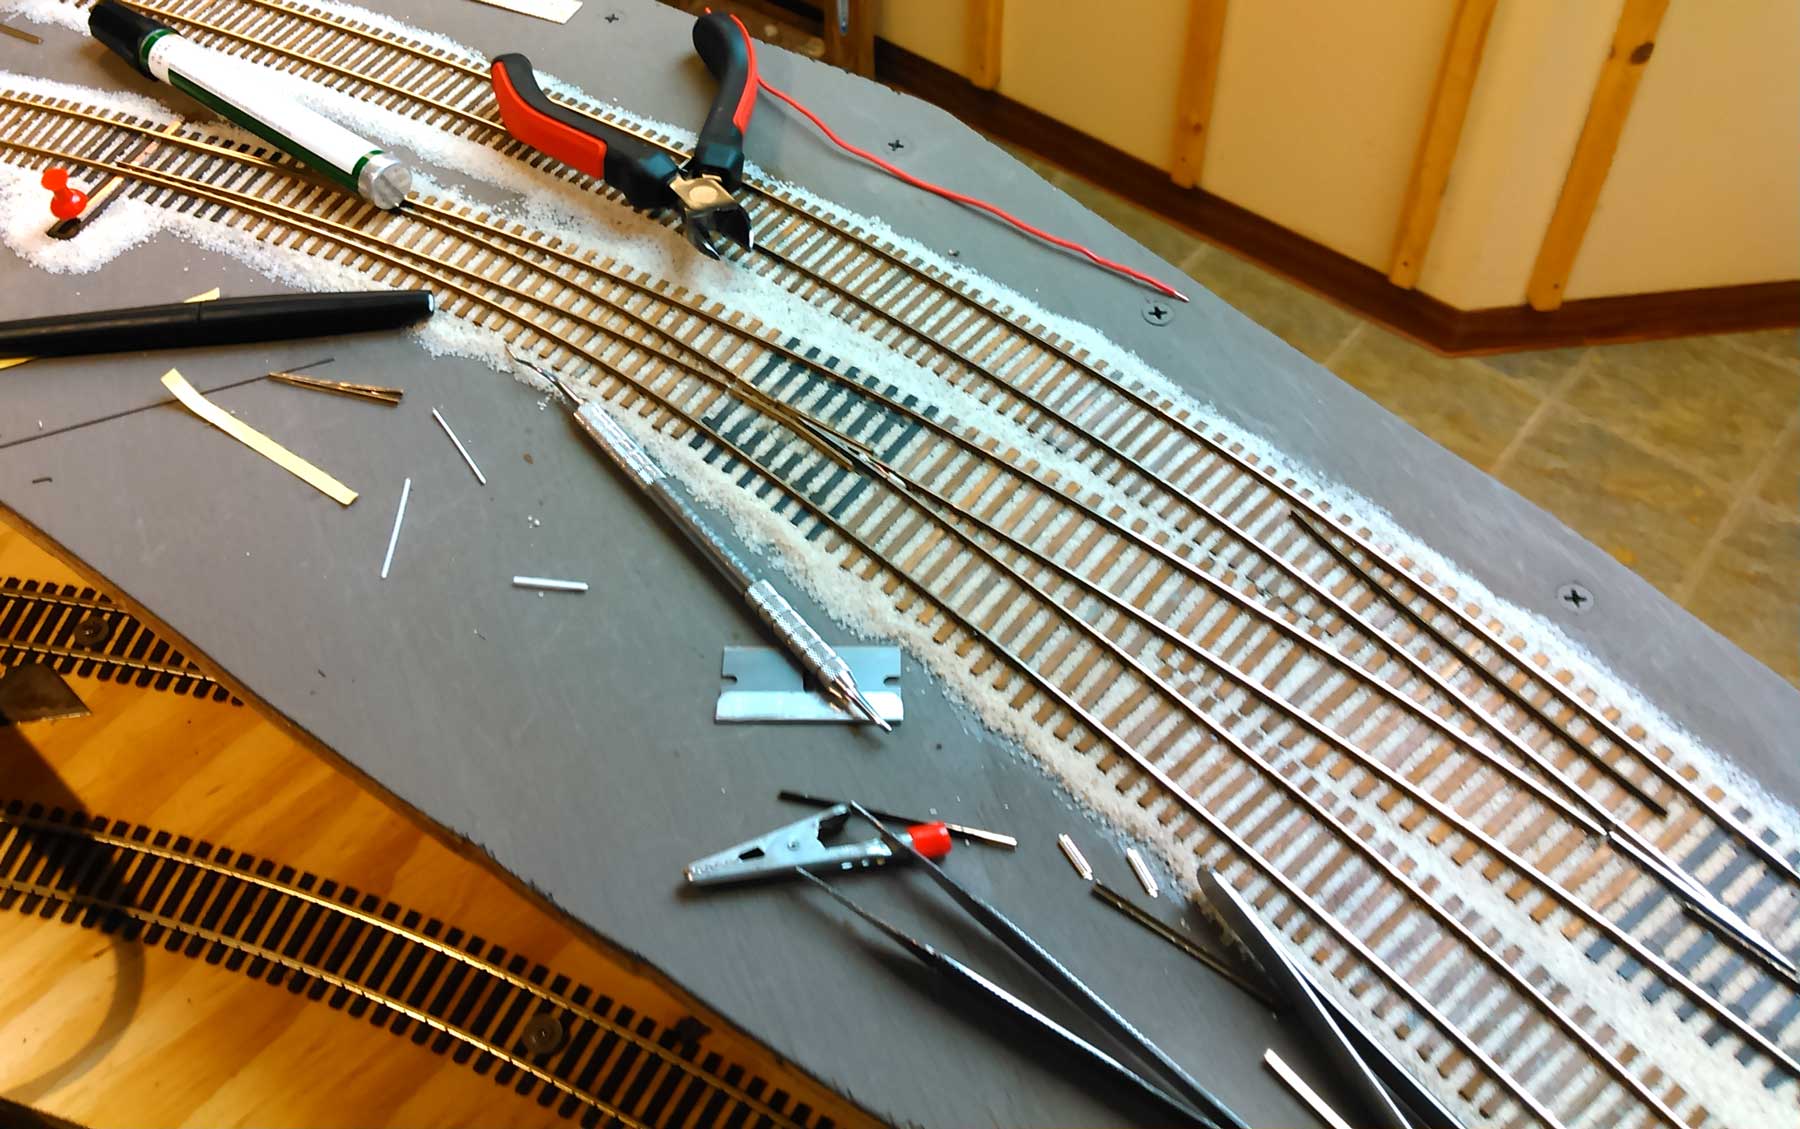
Dave Schroedle finished handlaying two curved crossovers on the HO scale Beer Line layout of his brother Mark. Here’s Dave with some notes.
I needed to build a pair of crossovers at the top of a double-track helix for my new layout. These needed to be hand laid with tight tolerances. Four Fast Tracks #8 curved turnouts were used on this double crossover. Fast Tracks twisty ties were installed as they are curvable. The image above shows the not quite completed work. The final alignment and more spikes are needed to wrap this up.
I use an assortment of track gauging tools to align the rails. Custom made brass cylinder gauges are used to keep the rails in place when spiking. They follow the fine scale 1/87.1 ratio, not the NMRA standard gauge. Once this is area complete, I’ll probably have worked twelve hours on this important stretch of track.
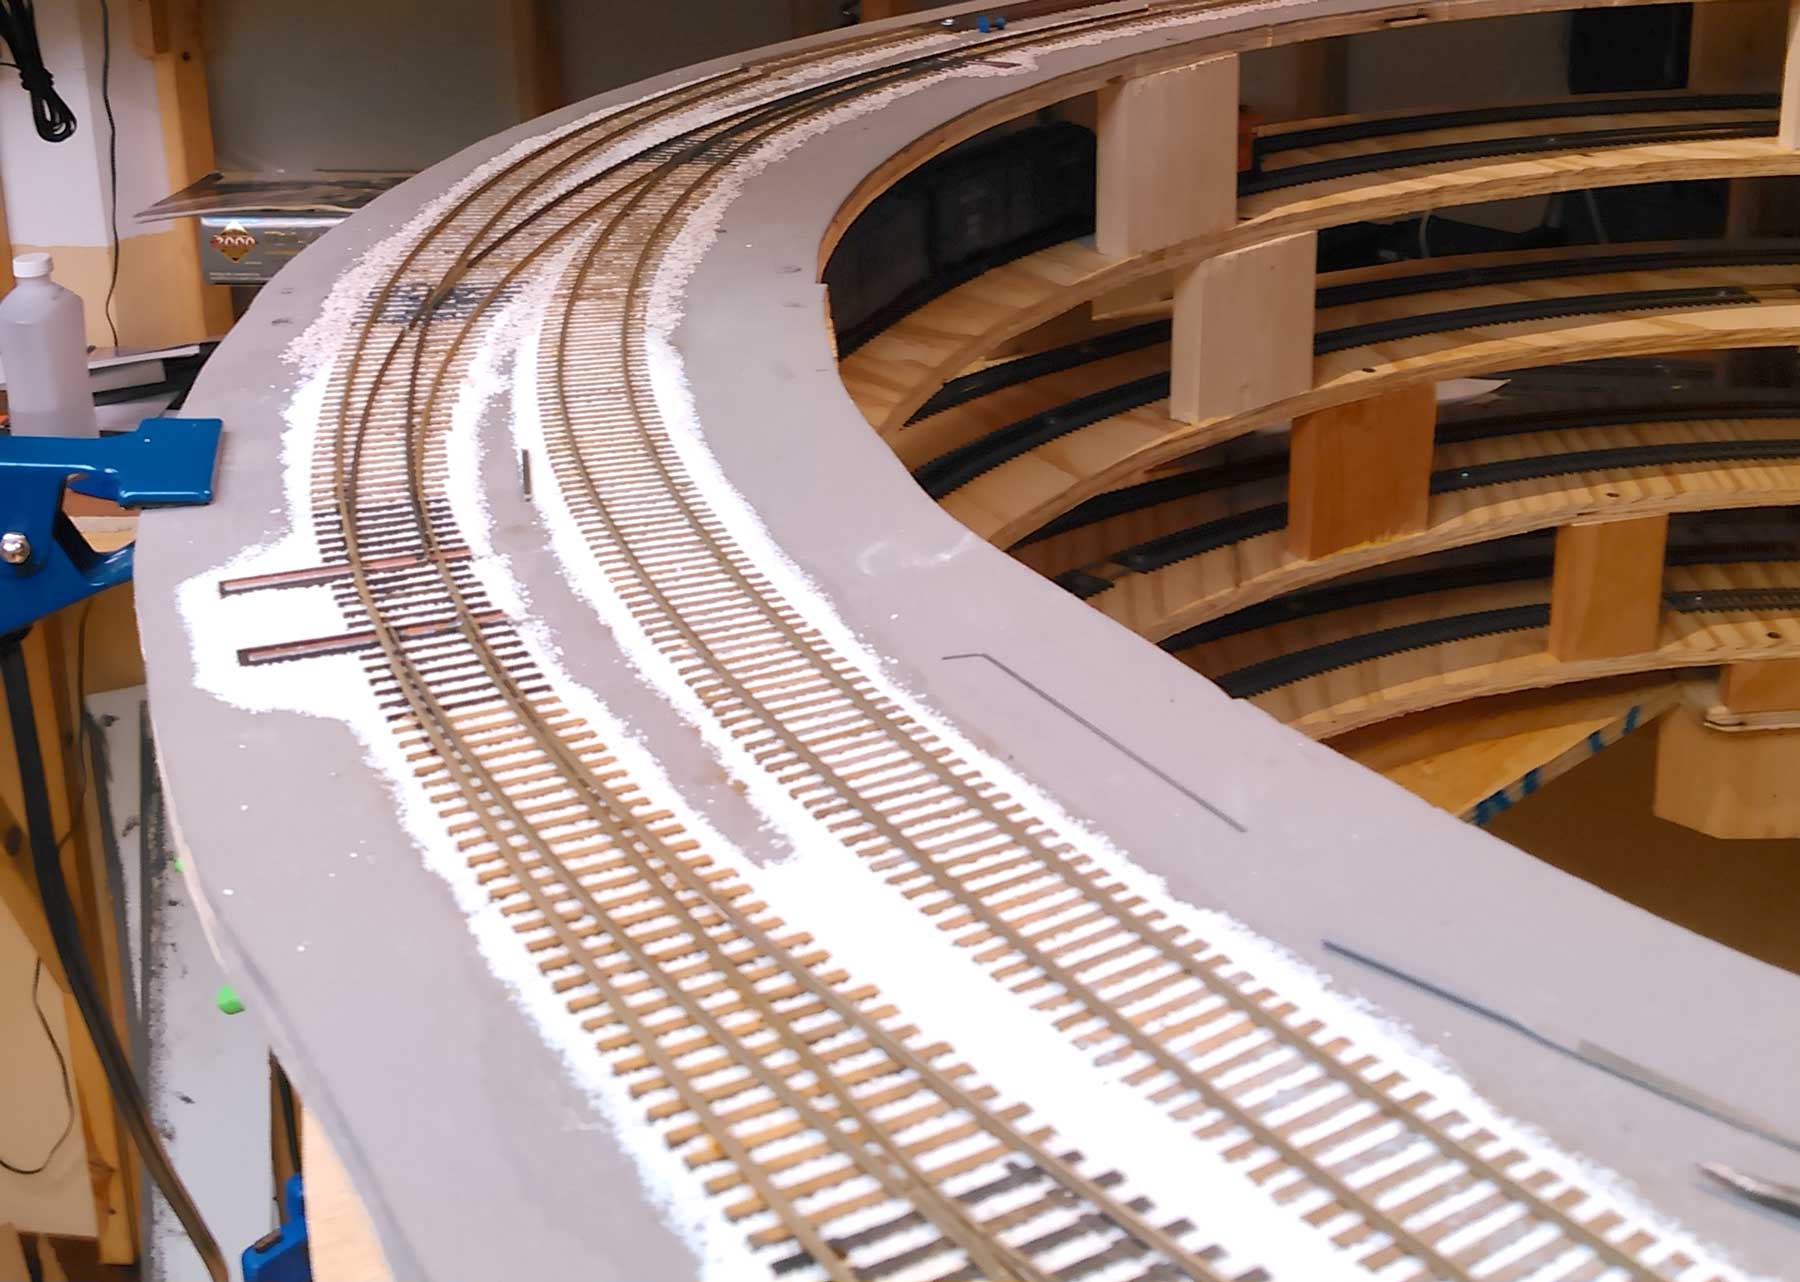
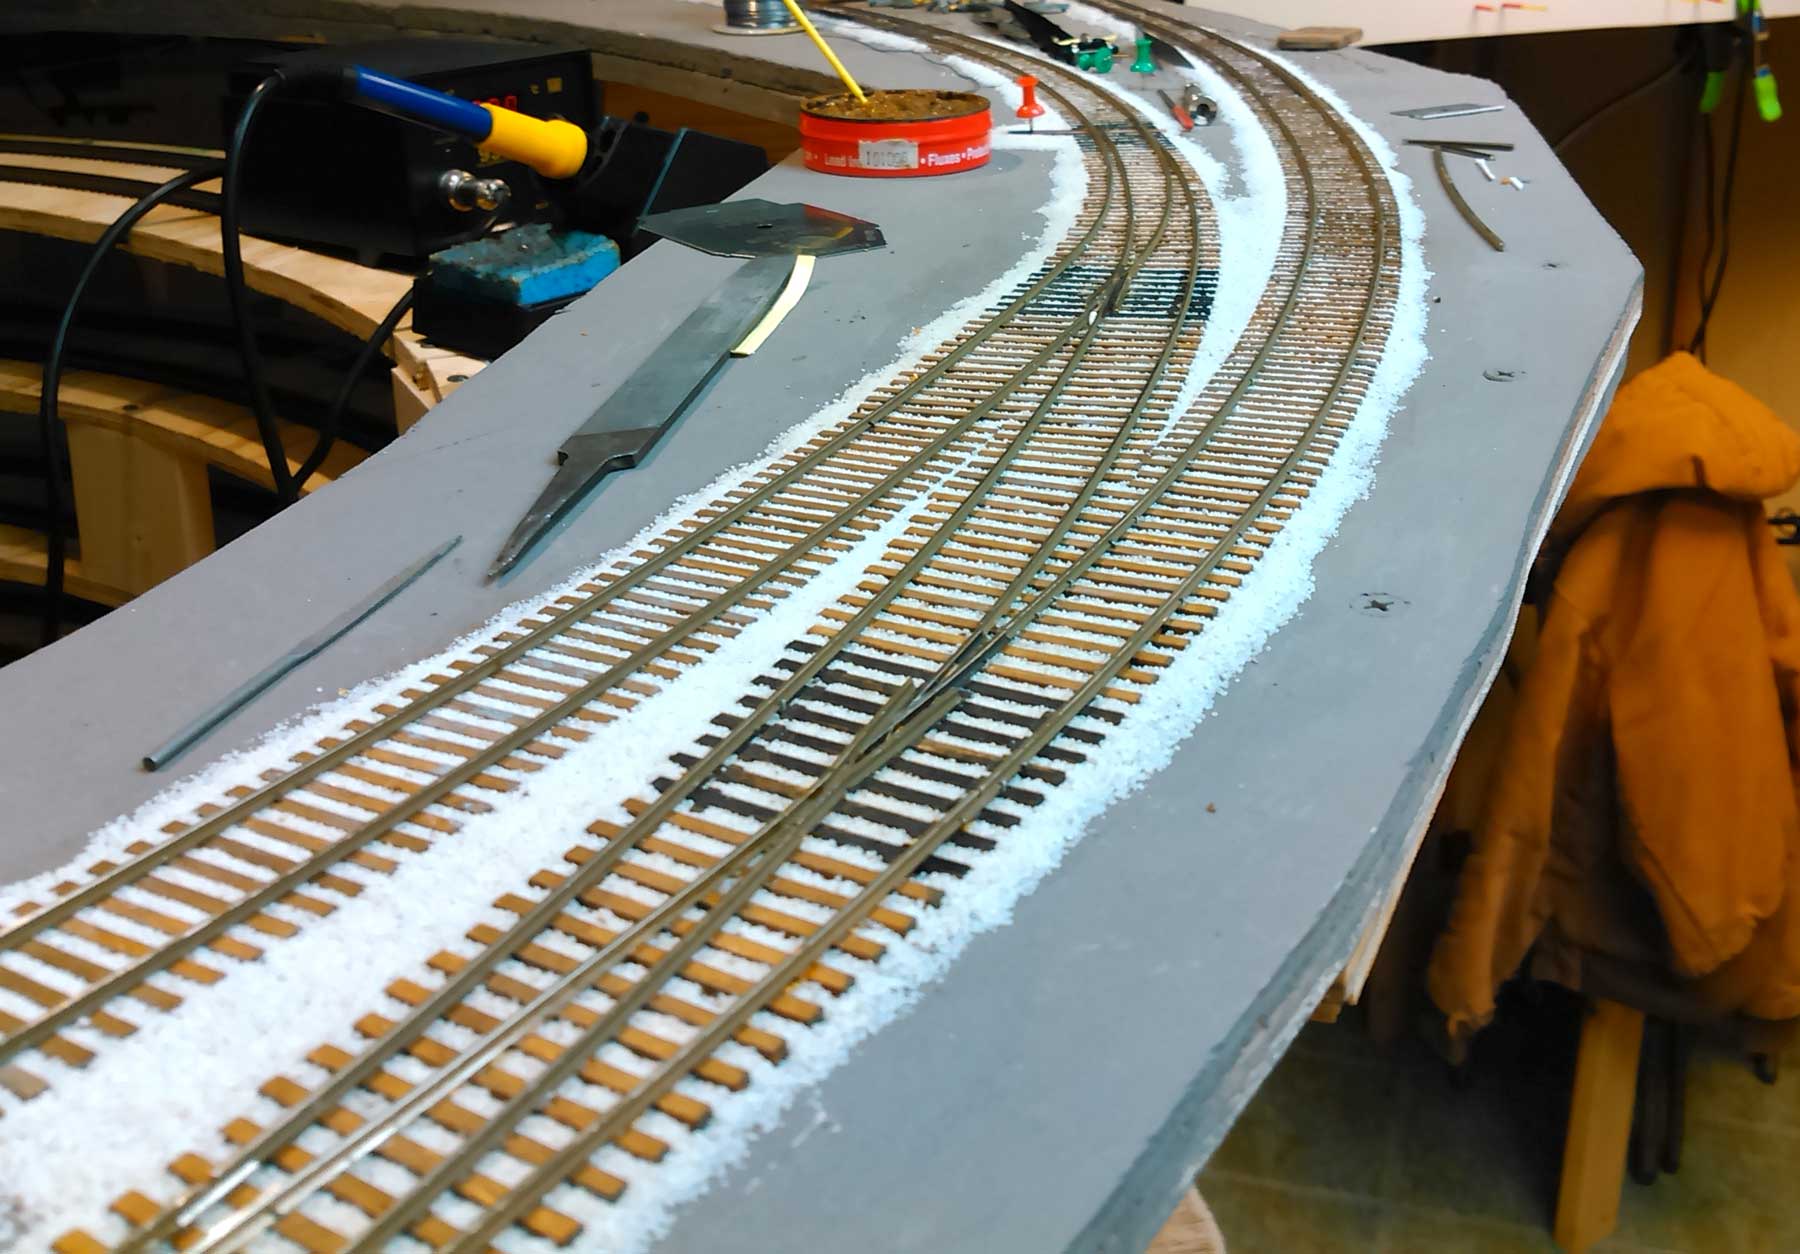
Here’s the other crossover. The outer curve is a 34-inch radius. We will be adding joint bars and weathering the track when completed.

George Toman is keeping busy with a couple of HO scale models. Here are his model notes.
I wrapped up a Resin Car Works Soo Line box car kit. I’ve installed the following details on this kit.
⦁ Yarmouth Model Works wood roofwalk and corner steps
⦁ Kadee retainer valve and side hand grabs
⦁ Accurail Scale Couplers
⦁ fully detailed underframe
The ladder rungs were carefully filed to 0.011-inch.
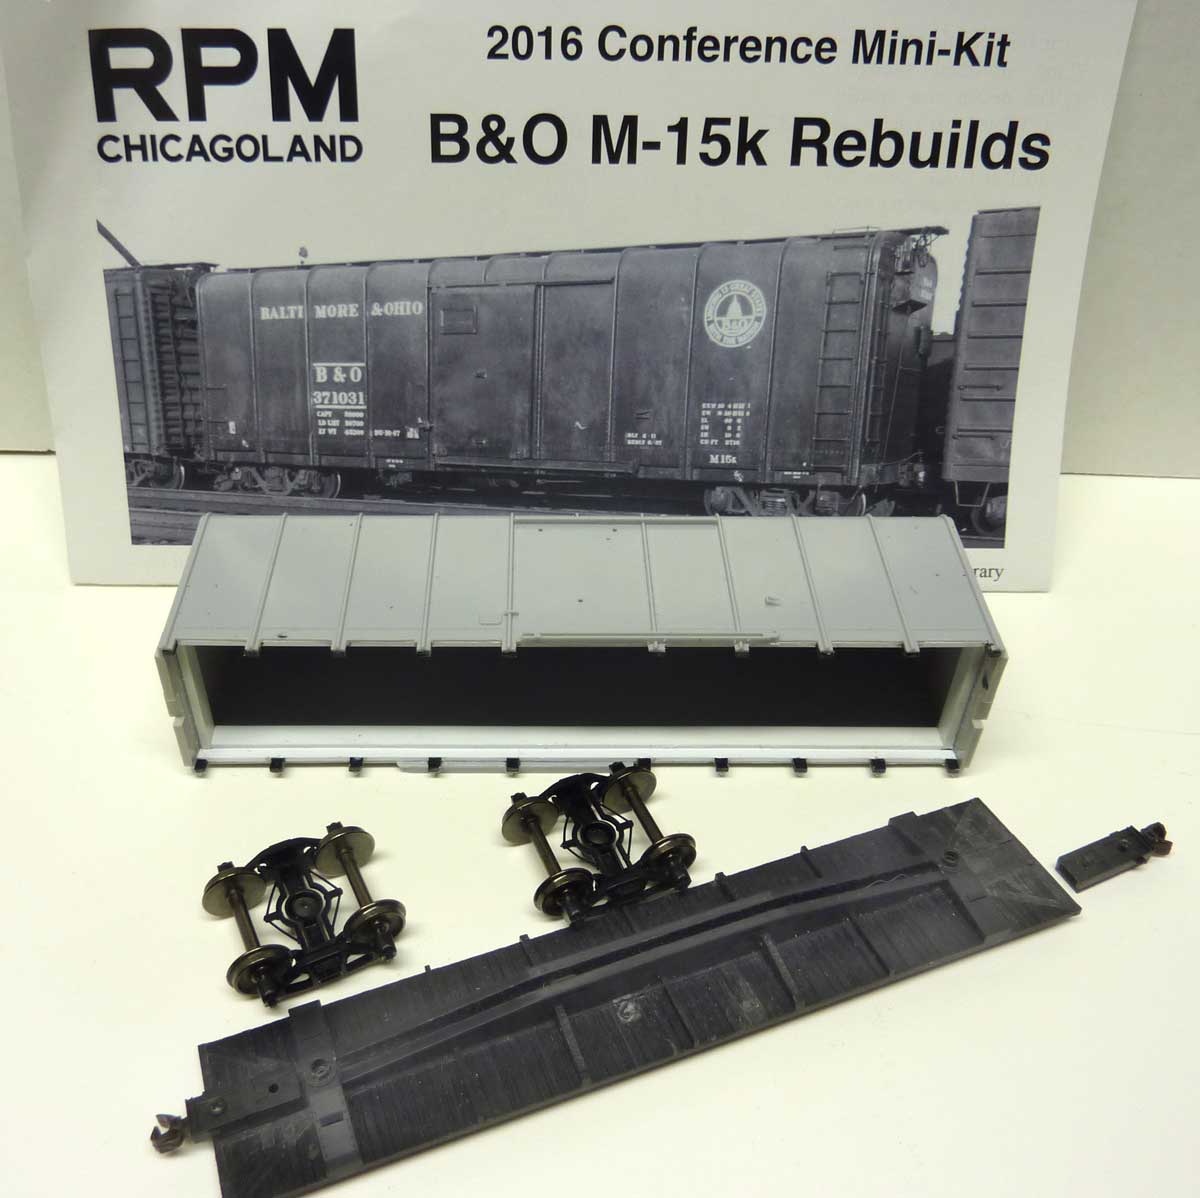
I just starting the RPM Chicagoland B&O M-15k kit after doing addition research. I need to improve the underframe brake rigging.
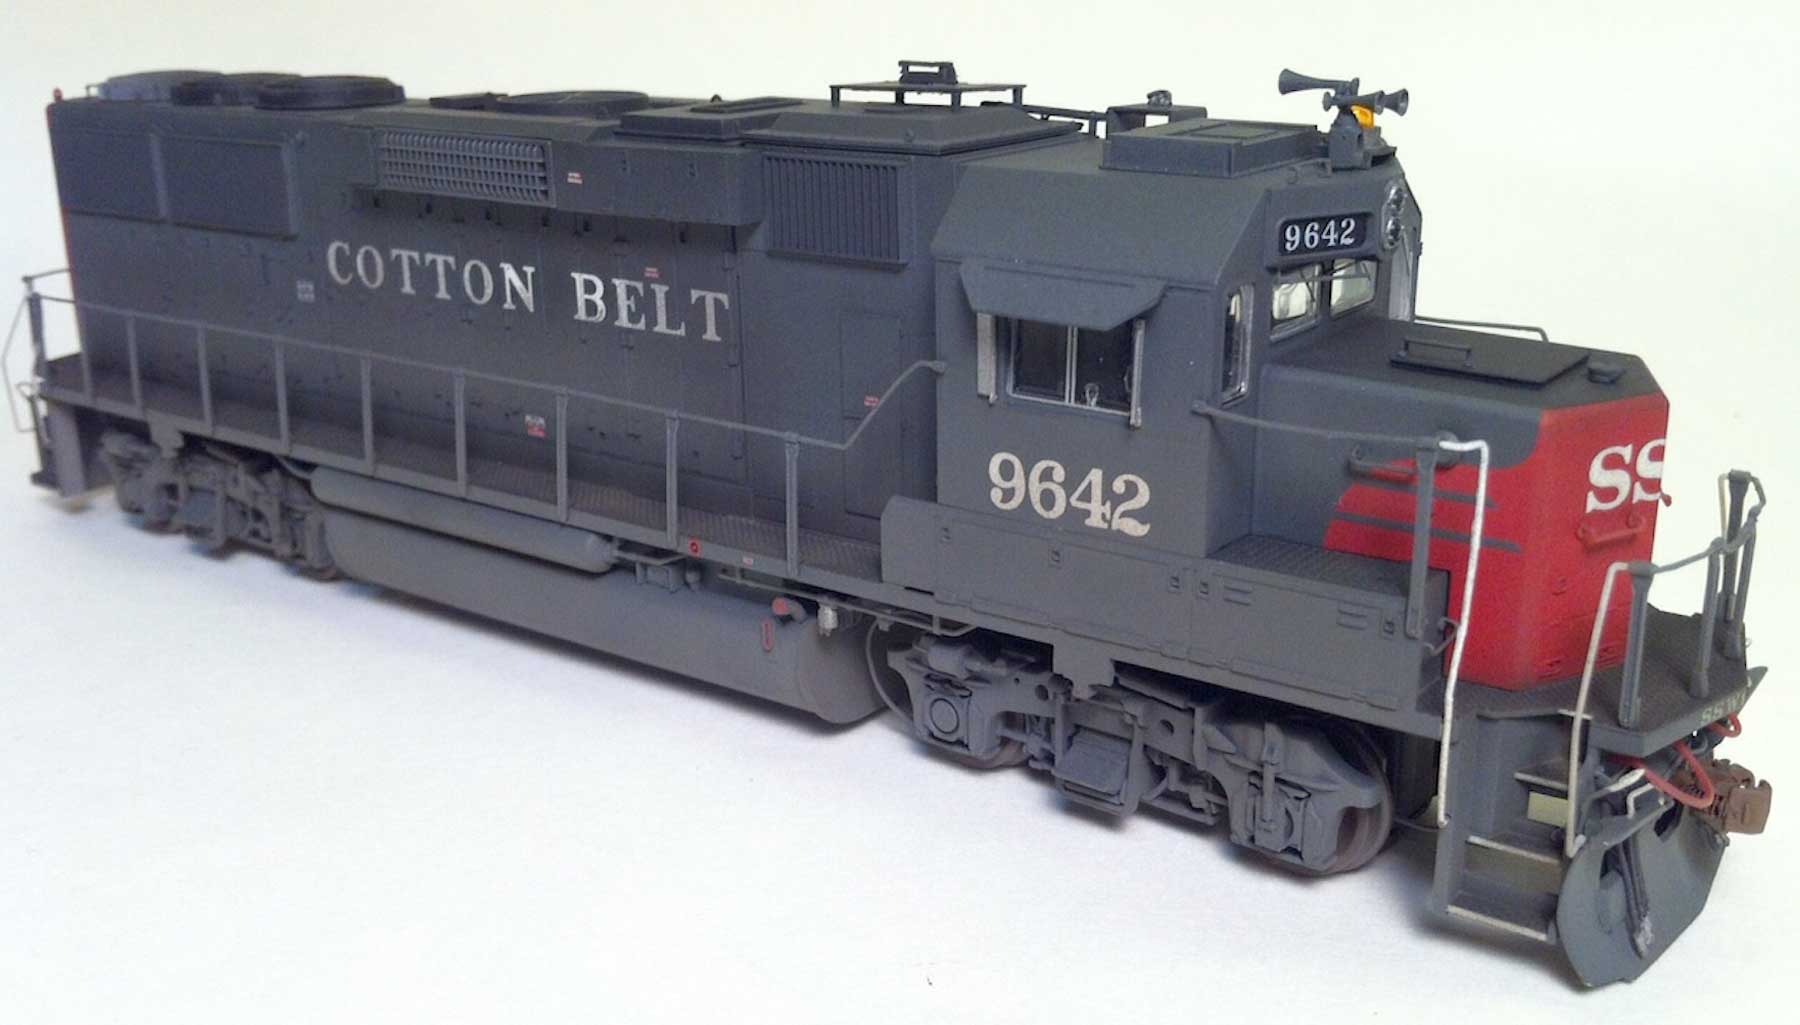
Sean Graham-White completed detailing a GP60 for the SSW. Here are Sean’s details
SSW 9642 is an already decorated Proto2000 (P2K) unit that has been completed to represent it after several years of intensive service.
Stock details added from the P2K box include the following
⦁ cab sunshades
⦁ mirrors (3 modified to lay flat)
⦁ horn and antenna platforms with conduit
⦁ grab iron on the bottom of the number board housing
⦁ truck shock absorbers
These details replaced OEM details.
⦁ snowplow (Details West 206)
⦁ air conditioner (Detail Associates Prime)
⦁ small Sinclair antenna on the small platform (Details West)
⦁ front MU hoses (Detail Associates)
⦁ trainline air hoses on each end (Detail Associates 6206)
And a few new parts were added.
⦁ Detail Associates knuckle holder boxes (and knuckles) on the sideframes on conductor’s side
⦁ Details West speed recorder
⦁ Details West digital fuel boxes
⦁ Detail Associates round fuel dial (engineer’s side) from a DA fuel filler
⦁ Detail Associates round air vent on the engineer’s side of the nose
⦁ Details West beacon and beacon platform — the beacon itself was not glued in place until weathering was complete.
⦁ Details West fuel tank bracket
Note the knuckle holder boxes, digital fuel boxes and beacon platform are only available in the DW SP/SSW/DRGW GP60 detailing kit. I also used Kadee 158 couplers painted Model Master Leather, then drybrushed with a dark brown and trip pins painted flat black.
Paint modification required painting of all fans which were unpainted from the factory. The dynamic brake fan received SP Lark Dark gray, while radiator fans received a semi-gloss black. One radiator fan was painted a light primer gray as many fans were replaced beginning in 1994.
After detailing, the truck sideframes received Lark Dark gray as there were unpainted from the factory. Various elements on the unit were painted white — step well handrails, grab irons on the snowplow and portions of the cut lever loops. Silver was used on the tips of the MU and trainline air hoses, large air filter at the rear of the fuel tank on the conductor’s side and the two smaller air filters at the front of the fuel tank on the engineer’s side, as well as the headlight housings.
I weathered primarily with an airbrush after masking the headlight bulbs and cab windows. I initially used a very thin light gray spray to lighten the unit — about 12 coats because I knew future weathering would darken it back up. Here are the additional weathering layers, from top to bottom.
⦁ exhaust was airbrushed on using a 19/1 flat black/medium brown mixture
⦁ air filter intakes and radiator grills were airbrushed with a custom (to eye) dark gray
⦁ walkways and step wells received AIM weathering powders … first dark gray, then a little light brown. The top of the nose received a very light application of dark gray
⦁ a combo of the gray and light brown was used on the hood sides
⦁ underframe and pilots were airbrushed first with Model Master Skin Tone Dark Tint then Floquil Mud
⦁ the wheels’ outer surfaces were brushed with Skin Tone Dark Tint and after it dried I applied AIM Rust weathering powder across the painted surfaces, then cleaned the tread to remove any paint there
⦁ the entire unit was then airbrushed with Model Master flat lacquer
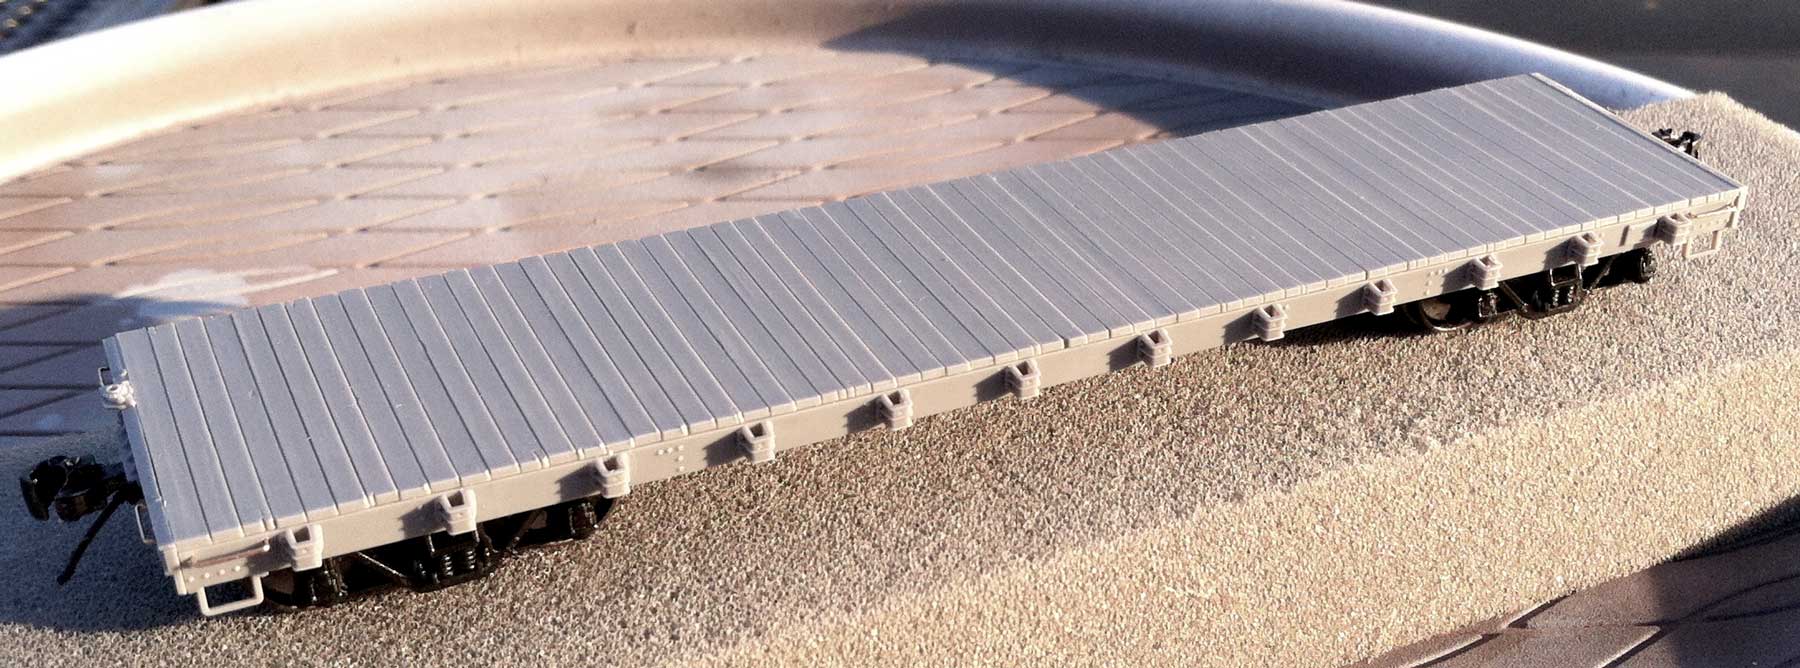
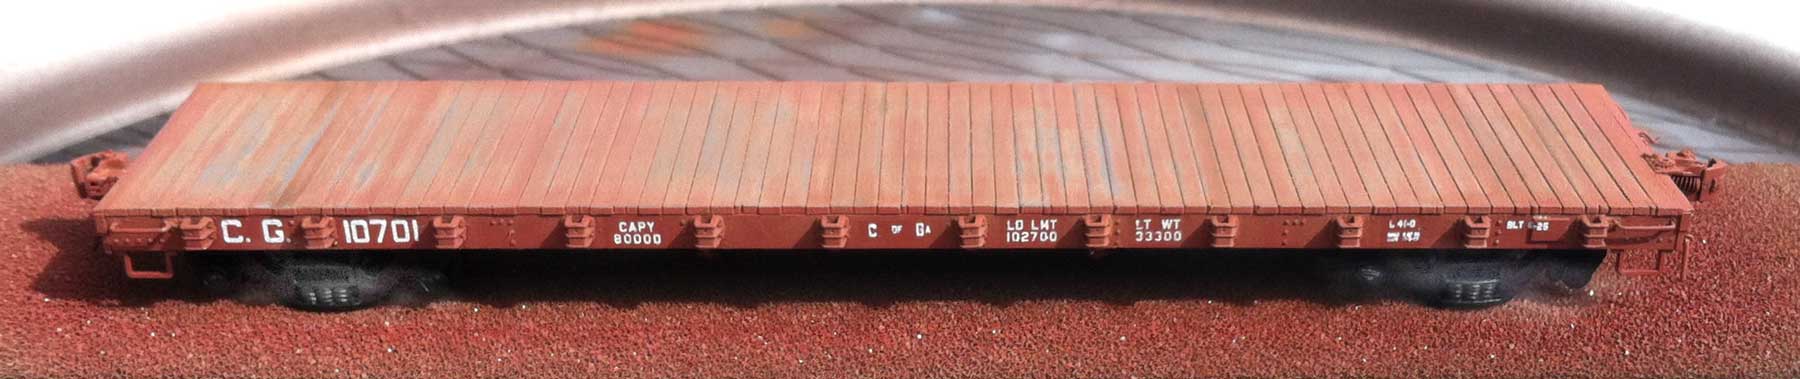
An HO scale Tichy Train Group flat car has been Justin May’s recent focus. Here are his notes.
My latest flat car model will become a member of the Central of Georgia 10701-10800 flat car series. The car was constructed according to the Tichy instructions with minimal additional details. These include Tichy Andrews trucks, Hi-Tech Details 22-inch air hoses, Yarmouth Model Works eye bolts for custom bent coupler release rods. This model will be painted black and use the CofG Historical Society’s custom decals. It will join an oxide painted car, seen below.
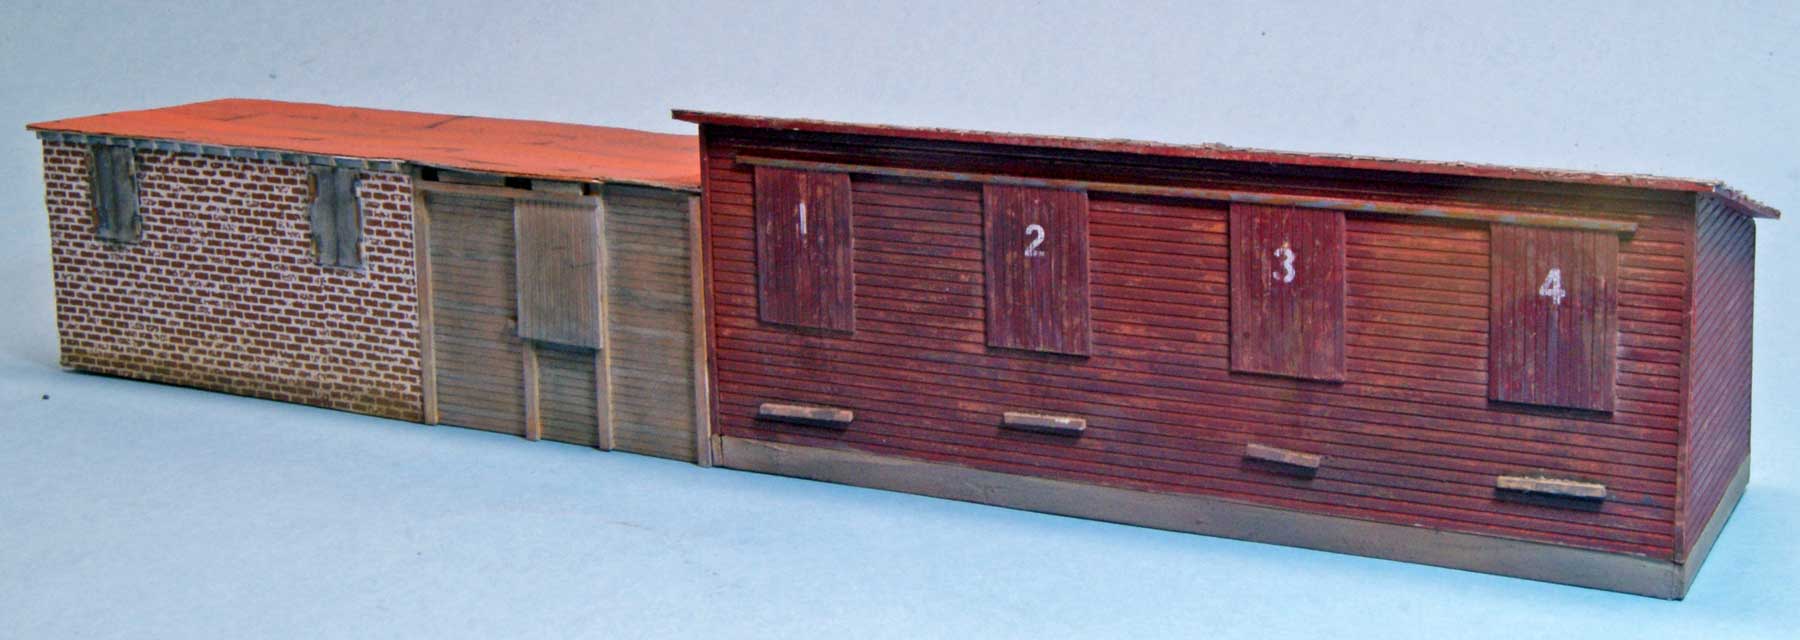
Clark Propst has added another segment to his new HO scale layout. Some line side bins are part of his new scene. Here’s Clark with more details.
Here’s a model of some storage bins at Roland Ia. on the M&StL Story City Branch. The bins are made from Evergreen styrene, paper brick from an unknown source, Clever Models shake shingles, and Stoney Creek rolled roofing.
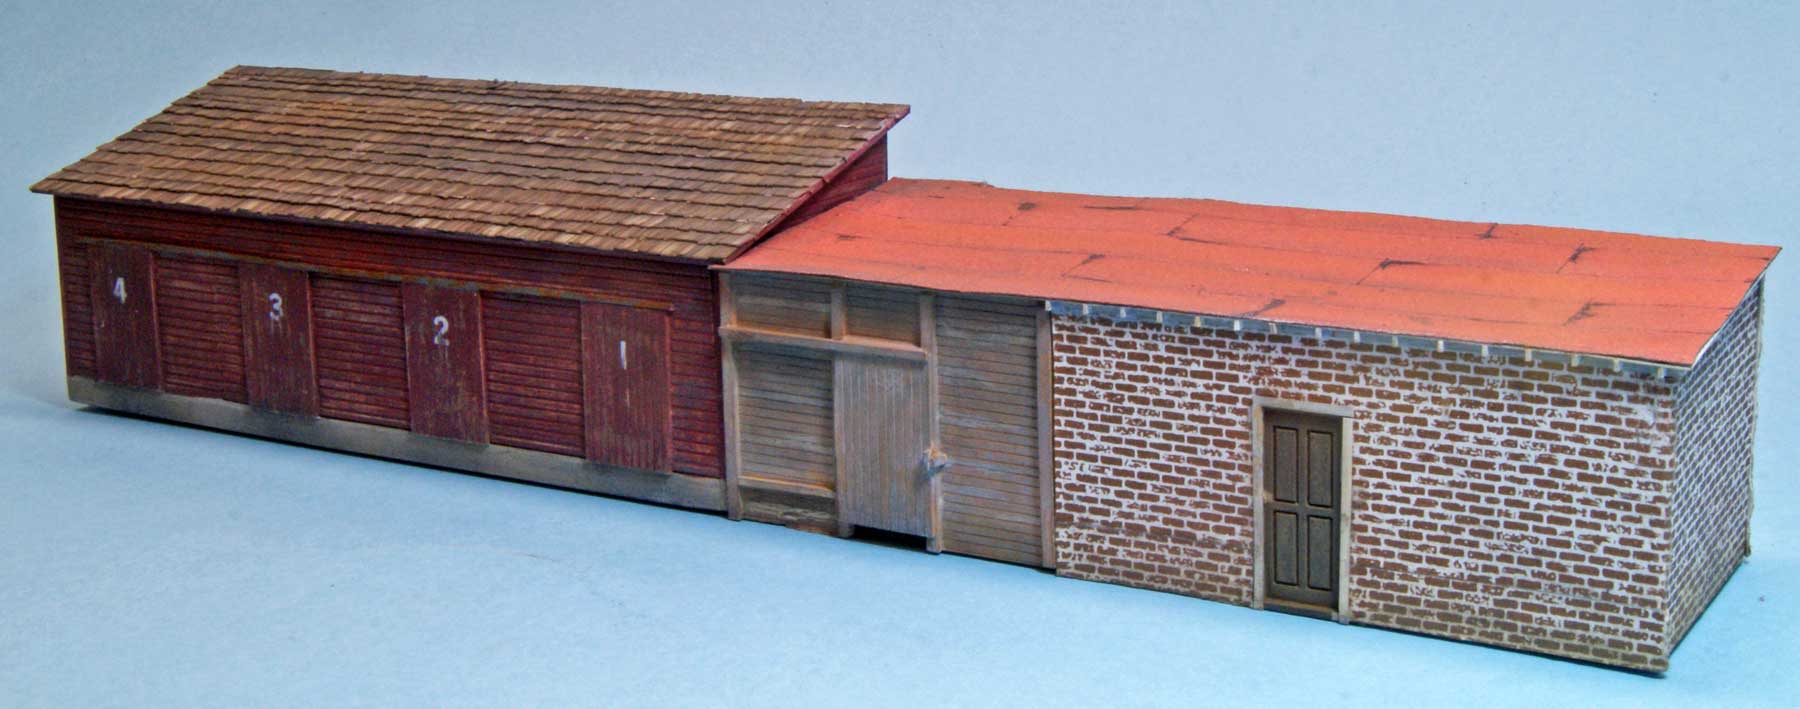
Polly S paints along with cheap craft paint. AK Interactive Heavy Chipping and Worn effects were used under the red on the coal bin. These bins were built and detailed at the time of the RPM in Cocoa Beach, Jan 5-7, during subzero temps here in North Iowa.
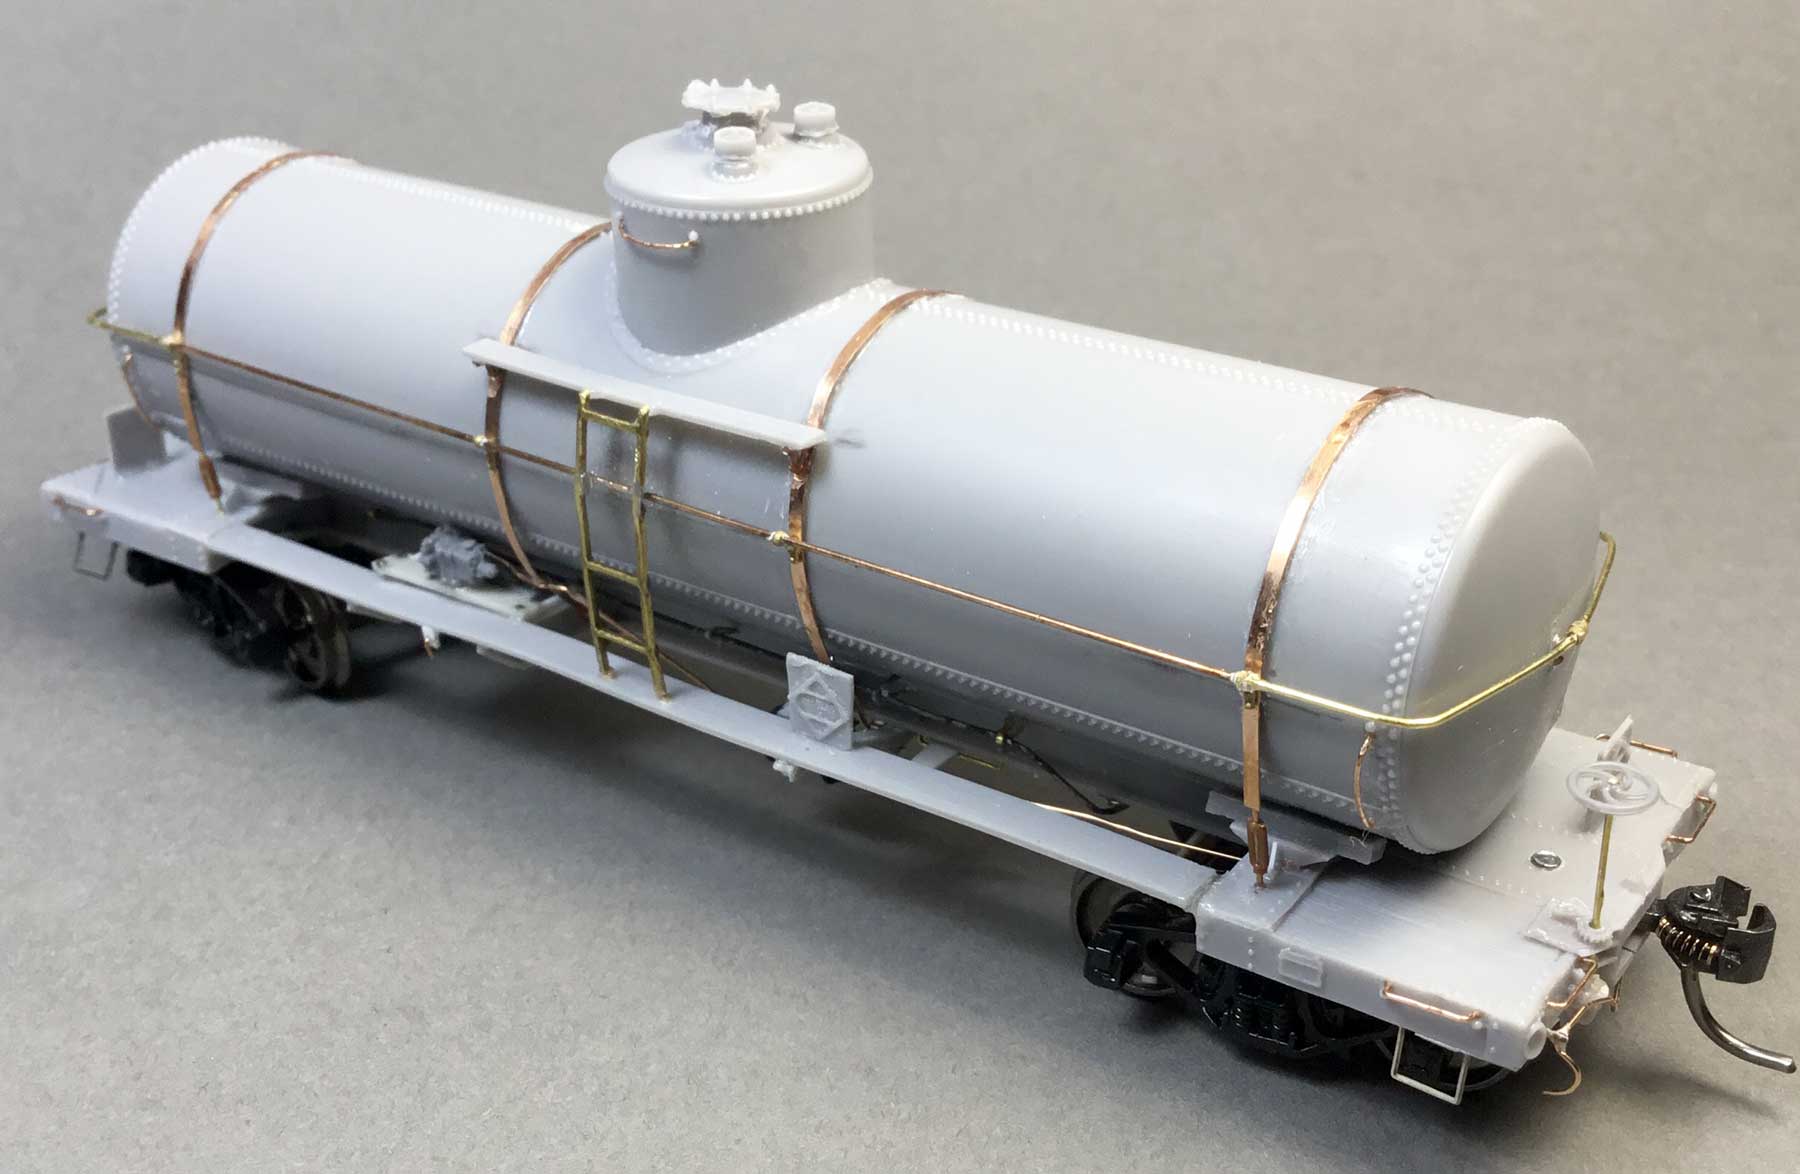
Lester Breuer has been building an HO scale Resin Car Works tank car. Here are a few notes from Lester.
As I have an operating model railroad, I opted to substitute a few kit components for more robust parts. I had some brass ladder stock on hand that matched the kit resin ladders perfectly. I also made the platform brackets from some scrap phosphor bronze wire.

This is the first resin kit where I have had to solder parts. The tank bands are soldered to wire at the ends to reflect the prototype attachment to the car frame. I used extremely fine solder and a very small tip in my iron to get the job done. The brass Precision Scale handrail stanchions were a challenge as they took a long time to drill out to accept the wire. Take your time drilling out these fine parts and support them well to avoid bending.
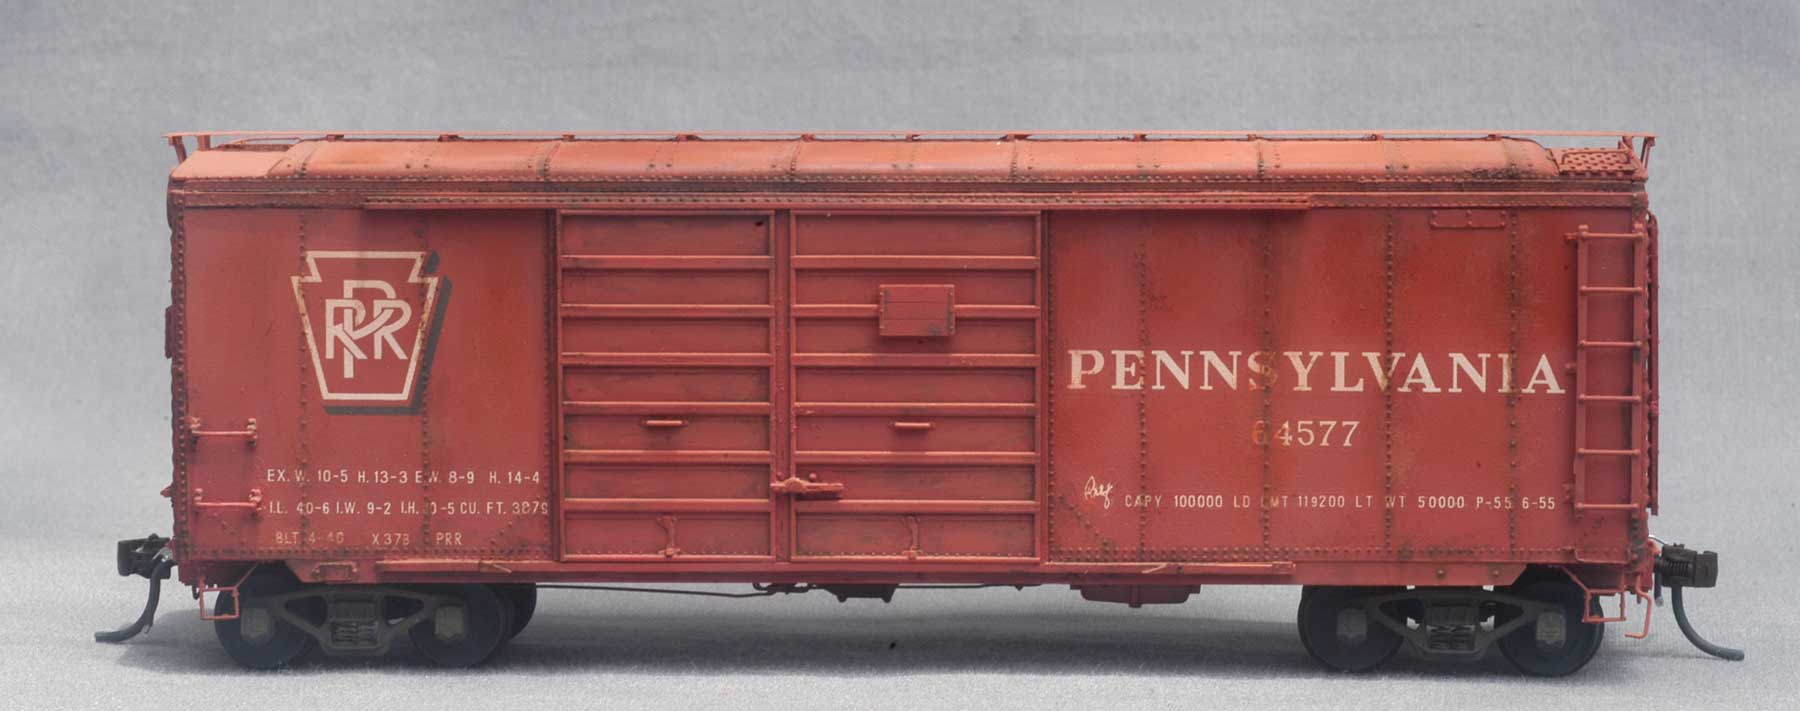
Elden Gatwood sent a few images of his latest freight car builds. Here’s Elden with a report.
These three HO scale cars were fun projects, except for the EJ&E car, which was one of those horrible early Sunshine kits I waited a decade to build.
The lead image is a PRR X37B built from a Sunshine kit. The model has an etched Allan Wood running board and corrected brake gear, with MicroScale decals in the Shadow Keystone scheme. Inspiration came from several photos I have of the prototype cars, which I am researching.
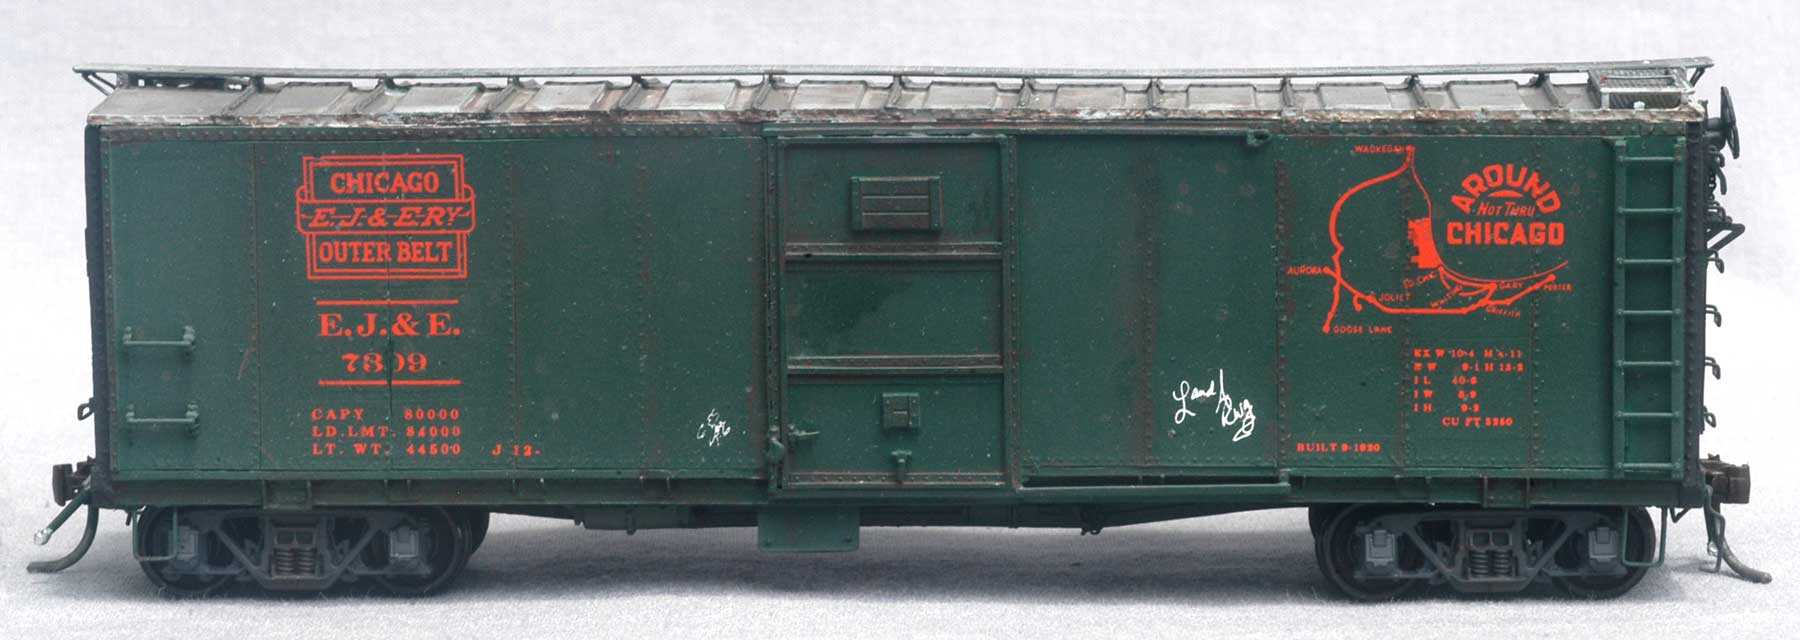
The EJ&E DS rebuild is a very early Sunshine kit with a reworked body and details, replacement running board and B-end details, in the early green and orange scheme. I got my inspiration from a color photo in RMJ many years ago.
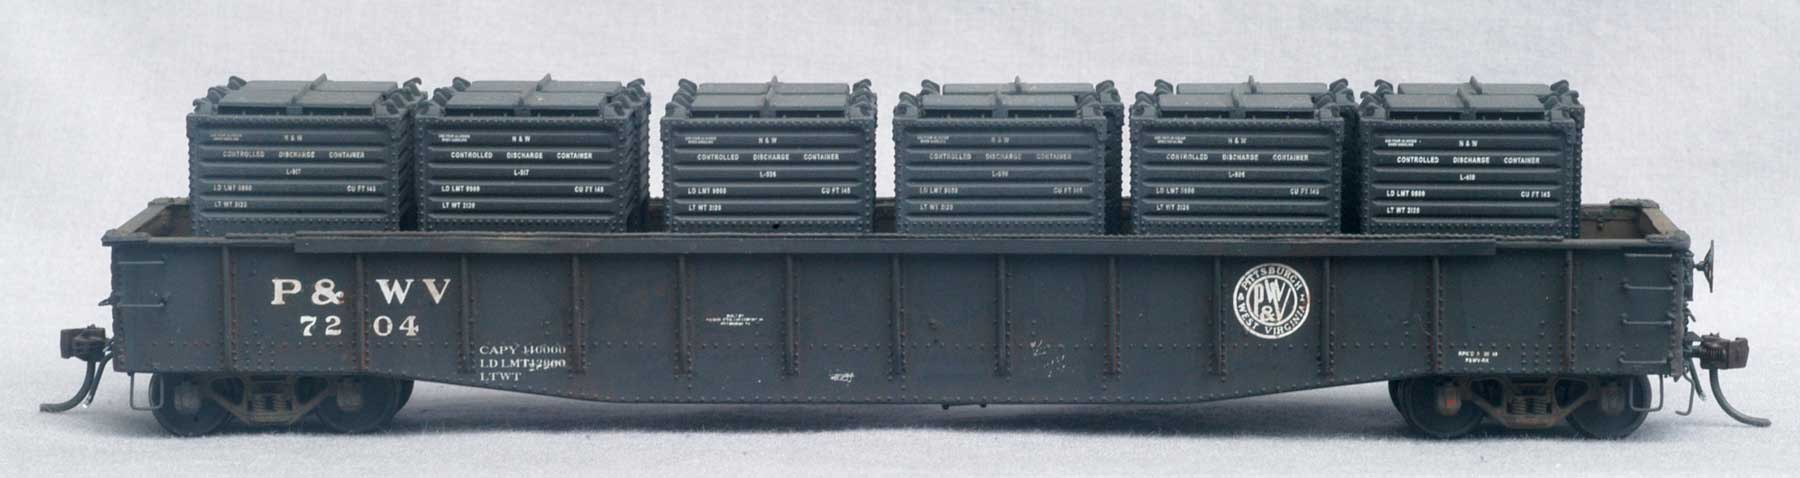
The P&WV container gon is a reworked Sunshine MoP fixed end gon with added bulb reinforcement, lading band anchor, and interior blocking with Walthers Youngstown containers. I got inspiration for this from a small group of photos I found over the years. I am currently researching the container trade.
All models were weathered with washes, chalks, dry-brushing and oversprays.
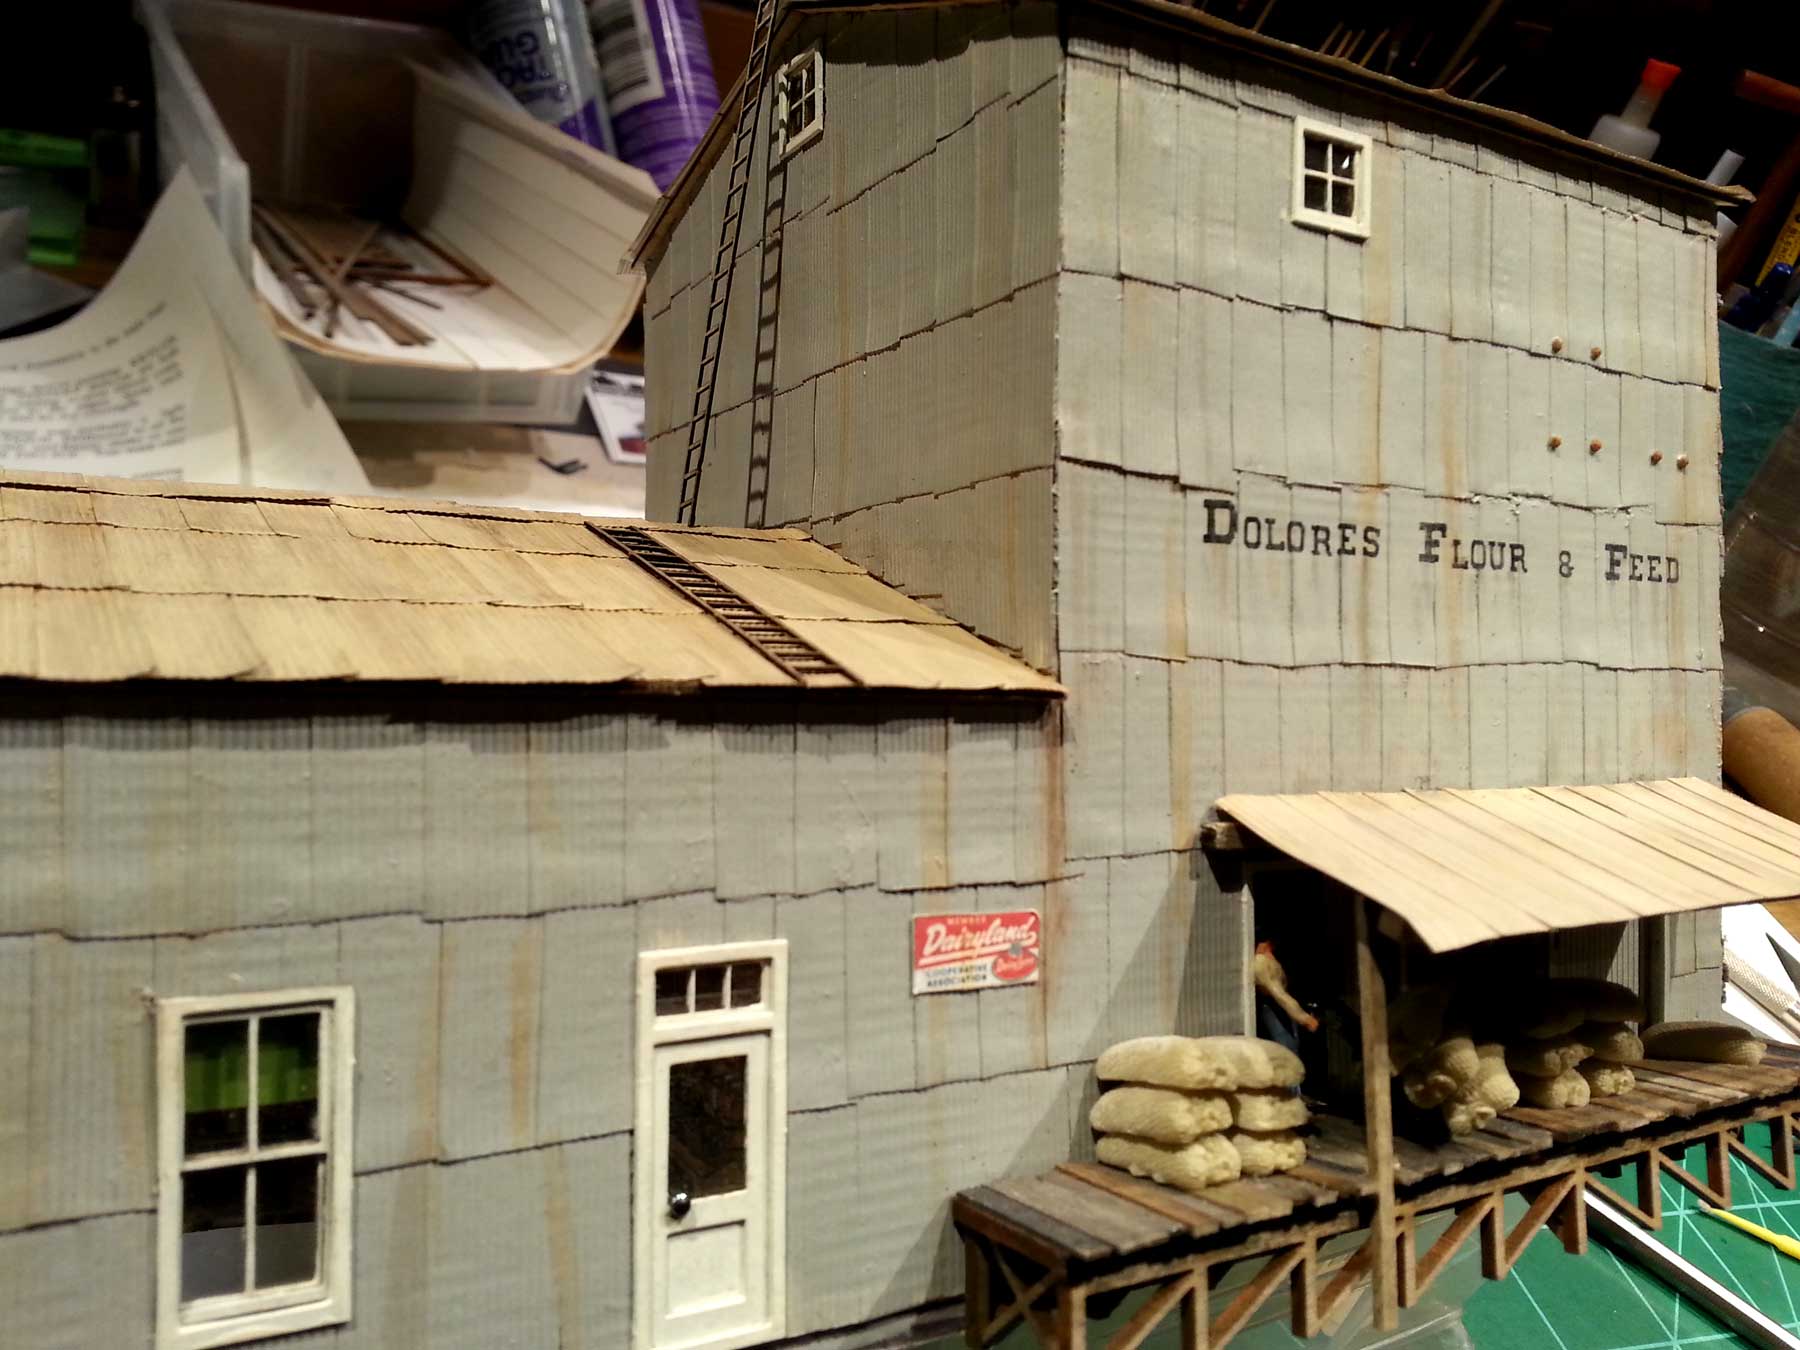
Steven Haworth tweaked an HO scale laser kit to reflect a prototype structure for his narrow gauge layout. Here are Steven’s details.
I just finished a model of an old flour mill in Dolores, Colorado. The prototype structure once existed along a siding of the Rio Grande Southern, in Dolores Colorado, circa 1940s. I started with a LaserKit model of the Hitzeman Mill then adapted it by adding a loading dock cover. A few windows and other details were rearranged to reflect the prototype.
Corrugated siding from Wild West Models (which is a paper product) was applied to the walls. Weathering is thin washes of Vallejo paints and Pan Pastels. There is a rough interior printed on cardstock. Some lighting was added just inside the open loading dock door and in the fixture over the side door. I used warm white LEDs for both of those lights.
A couple recent posts on my blog have lots more details about the build, including prototype photos. Detail on the mill is toward the end of this first blog post. And here’e the follow-up post on the lettering and some final shots.
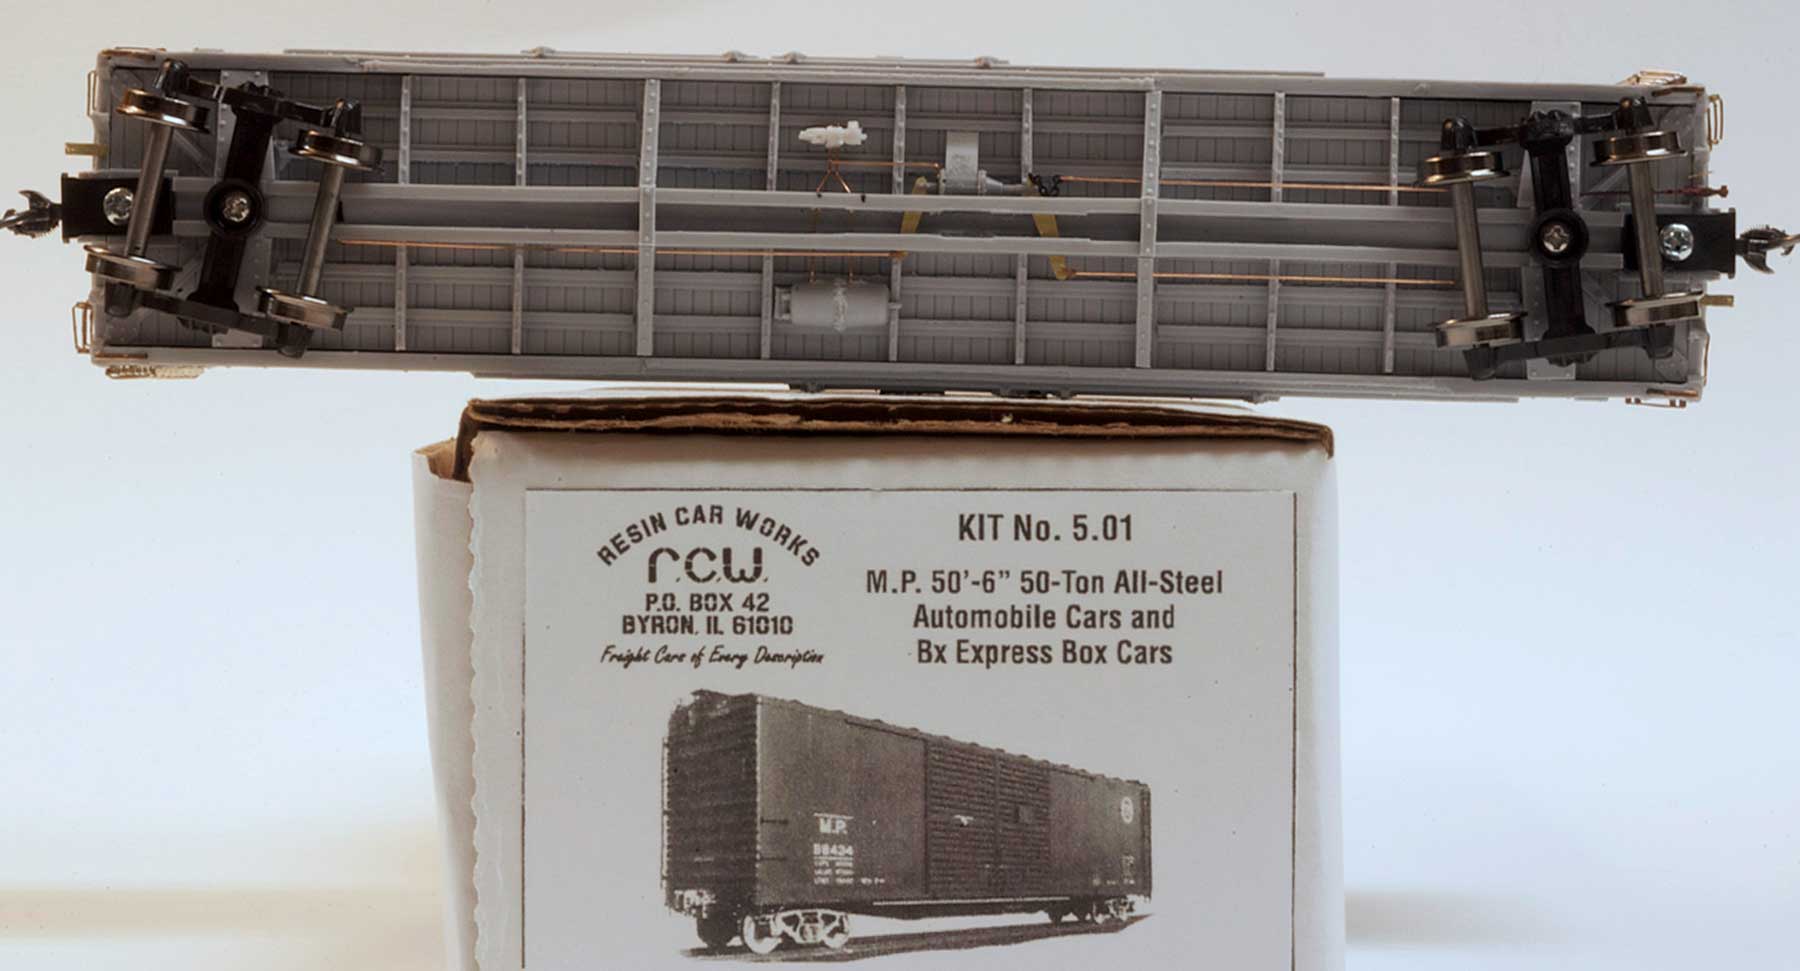
Craig Zeni has been building an HO scale Resin Car Works Missouri Pacific automobile box car kit. Here are Craig’s comments.
Unpainted cars are not kind to craftsmanship.
The car was built using mostly the parts in the box. I used Tichy Train Group wire rungs on the Yarmouth Model works etched ladder stiles. Some solder/flux paste really made for much neater soldering work.
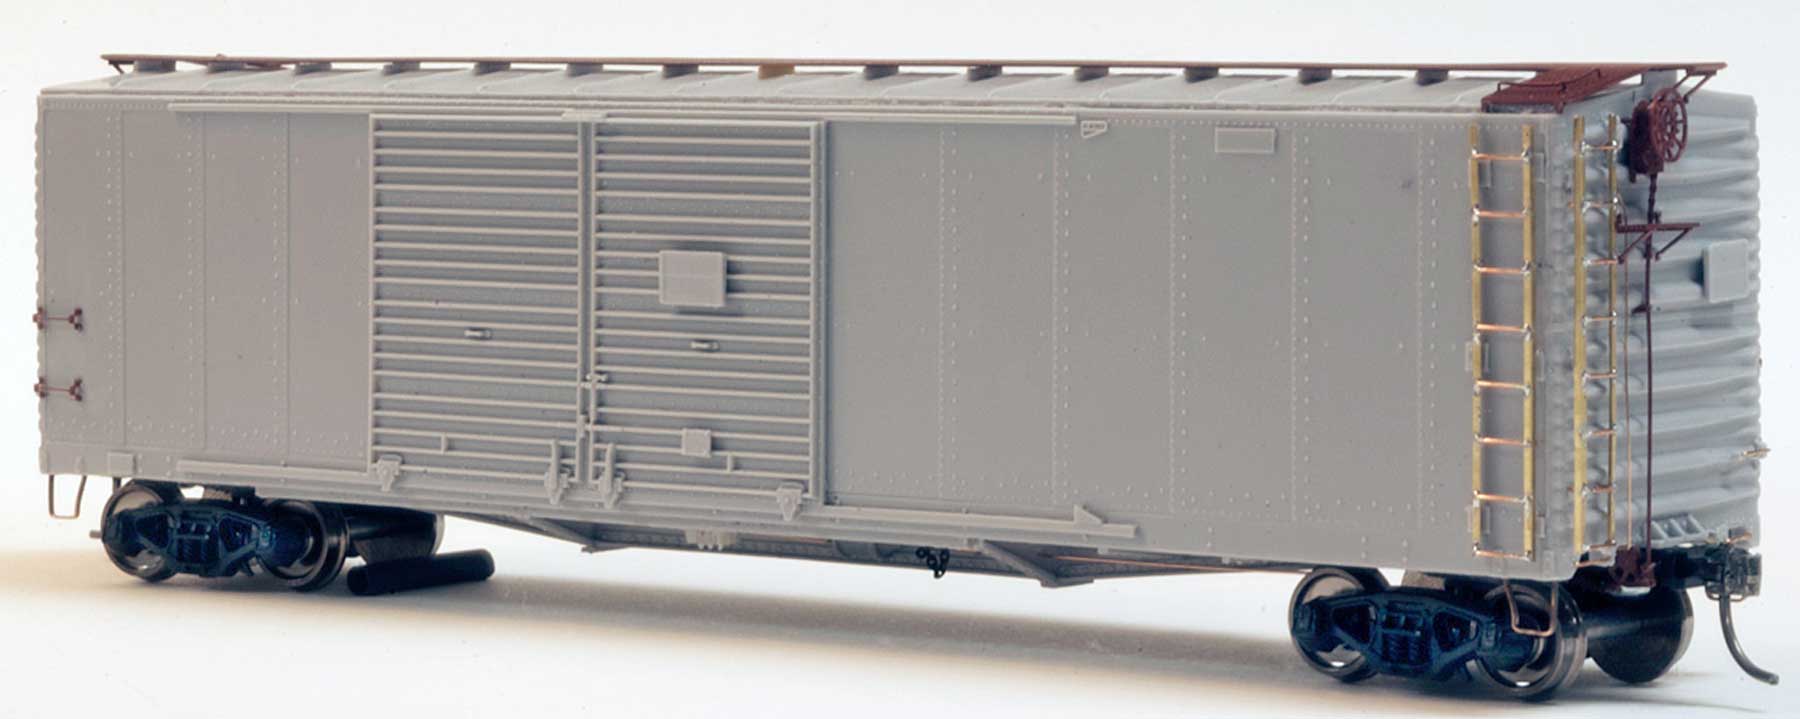
I substituted Kadee running board, bracket grabs, handbrake package and brake step; I’m not certain I like the running board and may go back to the etched part that came with the kit.
Resin Car Works thanks all of these modelers for sending along images and descriptions of their latest models. It was great to see structures and track in the mix. We hope to send out another Virtual RPM call in a few months. There are several RPM events scheduled at locations across the country. Check out the RPM Event Calendar and make your plans to attend a meet this year.
Questions and comments can be posted below. Please follow the instructions so your comment can be posted. All comments are reviewed and approved before they appear. To subscribe to this blog, enter your info for a comment and check the last box to notify of new posts by email. Share the blog link with other model railroaders.
What a great idea! Thank you for allowing those, who for whatever reason, cannot attend these events in person. I’m looking forward to participating in the next one. Hopefully, there will be many more to come.
Thanks again.
Not as good as being there, but sure appreciate the update. :0)
Thanks to all the contributors for sharing some really great modeling!!!