Lester Breuer returns to the blog with a recent freight car kit build.
Once more I am pleased to be able to share my work with you here on the Resin Car Works blog. The build this time was a Soo Line box car, square-corner design, offered in July. Nice photos for the build are in the kit “Prototype Data and Modeling Notes.” If photos of greater clarity are desired you can find the same photos with additional data in the captions in the Soo Line Freight Equipment and Cabooses book by Kenneth J. Soroos on pages 16 and 17.
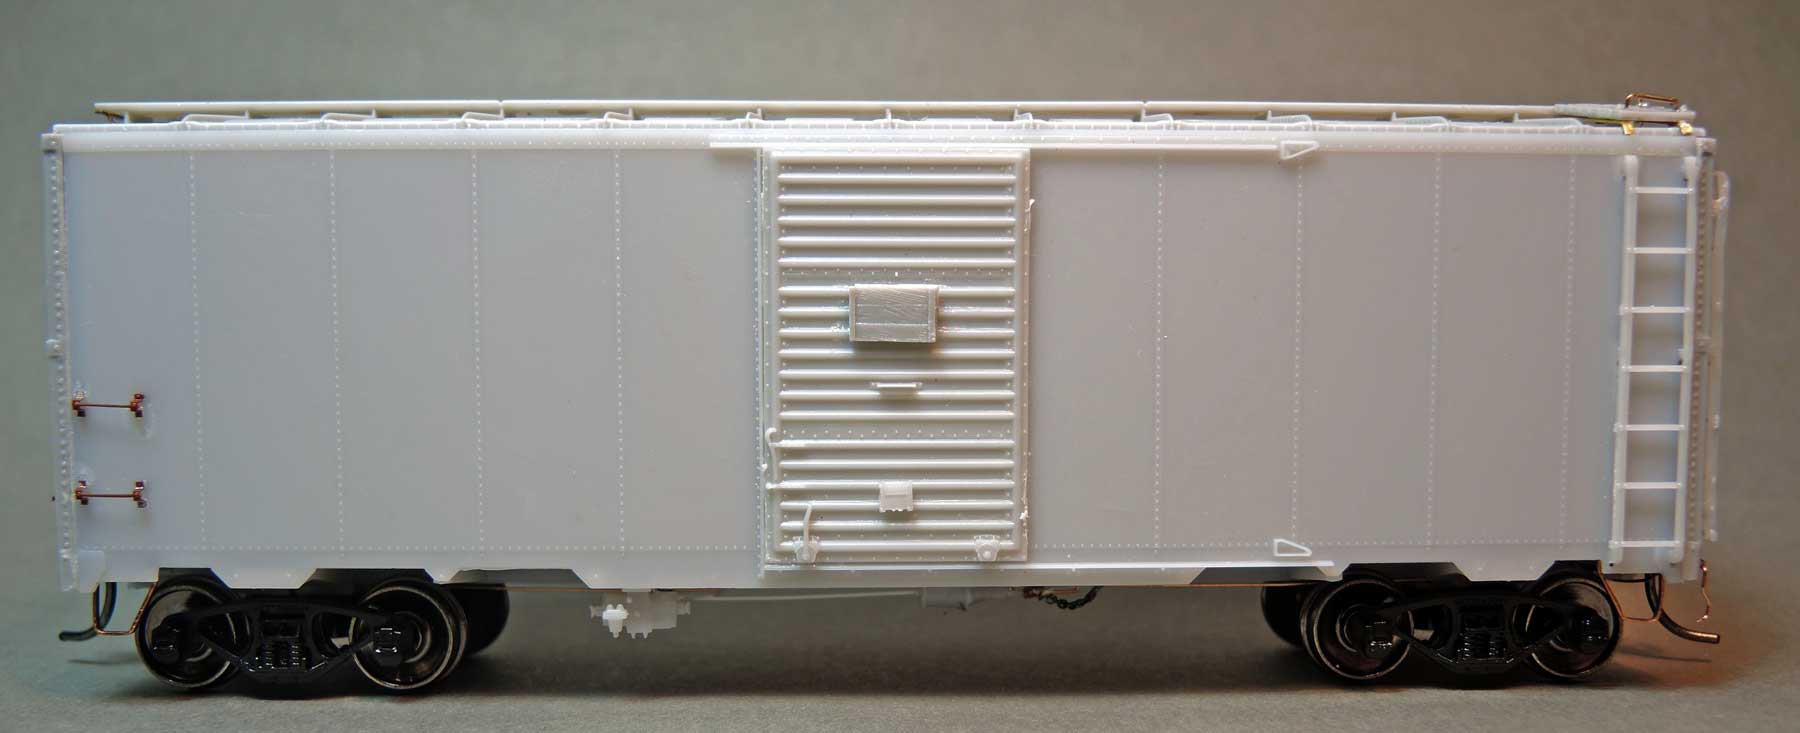
I began the build by installing the underframe. After the underframe, I notched the false ends on the car body with a fine toothed saw blade mounted in a Dremel tool to accept the Red Caboose roof included in the kit. At this time the Red Caboose roof was installed; however, not glued. With the roof installed I fit the resin 5/5 Dreadnaught ends over the false ends making sure to align the top with the roof eaves and the bottom coupler pad with that on the underframe. Once I was satisfied with the fit, I glued the ends over the false ends on the car body.
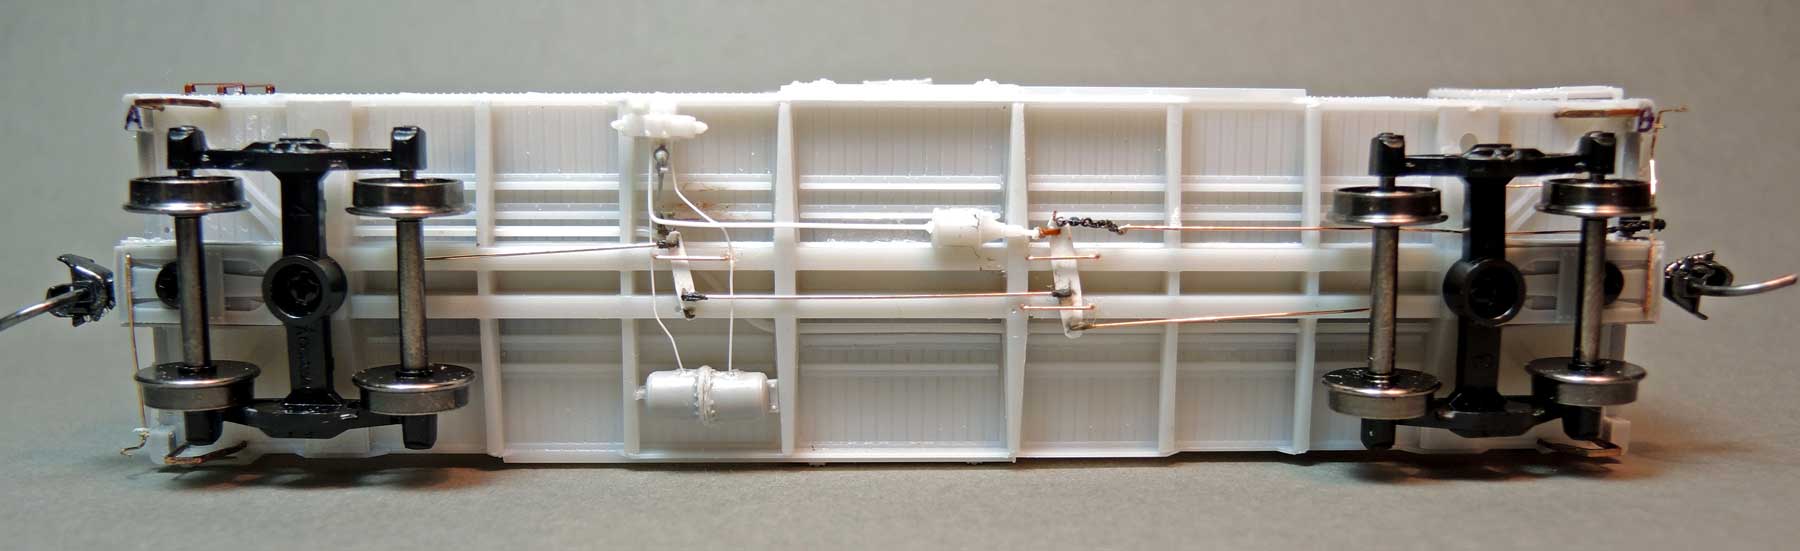
Now I turned back to the underframe. After first installing kit supplied resin coupler pockets with Kadee #148 “whisker” couplers, I mounted the brake components. I used the Intermountain control valve and brake cylinder which I cut from the molded rodding and brake levers. The brake cylinder piston received one-half of a Tichy Train Group (Tichy) #8021 turnbuckle to create a piston clevis to attach the brake cylinder floating lever. The air reservoir was resin cast supplied in kit. Brake levers were made from Evergreen Scale Models #8108 1×8 inch and #8106 1×6 inch strip styrene in a pattern used by Cal-Scale (plastic) or Yarmouth Model Works (etched brass). Brake lever hangers were bent from Tichy #1106 0.0125-inch diameter phosphor bronze wire and installed. Piping is Plastruct # 90850 0.010-inch diameter and #90849 0.015-inch diameter styrene round rod. The dirt collector is from Tichy set #3013. Brake rods were made from Tichy #1106 0.0125-inch diameter wire. The short length of chain is Campbell Scale Models black 40 links per inch. The trucks reflect an A.S.F. double-truss design, simulated by Intermountain trucks. Intermountain 33-inch metal wheels were installed. With underframe complete I removed the roof, weighted the car to 3.08 ounces, and glued the roof in place. The car body was now ready for detail.
First I did the roof. An Intermountain longitudinal running board was mounted and Yarmouth Model Works etched brass end braces installed. The latitudinal running boards were kit supplied resin parts mounted with brackets made from Detail Associates #2524 0.010 x 0.030-inch brass flat bar stock. Roof grab irons were made from Tichy #1106 0.0125-inch phosphor bronze wire with Yarmouth Model Works YMW355 eyebolts for corner brackets. The side details were installed next: kit provided ladders, Kadee bracket grab irons #2250, A-Line style “B” stirrup steps #29001, and kit placard boards on the doors.
The car body ends feature a number of details. The kit supplied end ladders, Kadee end grab irons #2253, end sill grab irons bent from Detail Associates #2503 0.010-inch diameter brass wire, and kit supplied resin placard boards were mounted first. Uncoupling levers were fabricated from Tichy #1106 0.0125-inch diameter phosphor bronze wire. Uncoupling levers could have been mounted with the resin uncoupling bracket levers provided in the kit; however, I chose to mount them with eyebolts formed using Xuron 488 wire bending pliers and Detail Associates #2503 0.010-inch diameter brass wire.
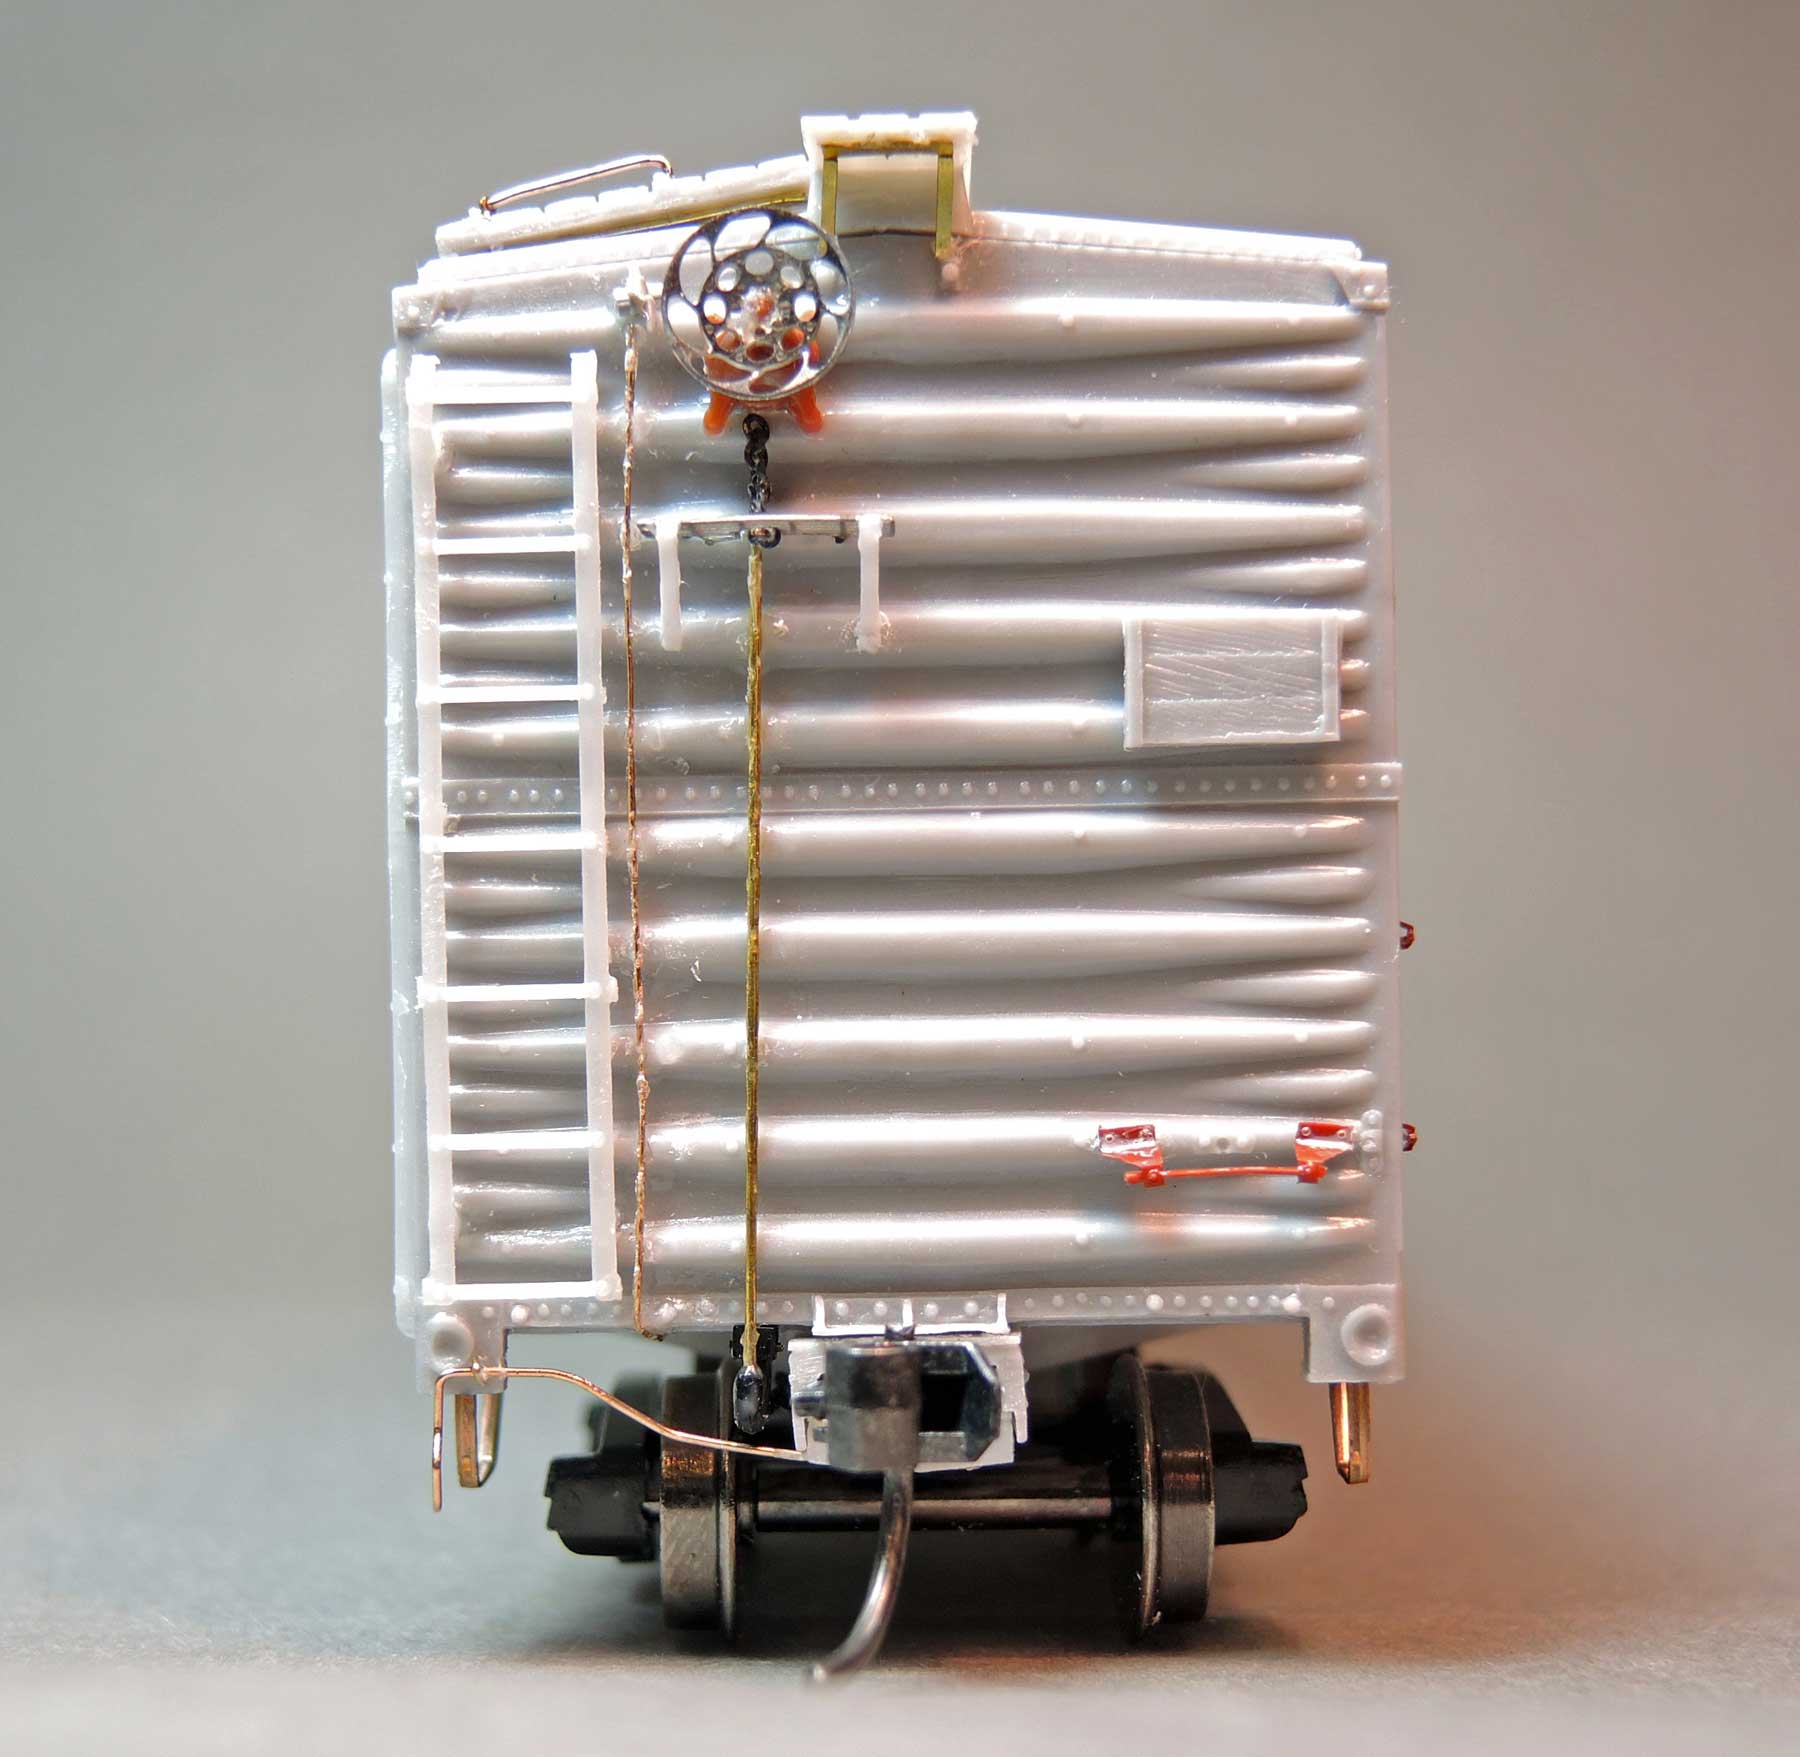
The rest of the “B” end detail was added next. A Plano etched brake platform with braces made from Evergreen #8102 1×2-inch strip styrene was installed. The beautiful kit supplied Klasing hand brake and etched brake wheel were mounted next. I attached fine Campbell black chain to the hand brake gearbox. A Cal-Scale bell crank from set 190-283 was installed. The brake rod, Tichy #1106 0.0125-inch phosphor bronze wire, followed. A Precision Scale #31796 retainer valve and retainer line fabricated from Tichy #1100 0.008-inch phosphor bronze wire were installed, wrapping up the detail work.
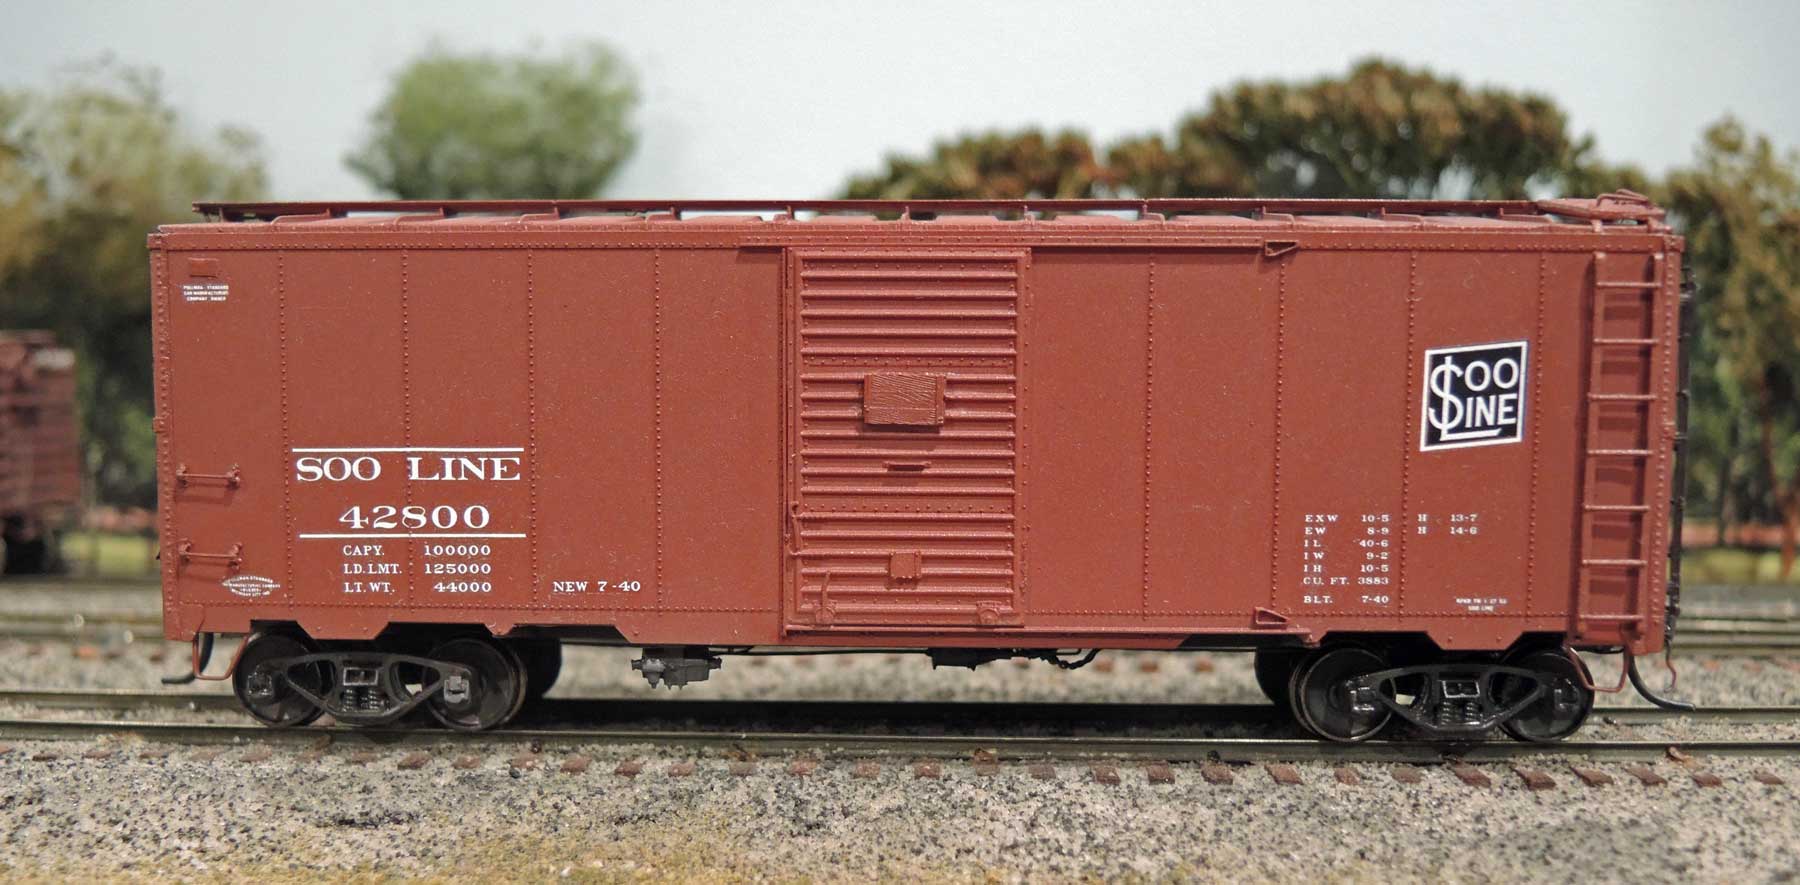
The model was ready for paint and decals. The underframe was sprayed with Vallejo #29022 Tarnished Black, while the truck and wheel sets were brush painted with PollyScale F414140 Tarnished black. The car sides and roof were sprayed with a PollyScale mix of 50% Box Car Red F414281 and 50% PRR Tuscan F414167, thinned with Liquitex airbrush medium. Once dry, the roof and sides were taped with Frogtape prior to spraying the ends with PollyScale Engine Black F414290. After the paint was dry, the Frogtape was removed and Model Master 4638/Gloss Clear Acryl was sprayed onto the car to provide a gloss surface for decals. The kit supplied MicroScale decals were applied using prototype photos as a guide. Once the decals were complete, the car body was sprayed with Model Master 4637 Semi-Gloss clear acryl.

This fine Resin Car Works kit provided me with hours of enjoyment building Soo Line box car 24800. The model will continue in service on the Minneapolis & Northland Railroad Company during monthly operating sessions for additional enjoyment.
We thank Lester Breuer for contributing a summary on his Soo Line box car build. The Resin Car Works kit Lester built is no longer for sale because kit components are not readily available.
Editor’s Note: PollyScale paint was mentioned in this blog post but the line of paint was discontinued. Some of the colors are now available through the Model Master paint line.
We recommend a paint resource available through the Model Railroad Hobbyist publication and website. They offer a free acrylic painting guide and airbrushing tutorials on their website. The acrylic paint guide also has a paint conversion chart for Floquil and PollyScale paint, and the corresponding colors for Model Master and Vallejo Acrylics products. You will need to establish a user account to access the details, but this is free and well worth your time to set up a user name and password to login.
Questions and comments can be posted below. Please follow the instructions so your comment can be posted. All comments are reviewed and approved before they appear. To subscribe to this blog, enter your info for a comment and check the last box to notify of new posts by email. Share the blog link with other model railroaders.
Way cool Lester!
Very well done Lester. I didn’t realize your talent for these.
Excellent work, as usual, Lester. Thanks for sharing with me. Having built several freight cars for the AP toward MMR several years ago, I have an appreciation for your efforts.
Outstanding Model and Craftsmanship.
Thanks for posting. Just the inspiration I need to finish mine up
George Toman
George Thank You for the kind words. Enjoy finishing your Soo line box car.