
Just before Christmas, discussion on the Steam Era Freight Cars YahooGroup was focused on box car roof paint failure. Many felt the overall effect was interesting, but far less common in the steam era due to more accumulation of soot on freight cars. Nonetheless, paint does fail, most noticeably on galvanized metal roofs. The above image is a portion of a 1943 Jack Delano photograph of the Milwaukee Railroad freight house in Galewood, IL. Of the nine box cars in the edited image, three of the roofs show signs of paint failure. The most apparent example can be seen on a car in the second row and second from the left. The two cars in the front row on the right side also show some paint failure.
We invited modelers to share images and techniques to inspire others to add this detail to a few of their freight cars.
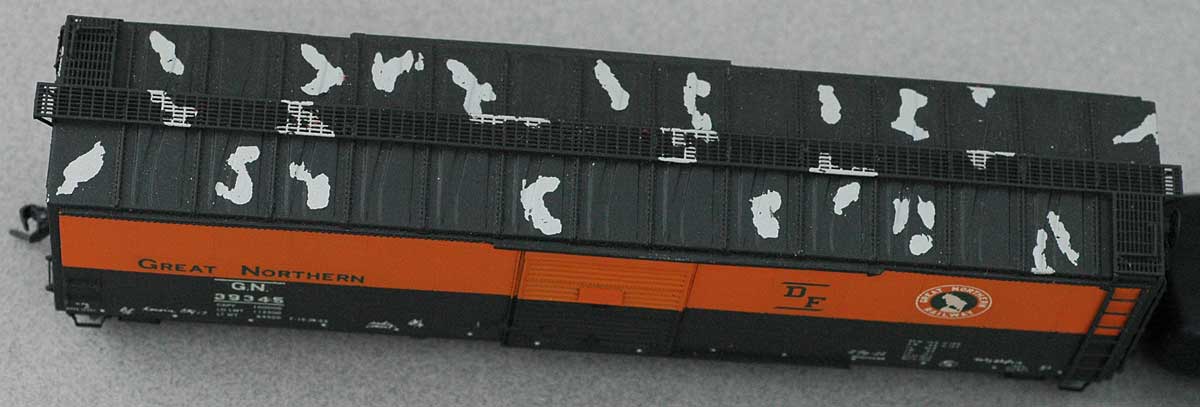
Bill Welch built this Great Northern box car nearly 20 years ago and used a product called “Mask It” to try for the peeling paint look. He says he liked it at the time but in retrospect the peeling paint looks too contrived or planned, and looking a bit too much like “Bird Poo.” Not exactly the look he wanted for this model. Additionally, the model represents a car with two years of service, so there is probably too much peeling paint for that short time period. Bill plans to touch this up with PanPastel Burnt Sienna and Dark Gray to will help calm it down.

Michael Gross sent along his image of an InterMountain AT&SF Sk-T stock car reflecting a 1954 appearance. He airbrushed the roof with acrylics to reflect soot and dirt typical of the late steam era. The galvanized patches are a mix of black and white tube gouache applied with a fine brush. When dry, the roof was again airbrushed with a sooty acrylic mist to tone down the patches and tie everything together.
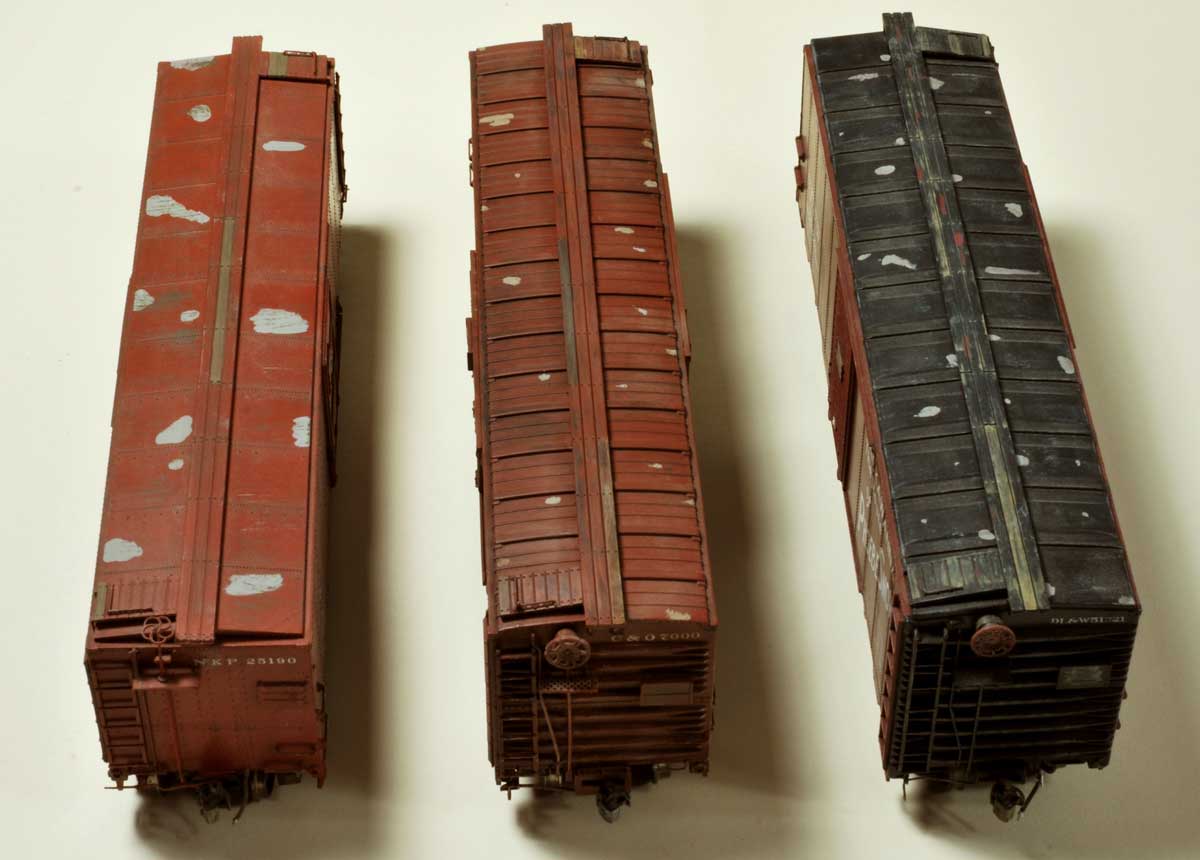
Eric Hansmann built and weathered these cars before his modeling focus shifted to an earlier era. He kept the process simple by using a micro brush with a small amount of Tamiya Sky Grey paint and rolling it onto the model roof to create a peeled paint effect. An additional weathering wash and years of accumulated dust have muted the peeling paint color and boundaries.
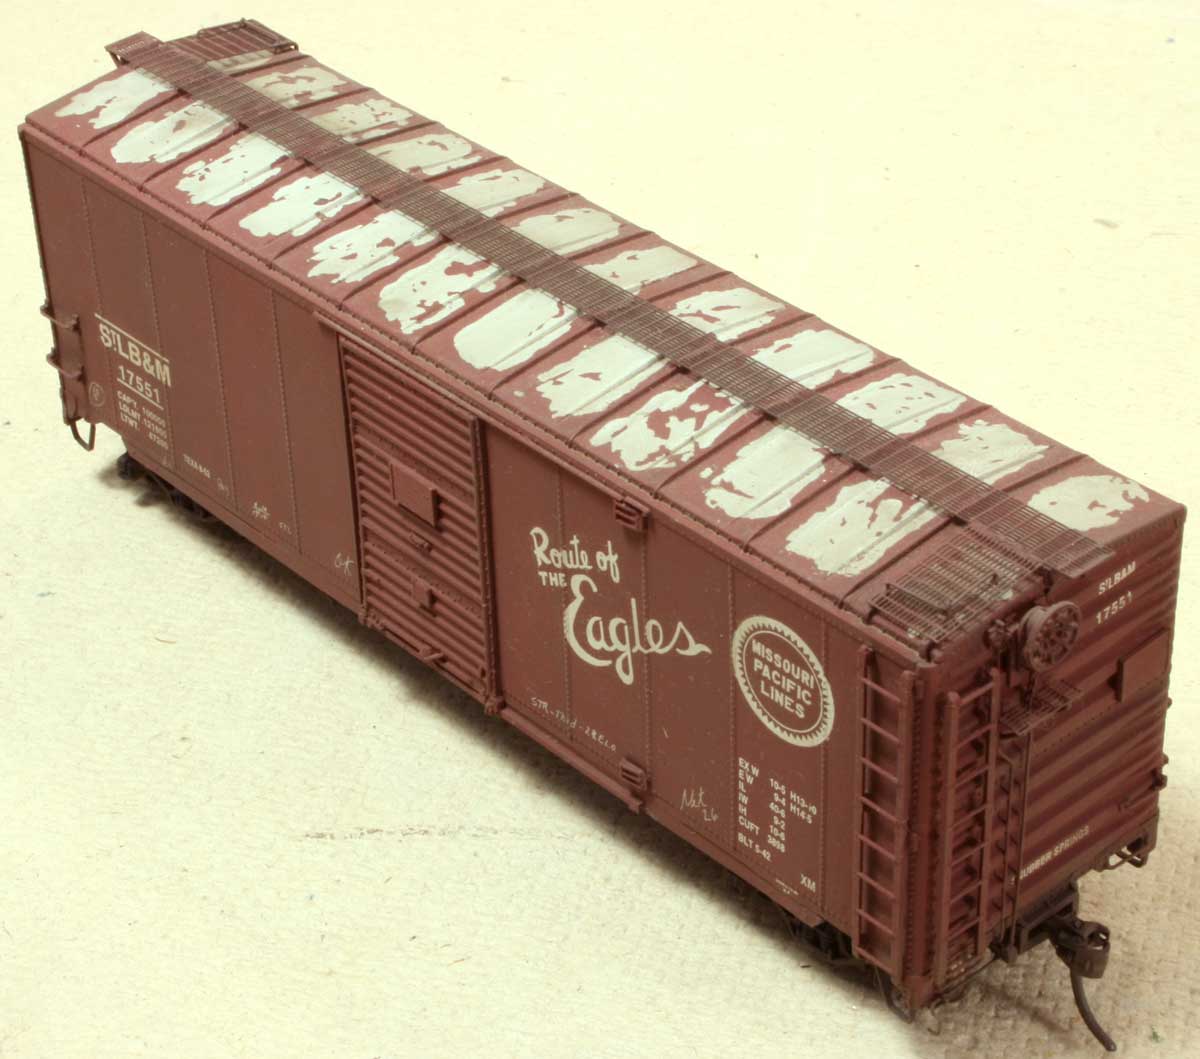
Frank Hodina sent in this model image. The car is an InterMountain 10-foot, 6-inch interior height box car modified with a Sunshine mini-kit that was the 2005 Naperville gift. The kit roof was replaced with one from Red Caboose and the running board is an etched metal detail part from Plano Models.
Frank used rubber cement to create a peeling paint effect. A galvanized color of 50/50 Floquil Old Silver and White is sprayed onto the roof as a base color. Once dry, dab on small amounts of rubber cement then paint the car color over the roof. When all is dry, carefully peel the rubber cement off of the roof using sticky masking tape.
Scaling down subtleties is not as easy as it seems. At least two of the four modelers who featured models here feel they can do a better job with peeling paint effects on future attempts. Bill Welch has been working on a few techniques that may be featured on the RCW blog.
Thanks to Michael Gross for submitting photos and a description of his stock car model. Questions and comments can be posted below. Please follow the instructions so your comment can be posted. All comments are reviewed and approved before they appear.
A very nice round-up of some techniques for modeling peeling paint on roofs. I have successfully used a technique called “salt weathering”, which I learned about from someone in the aircraft modeling hobby.
In short, you paint the roof a galvanized colour. When the paint is dry, you sprinkle water droplets on the roof, then apply sea salt (I use a grinder that’s fairly open so it lets chunks through) and let this dry. The salt will stick, lightly, to the roof. Then you airbrush your roof color and let it dry. Finally, you take a stiff toothbrush and brush the roof to remove the salt, exposing the galvanized roof underneath. In some cases, a light overspray of the roof color after removing the salt will help tie everything together. In other cases, weathering is sufficient.
I wrote an article about this in the October 2008 RMC, using an O scale model of a Maine two-foot boxcar as an example. I’ve posted a few photos at these links:
http://i1218.photobucket.com/albums/dd410/stinksandbangs/Maine%20two-footer%20in%20On2/RoofPeel-02_zpsf3qcewws.jpg
http://i1218.photobucket.com/albums/dd410/stinksandbangs/Maine%20two-footer%20in%20On2/RoofPeel-03_zpsa6umh8ij.jpg
http://i1218.photobucket.com/albums/dd410/stinksandbangs/Maine%20two-footer%20in%20On2/RoofPeel-01_zpsqzupbeej.jpg
Great photos and models – thanks for sharing.
Also, look at the tack boards on the ends of the cars. There are remnants of the cards or paper that was tacked to those boards. Could be simulated with some dabs of white paint?
Pete, you have a keen eye for details! I follow Tony Thompson’s lead on modeling these route tags, or several remnants of previous route tags. I use bits of newsprint or Post-It paper of yellow or blue shades. Wood sheathed cars typically have several remnants visible on the door or on the sheathing to the left of the door and just above the sill. Steel sheathed cars have a small tag board along the sill for these and often exhibit a tag tacked in place. The larger tack boards may have some remnant of a former placard, but I’ve noticed there is frequently a tag or remnant on the smaller route tag board. I apply a small dot of canopy glue and stick the tag or remnant onto the glue. – Eric
Rather than just paint failure should we address “overspray”The pracrice of paint roofs seemed to be less imortant.New cars often showed only partially painted roof.The “overspay from the sides of the cars varied greatly from car to car.Guess we could call it just failure to paint the roof
Guess I had better proofread my replys in the future.
Armand, Over spray techniques were shared here in August by Bill Welch. Click on that link to see the blog post. – Eric
January 4, 2016
Frank’s approach using rubber cement has worked best for me, but it is a process that requires forethought and enough time for several layers of ‘coating’ to dry thoroughly. Kits with separate roof casting or assemblies can be pre-painted and weathered in mass before kits are assembled, then ‘final’ weathering can be applied when the rest of the car is weathered providing continuity that can be challenging otherwise.
-One caution if pre-painting roofs. Paint both sides of the roof (inside and outside) to reduce or prevent roof warping, especially if you still use solvent based paints- (I prefer Scalecoat II and painting it only on the outside will warp most injection molded roofs, not too sure about molded resin roofs)
I have cars that show the ‘rubber cement’ approach fairly well, but we moved from Moline, IL to the Cleveland, OH this past October and models are packed and stored until our new home is finished this summer, so I can’t provide photos at this time.