Matt Smith sent photos and notes on his recent IC hopper builds. Here’s his info on the models. Click on any image here to review a larger size.
I picked up a pair of Resin Car Works Illinois Central Enterprise hoppers during last year’s Chicagoland RPM. I had a chance to meet Frank Hodina and Eric Hansmann. It’s neat to meet to folks behind these great kits. I had never built a complete rail car model in resin and I wanted a new challenge. I had dealt with resin years ago during my scale modeling days, back then the pieces were crude and needed a lot of work. Boy have times changed. I was very impressed with the quality and fidelity of castings. The fine detail is amazing!
I was a bit overwhelmed after the first read through the directions to get an overview of construction. Which of the 3 door locks will I use? Which of the hand brakes do I need? Thankfully RCW has detailed photos on their website to aid in construction. I also had a copy of Railway Prototype Cyclopedia Volume 25 that featured the Illinois Central Enterprise twin hoppers, the various builders, and their specific equipment for each lot of cars. I model central Illinois in 1951 so a couple of these IC hoppers are perfect.
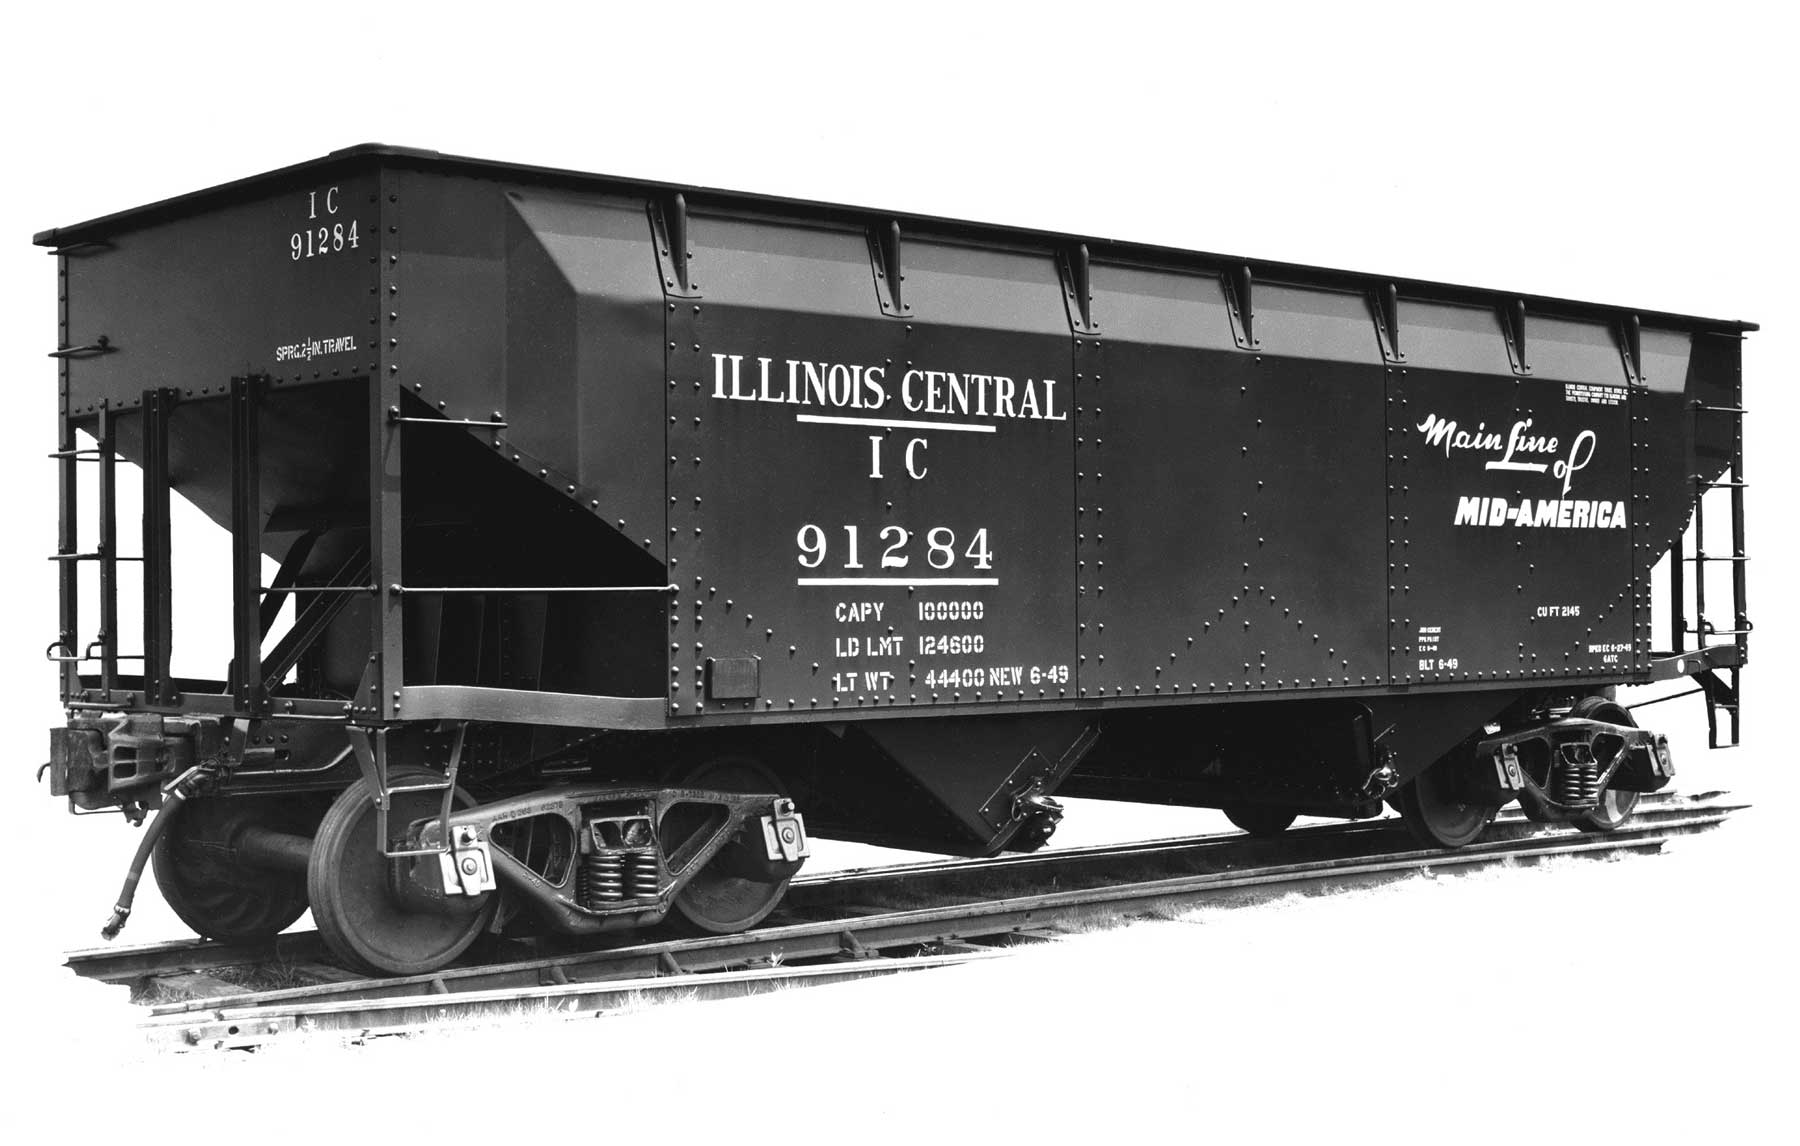
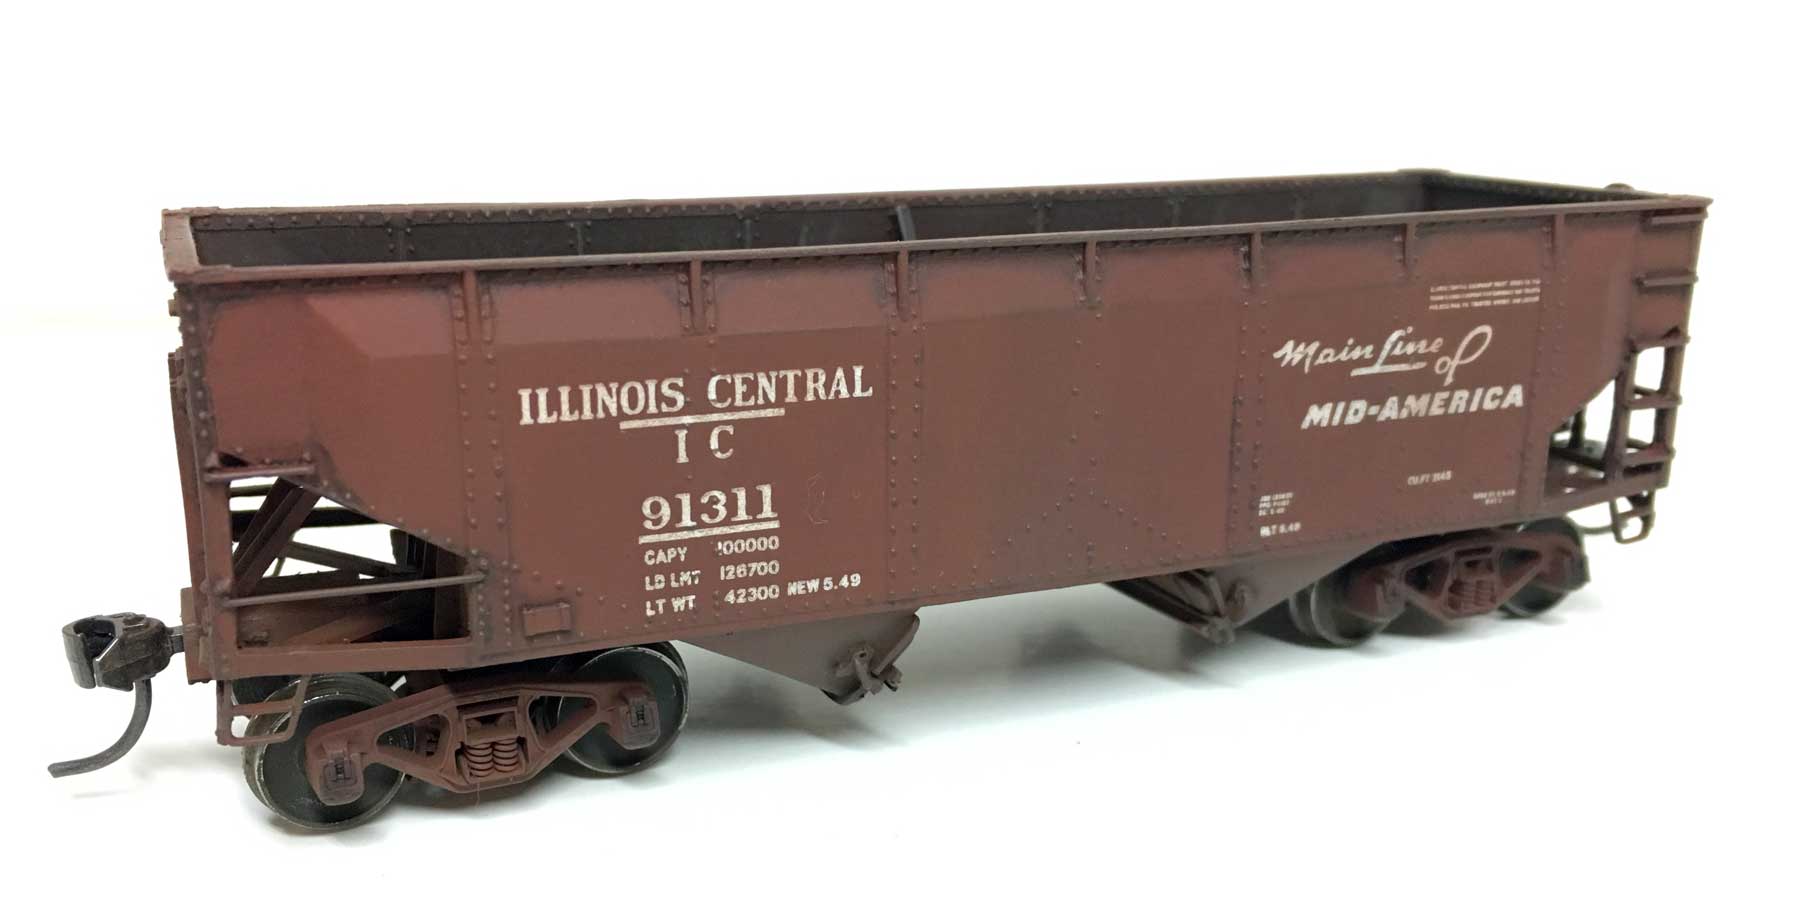
I chose to model the 91,000-91,499 series. They were built in the spring of 1949 by General American Transportation Corporation (BO 2995) and featured Wine doors locks, Barber S-2 spring-plankless trucks, and Ajax power hand breaks. The kits include all the components to build any configuration from any car builder. The kit decals allow you letter any IC configuration from any era. I choose to use Tahoe Model Works trucks and Kadee whisker couplers.
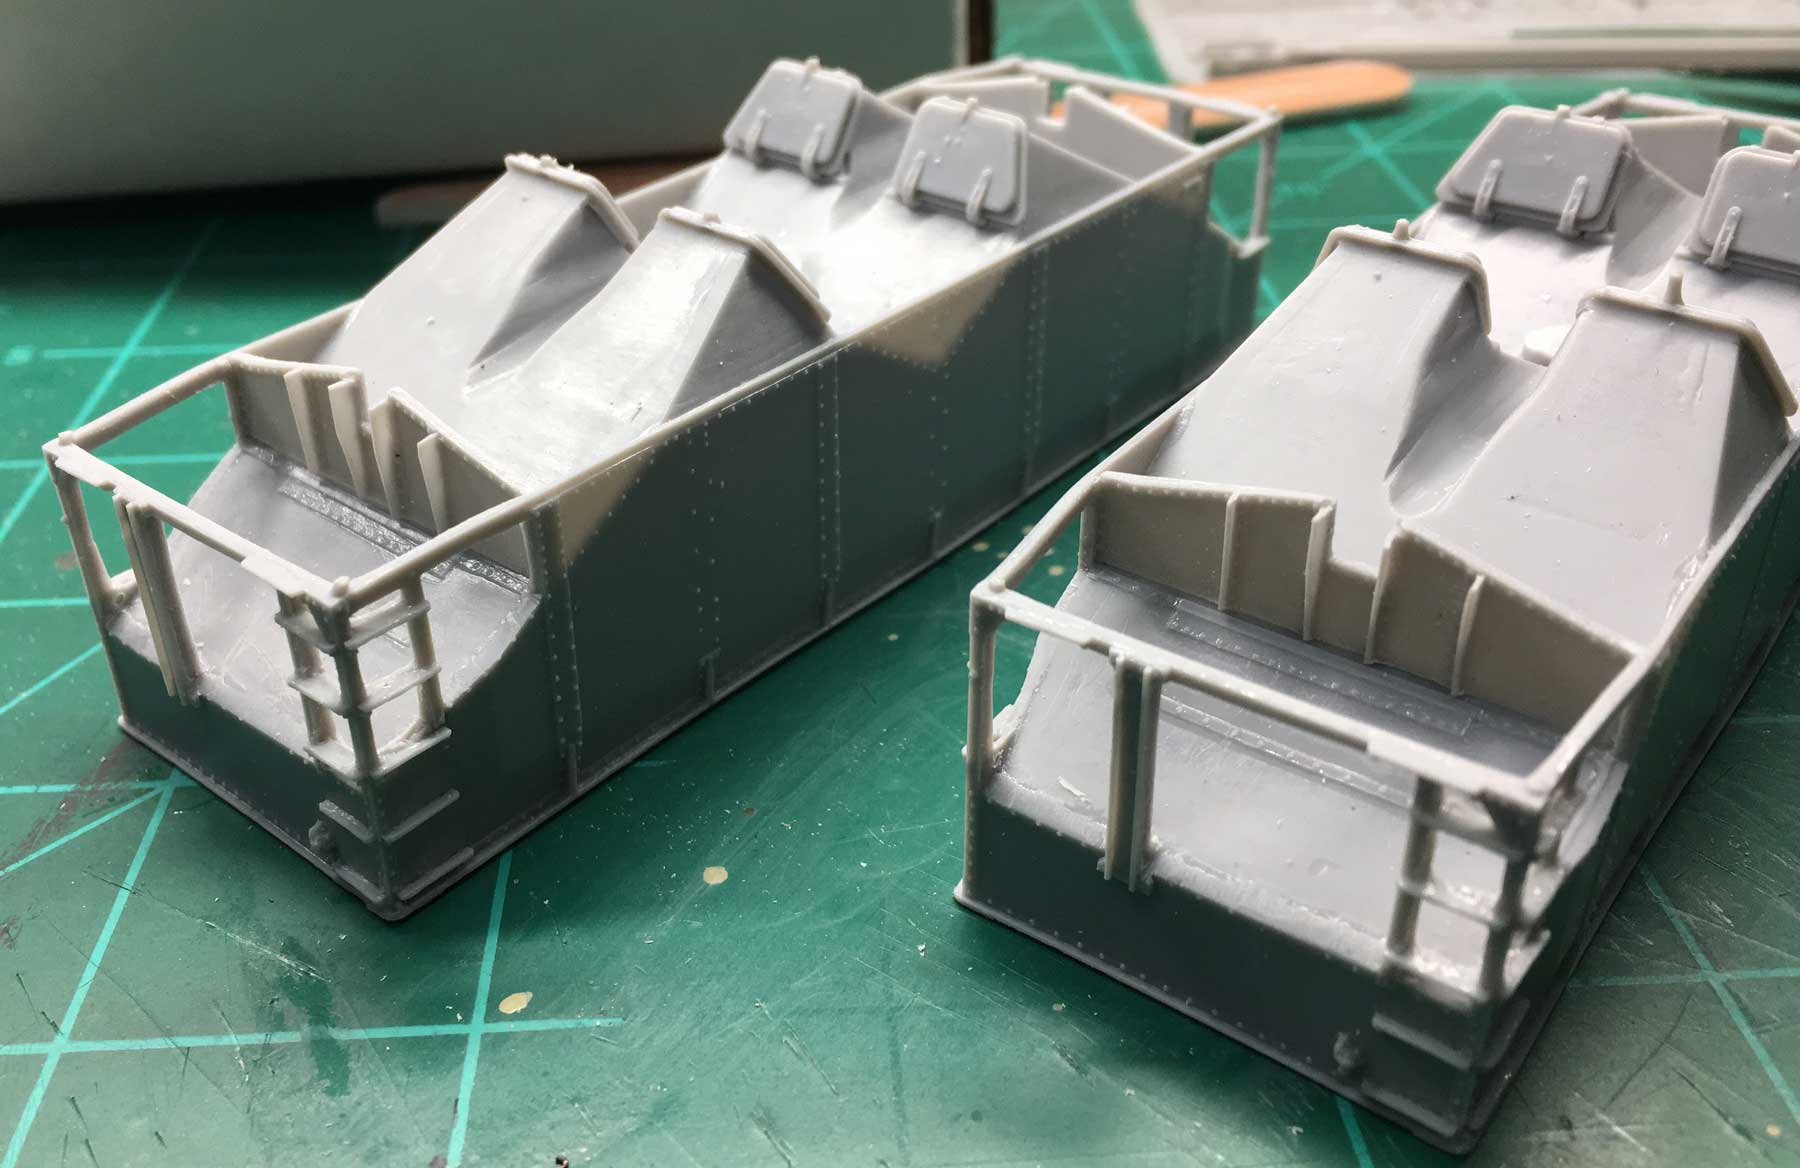
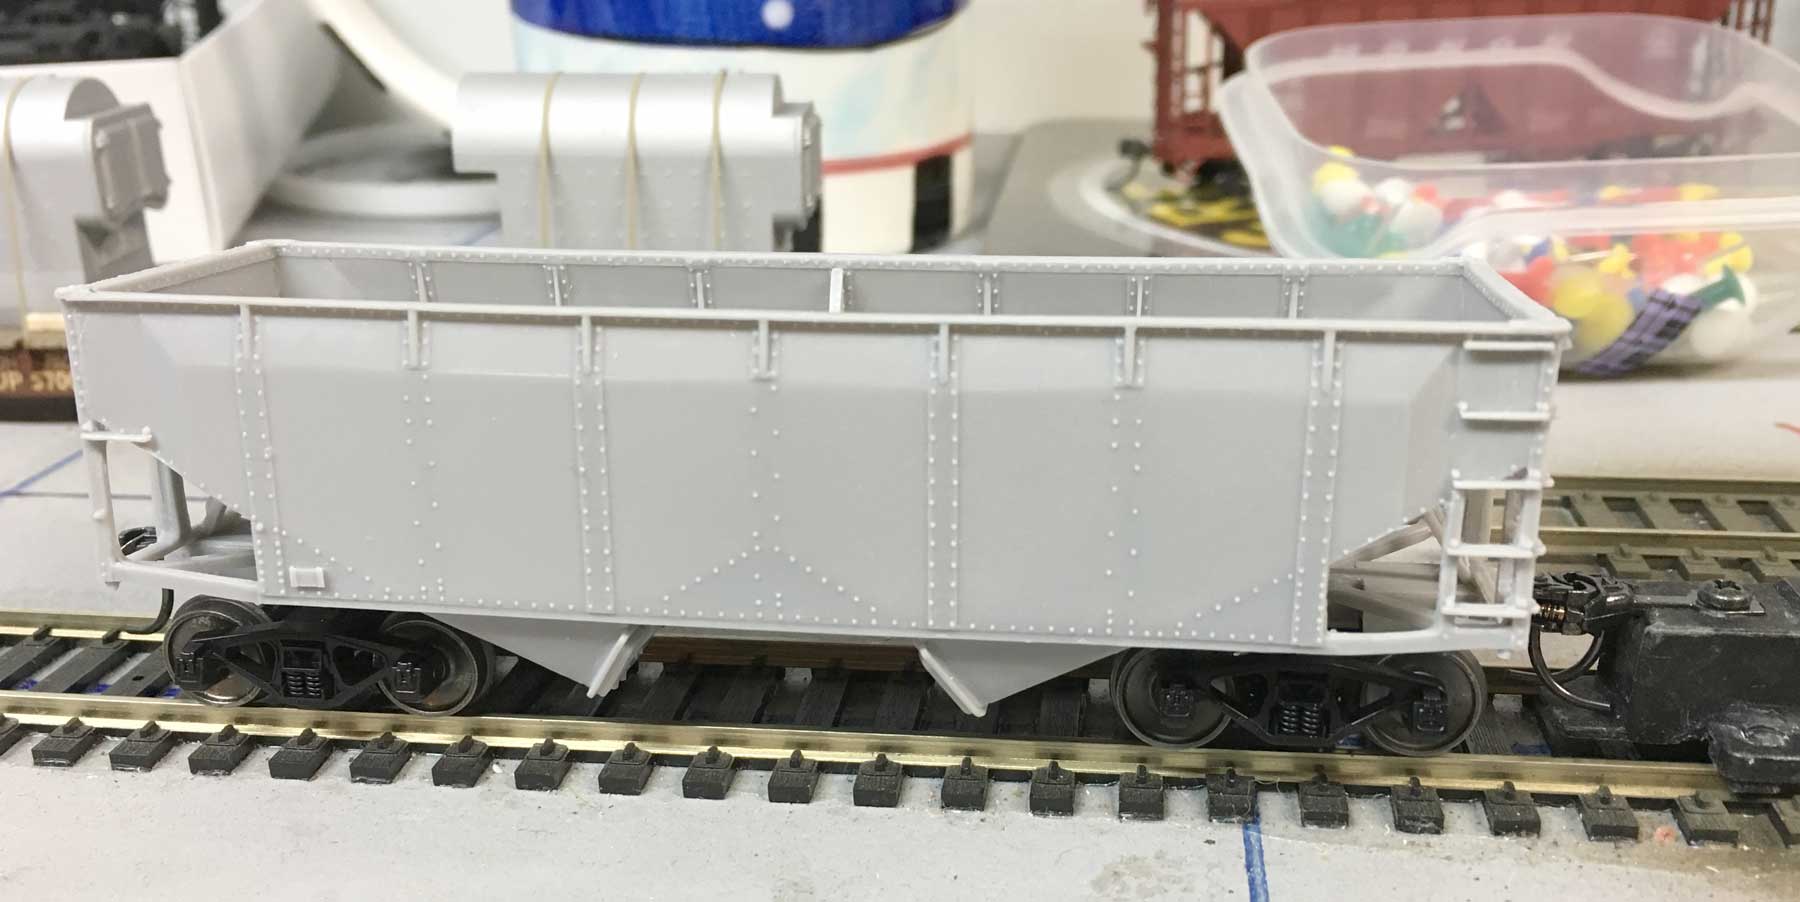
The construction starts by giving the parts a good scrub to remove any of the mold release residue. Follow the directions, read slowly, and re-read SLOWLY again. My modeling opportunities are cut up into short periods of time, so being able to take a step back and think about my next step helps. Resin kits require more filing, trimming, and sanding to get pieces to fit correctly. There are no pins, tabs, or alignment slots like injected molded kits such as a Tichy kit. The directions included are good but if you download a copy from the RCW website you can get better color pictures that you can magnify.
There were very few issues during construction. I did have difficulty fitting the bolster slope sheet support covers. Too much of a gap was visible between the slope sheet support and the cover for my liking. I ended up cutting the cover piece into three pieces. The center sill for truck mounting and the two side “wing” pieces. I attached each piece individually with Cyanoacrylate (CA) cement.
The brake reservoir ended up being the trickiest piece to mount. I tried the suggested method using a pin in the reservoir and then attaching it to the slope sheet support. I just couldn’t get it lined up. After taking a break and looking at prototype photos I decided to mount a small scrap of styrene to the inside of the sill. The brake reservoir was installed on the scrap piece with the piping on the center sill. The piping was attached from underneath with CA.
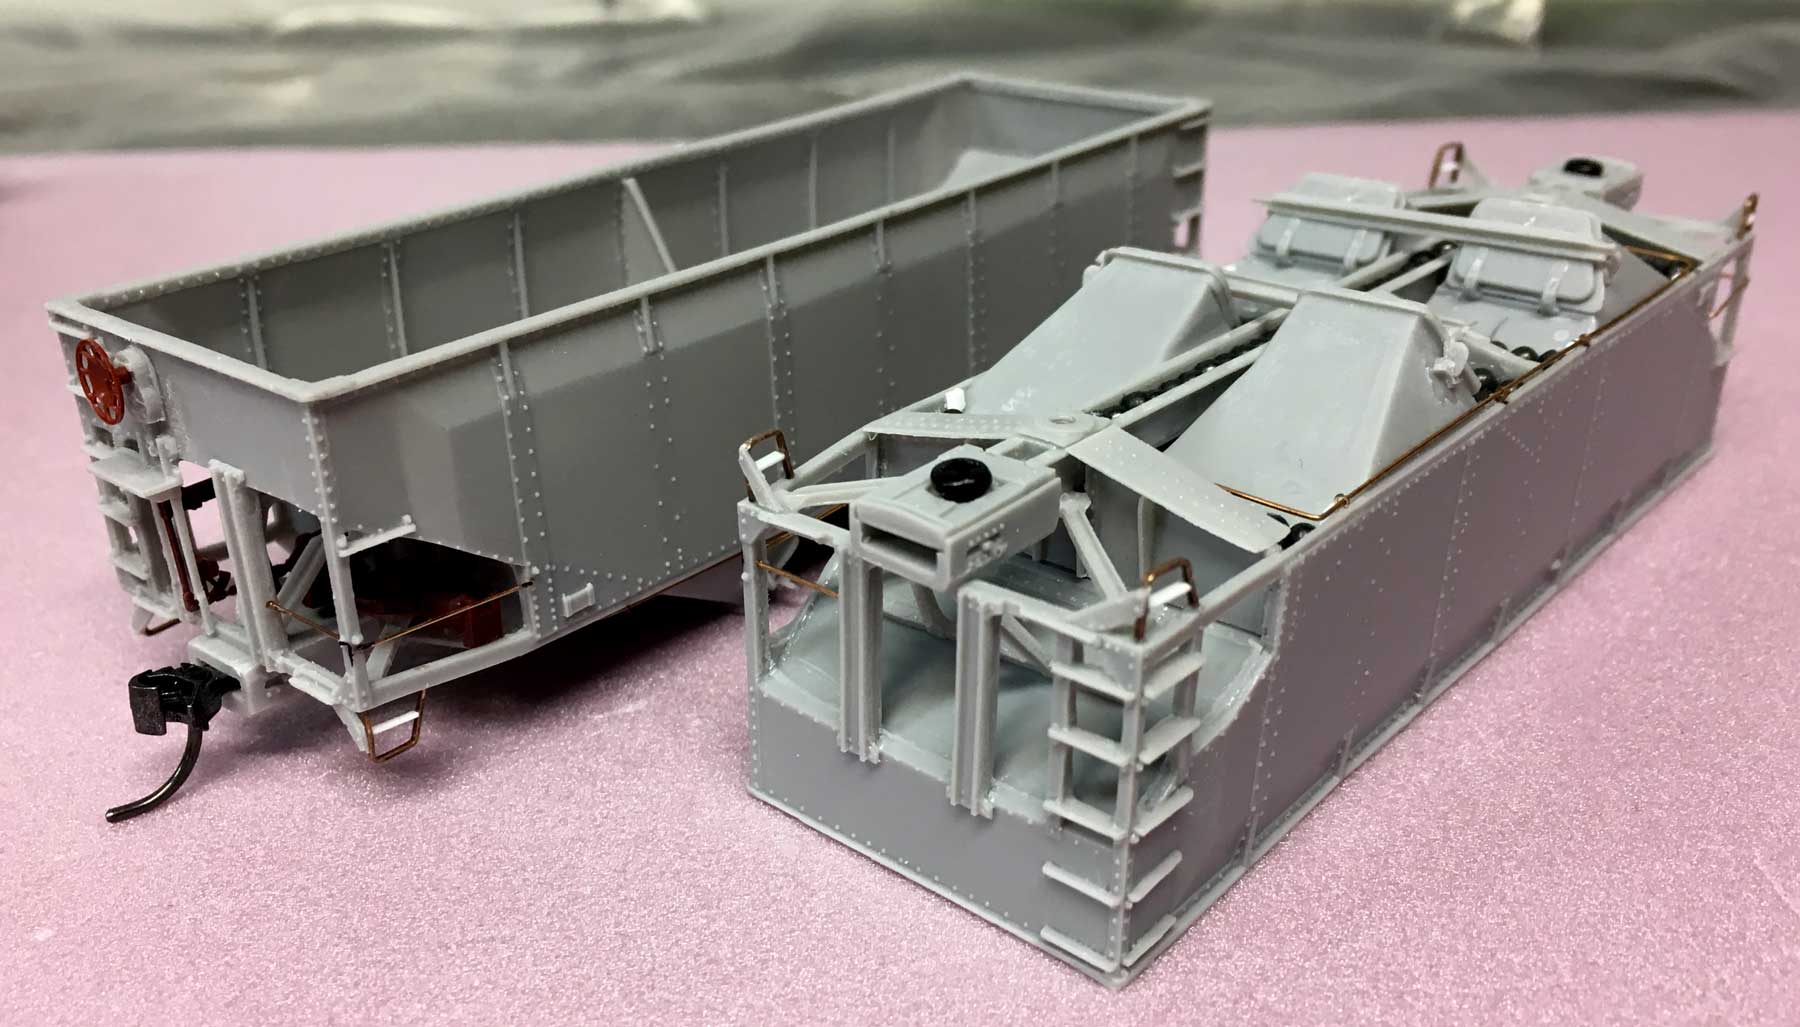
I mounted the corner horizontal hand holds a little different than the directions instead of mounting them separately. I made an L-shaped piece and inserted from the outside corner post before securing with CA. Its not 100% prototypical but you hardly notice the difference. It simplifies installation and is very durable.
The only other issue was in mounting eyelets for the train line. I recommend referencing a photo with the car right side up and marking which side the train line is mounted. I ended up mounting them on the opposite side. No big deal, I just had to mount them twice! Glad I noticed before it went to the paint shop.
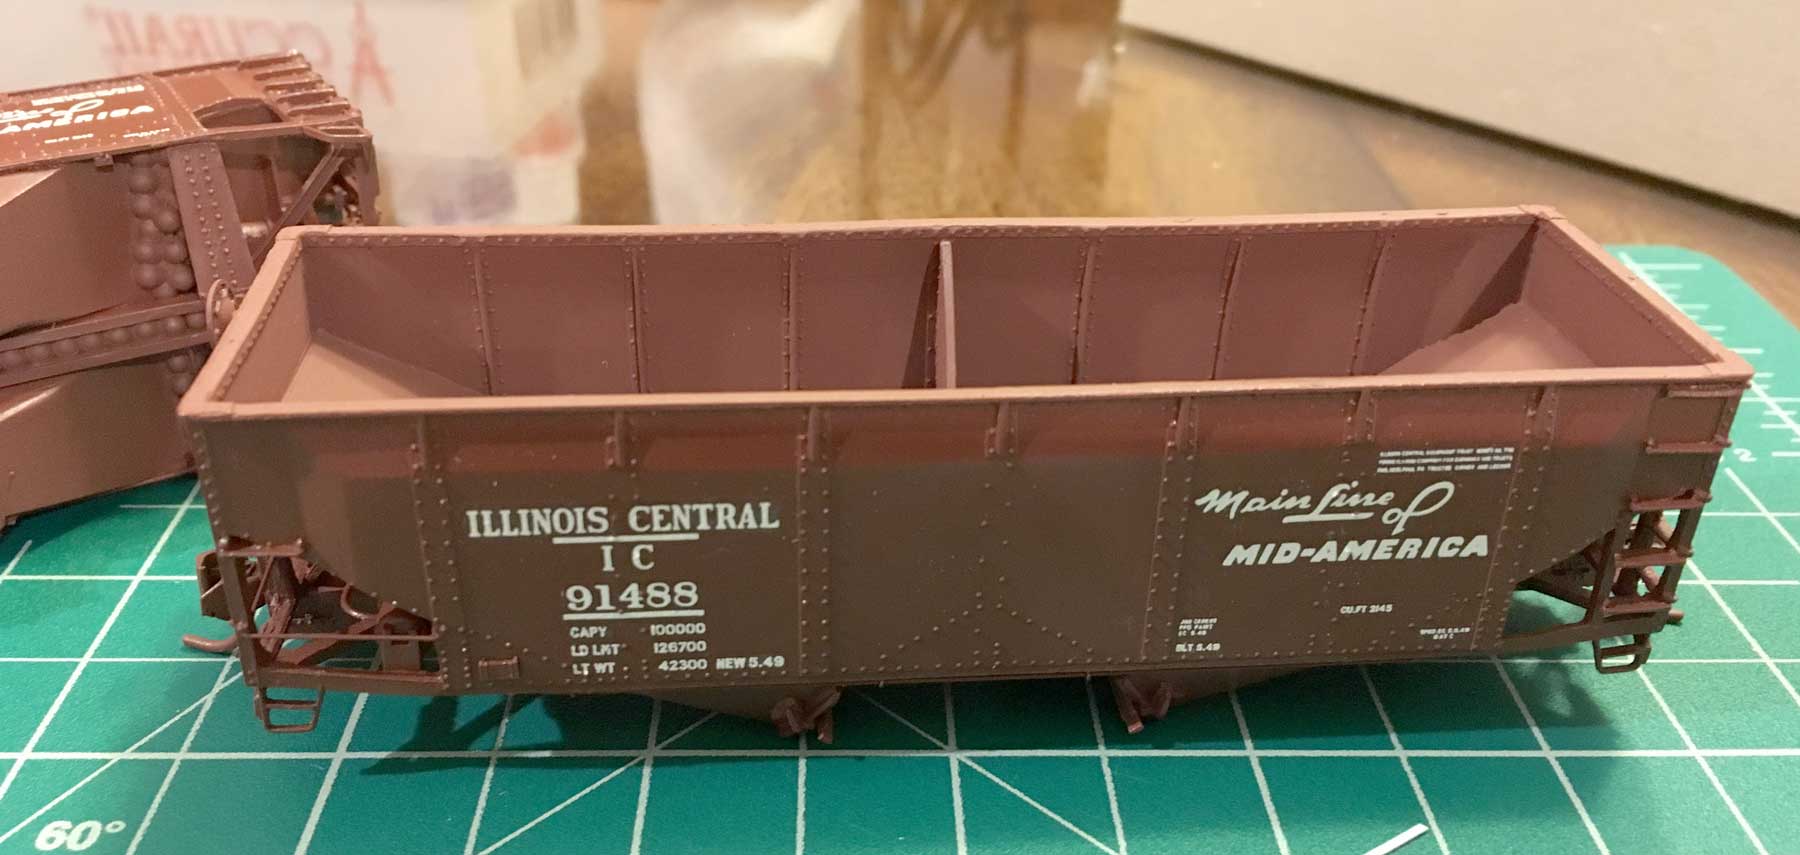
I painted the hoppers with two coats of Polly Scale red oxide. After painting I decided to try a new (to me) method of clear coat using Pledge Floor Care Multi Surface Finish (formerly Future) sprayed with an airbrush at 28 psi. I like that its read to spray. A word of caution is it is easy to spray too much and get runs. However, a corner of a paper towel can soak up the runs. This acrylic finish provided a nice smooth surface for decals. After decaling I coated with one more coat of Pledge to seal the decals then used Acrylics Vallejo flat thinned slightly for a dull flat coat.
On my layout, these hoppers would have been in service about two years since new. As they are due for their first trip to the back shop soon, they needed to be grimy from hauling black diamonds. Rust would be minimal. Weathering was done primarily with oil washes and Pan Pastels.
I start by thinning burnt umber oil paint and slopping it on the sides of the car. I then used a clean brush soaked in turpentine to remove the excess paint until I have the desired amount of wash in the cracks and crevices. The nice thing about oil is it has a long drying time and stays workable longer then acrylics.
After the oil wash, I dull coated again to give the Pan Pastels some tooth to stick to the car. This is the key to using Pan Pastels as they do not stick to gloss surfaces. I used brownish tones to simulate road grime on the lower portions of the car and I use the many red tones to take down the brightness of the red oxide and lettering.
The hopper interiors received a slopped-on wash of burnt umber. After that was dry, Pan Pastels were used to apply rust tones to sides and corners and grays to slope sheets to simulate the scraped sheet metal from coal loading and unloading.

Overall, I enjoyed building these hopper kits. I learned a ton about these series of hoppers simply doing the research for which configuration I wanted to build. It was a challenging build but not hard. Take your time, test fit often, and check your work against prototype photos. I suggest anyone who wants to learn a new skill set, or take your modeling to a next level, should give a resin car kit a try. Thanks to Resin Car Works for making such a great kit!
We thank Matt Smith for sharing his build notes on the Resin Car Works Illinois Central Enterprise hoppers. These kits are currently not available but may be found at train shows and swap meets.
Questions and comments can be posted below. Please follow the instructions so your comment can be posted. All comments are reviewed and approved before they appear. To subscribe to this blog, enter your info for a comment and check the last box to notify of new posts by email. Share the blog link with other model railroaders.
Matt you produced some very fine hoppers. Hope to see more of your work in the future. Thanks for sharing.
Matt,
Very nice job on those hoppers. Thank you for sharing your techniques. I have one of these to build and I will use your techniques as a guide to my build.
Jim Kubanick
Morgantown WV
Super!! Just Super .
Matt,
Great job of assembly and paint. The weathering is very believable. Thanks for sharing your build process.
George Toman
Thanks, Matt, (and RCW) for the notes and suggestions. I model a coal line set in southwestern Virginia in 1959, with close to a 100 hoppers. So, Matt’s level of detail and care would not be possible, but his success might well nudge me to trying what I’ve never done before: build a resin kit.
Roger Sekera