George Toman has kept busy with another freight car project. Here’s his latest work.
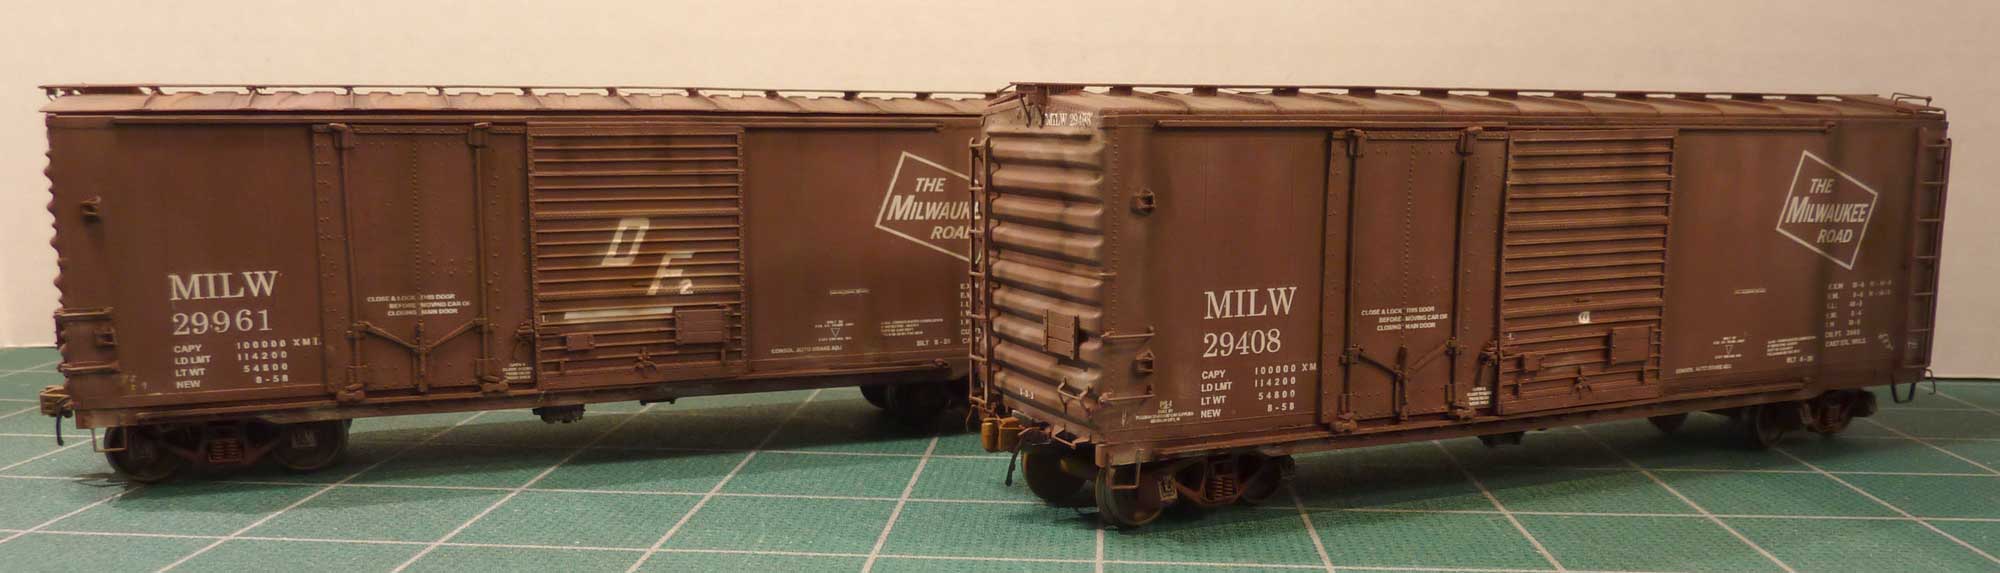
This project started with the intent of building a Milwaukee Road automobile box car that I had seen on display by Chad Boas at the 2015 Collinsville RPM meet. Little did I know at the time that there were at least four versions of these cars. I chose to build a PS-1 and a GATC version. Here’s a look at both prototypes, with the PS-1 on the left and the GATC car on the right.
According to the Morning Sun Color Guide The Milwaukee Road Color Guide to Freight Equipment Vol 2, the Pullman Standard car was built in 1958 and numbered 29000 to 29399. Here’s a look at the Pullman-Standard car.
The General American car was also built in 1958 and fell into the 29500-29999 number series. My model ended up with a DF2 logo, dating it to 1965. Here’s a look at the General American prototype.

After ordering the parts from Chad, an Intermountain PS-1, and a Branchline car I thought I was ready to go. I started with the research and found I was lacking info for the underframes. We will return to the underframes in a bit. By the way, Atlas now owns the former Branchline rolling stock and they offer the 6-foot door undecorated kit. It is listed as SKU: 84337504140-3, for 22.95.

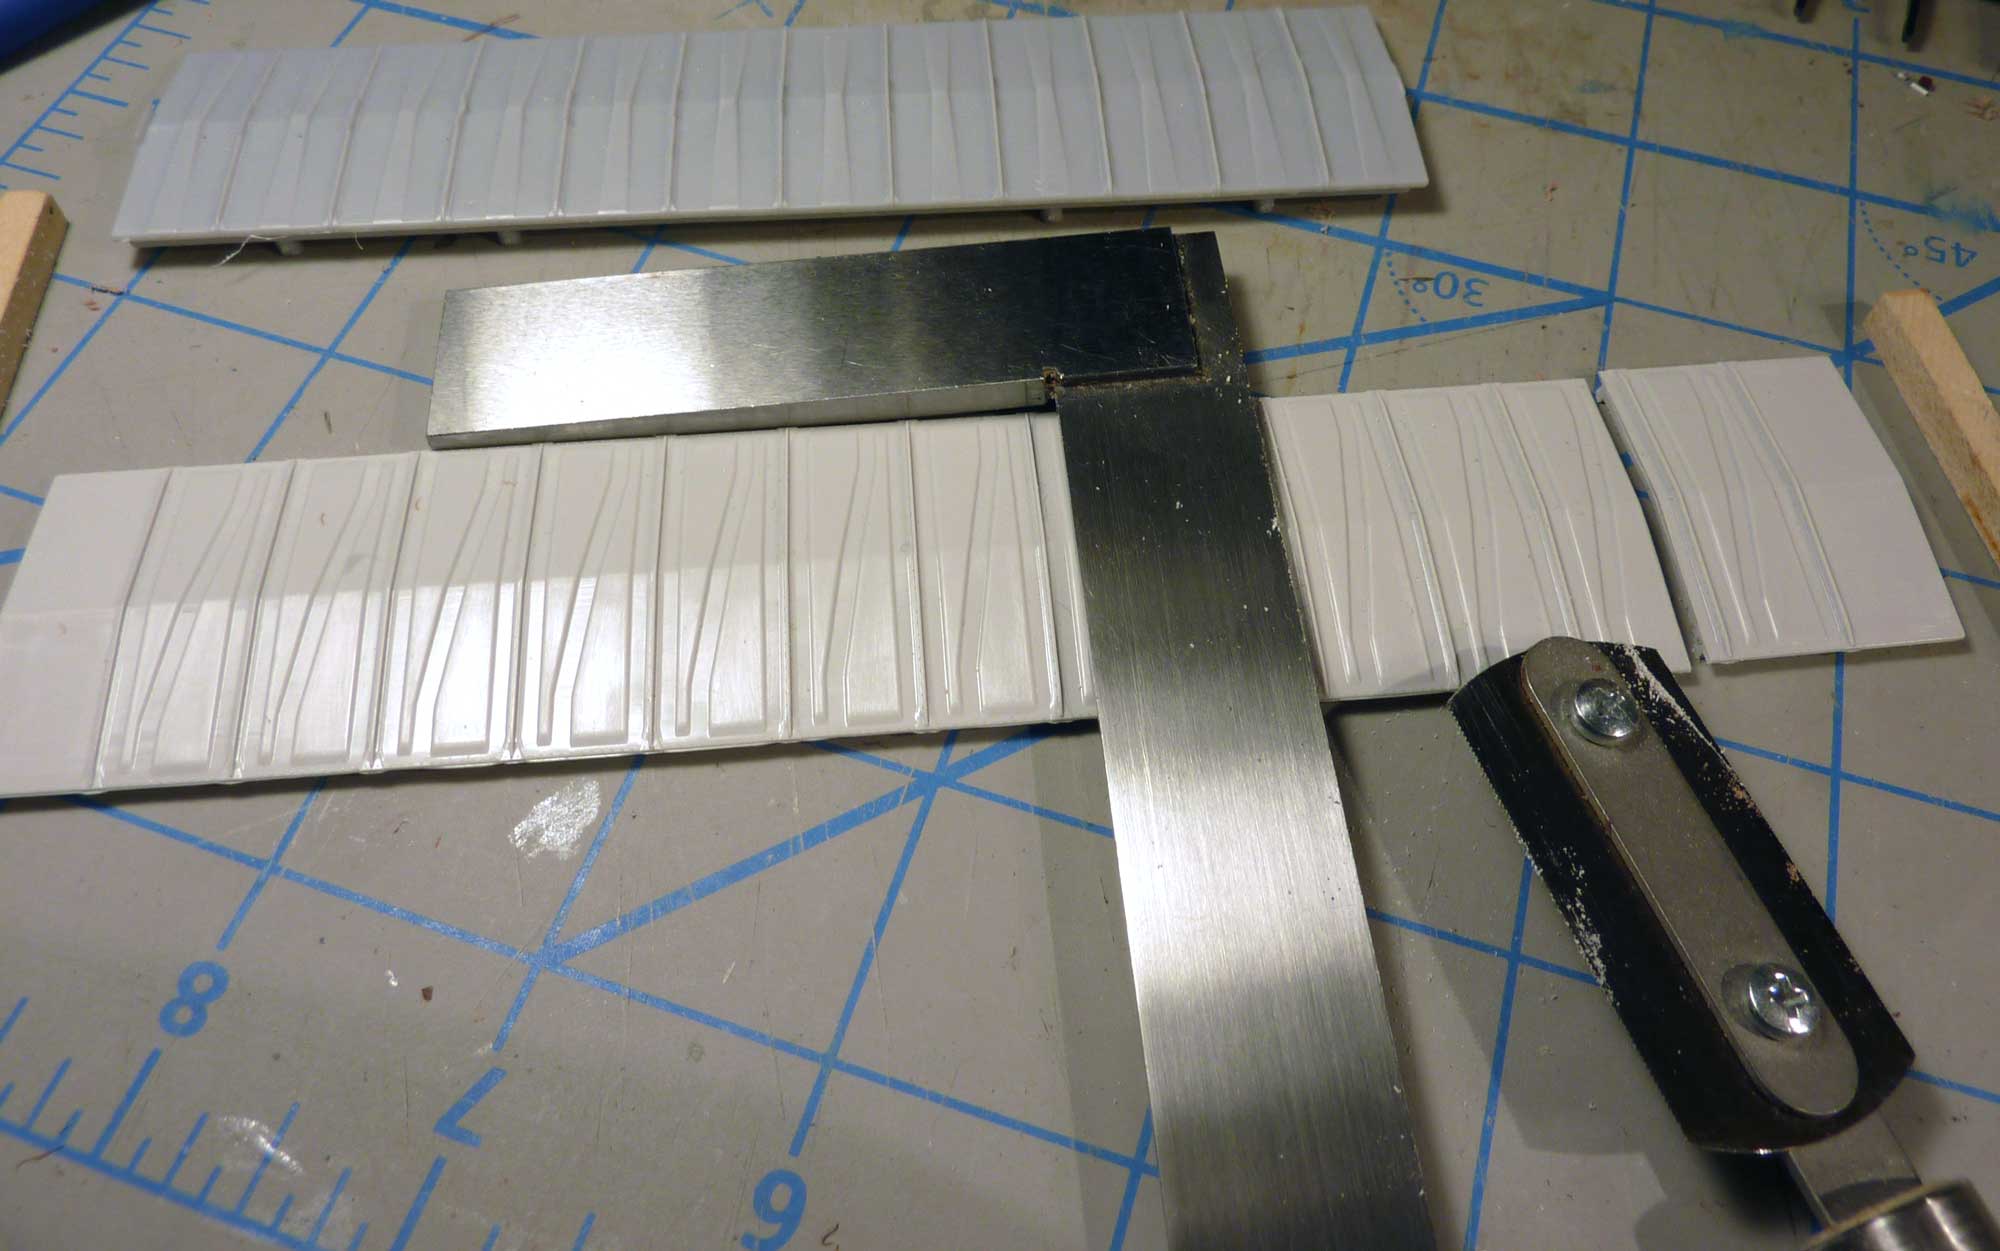
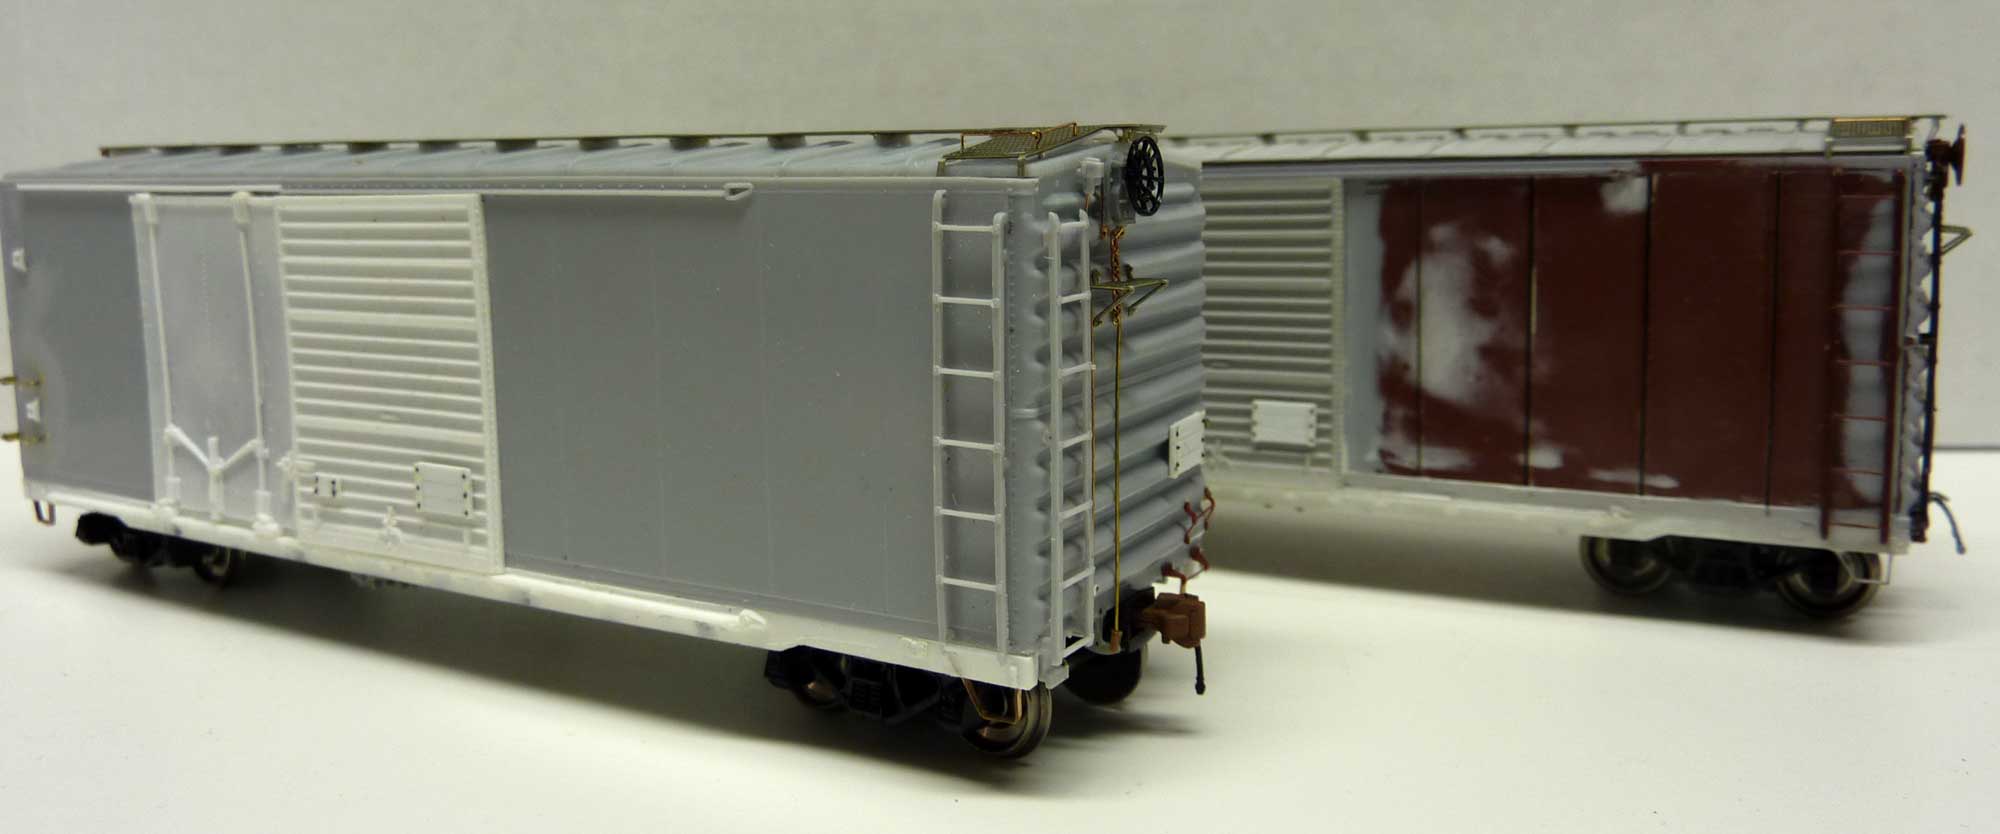
The replacement doors were placed on the model to check the fit.
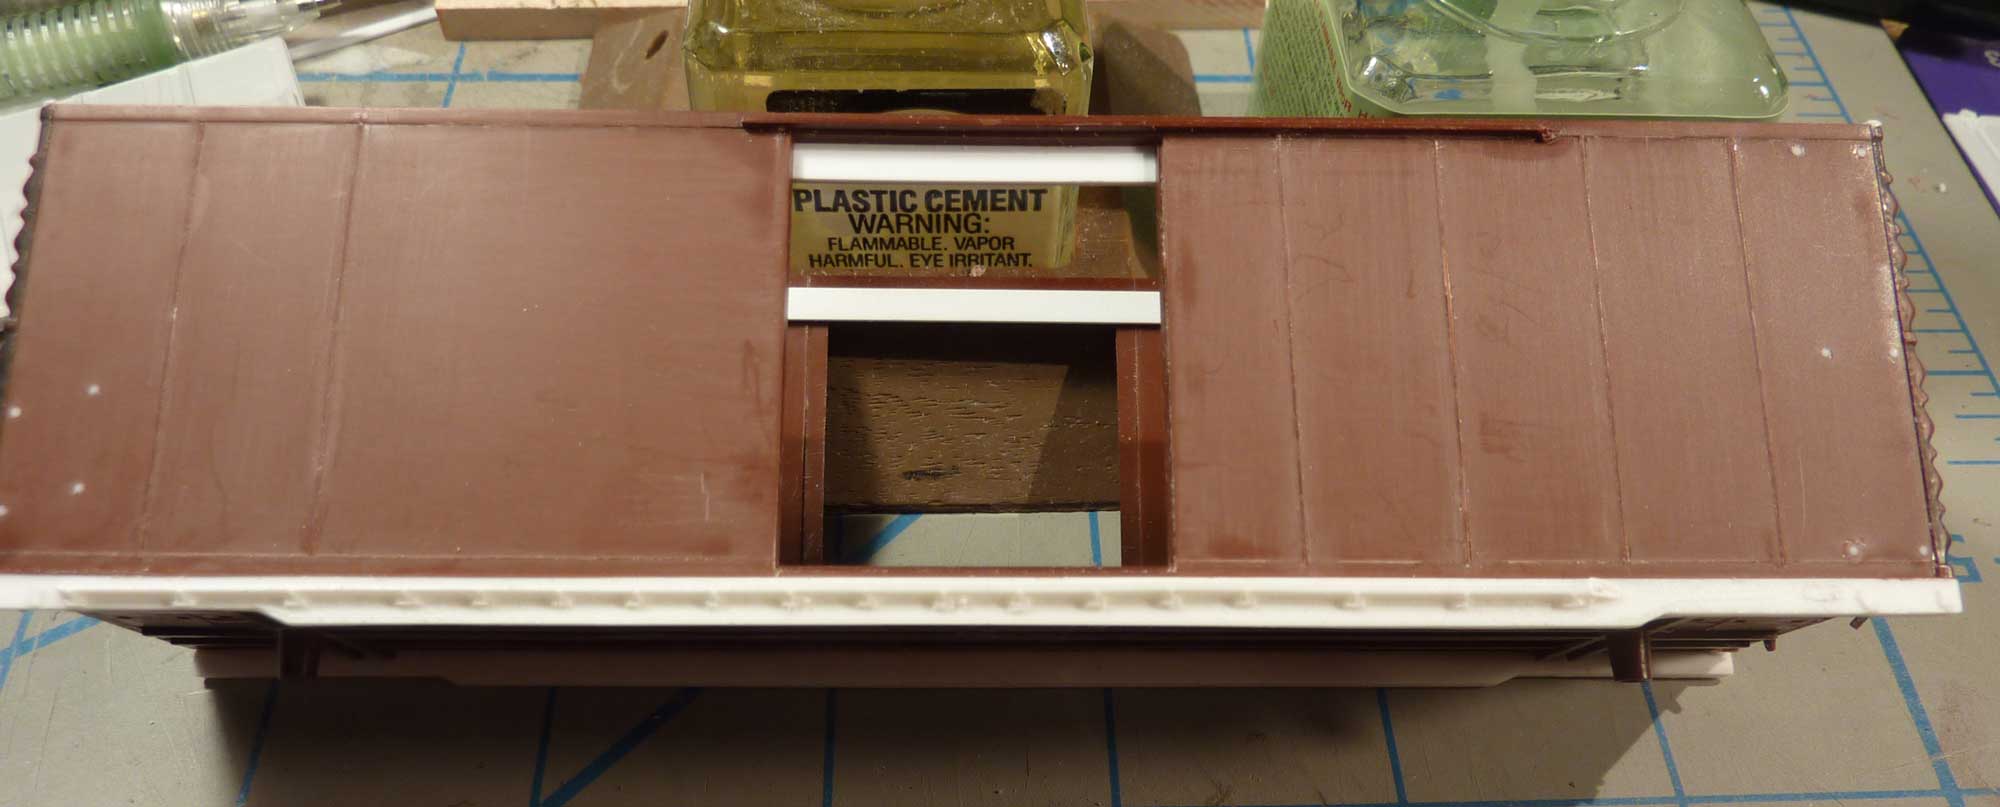
The sides of both cars had the sills cut off to allow for the installation of the proper resin side sills provided with the Chad Boas parts. Resin doors were then installed and the upper door track extended with styrene strip.
The styrene strips seen in the doorway in the above photo help support the Moloco roof. The roof should not sit flush on the car sides, so the styrene raises the roof to create a slight gap of about 0.010-inch between the roof and side. This gap extends the length of the car.
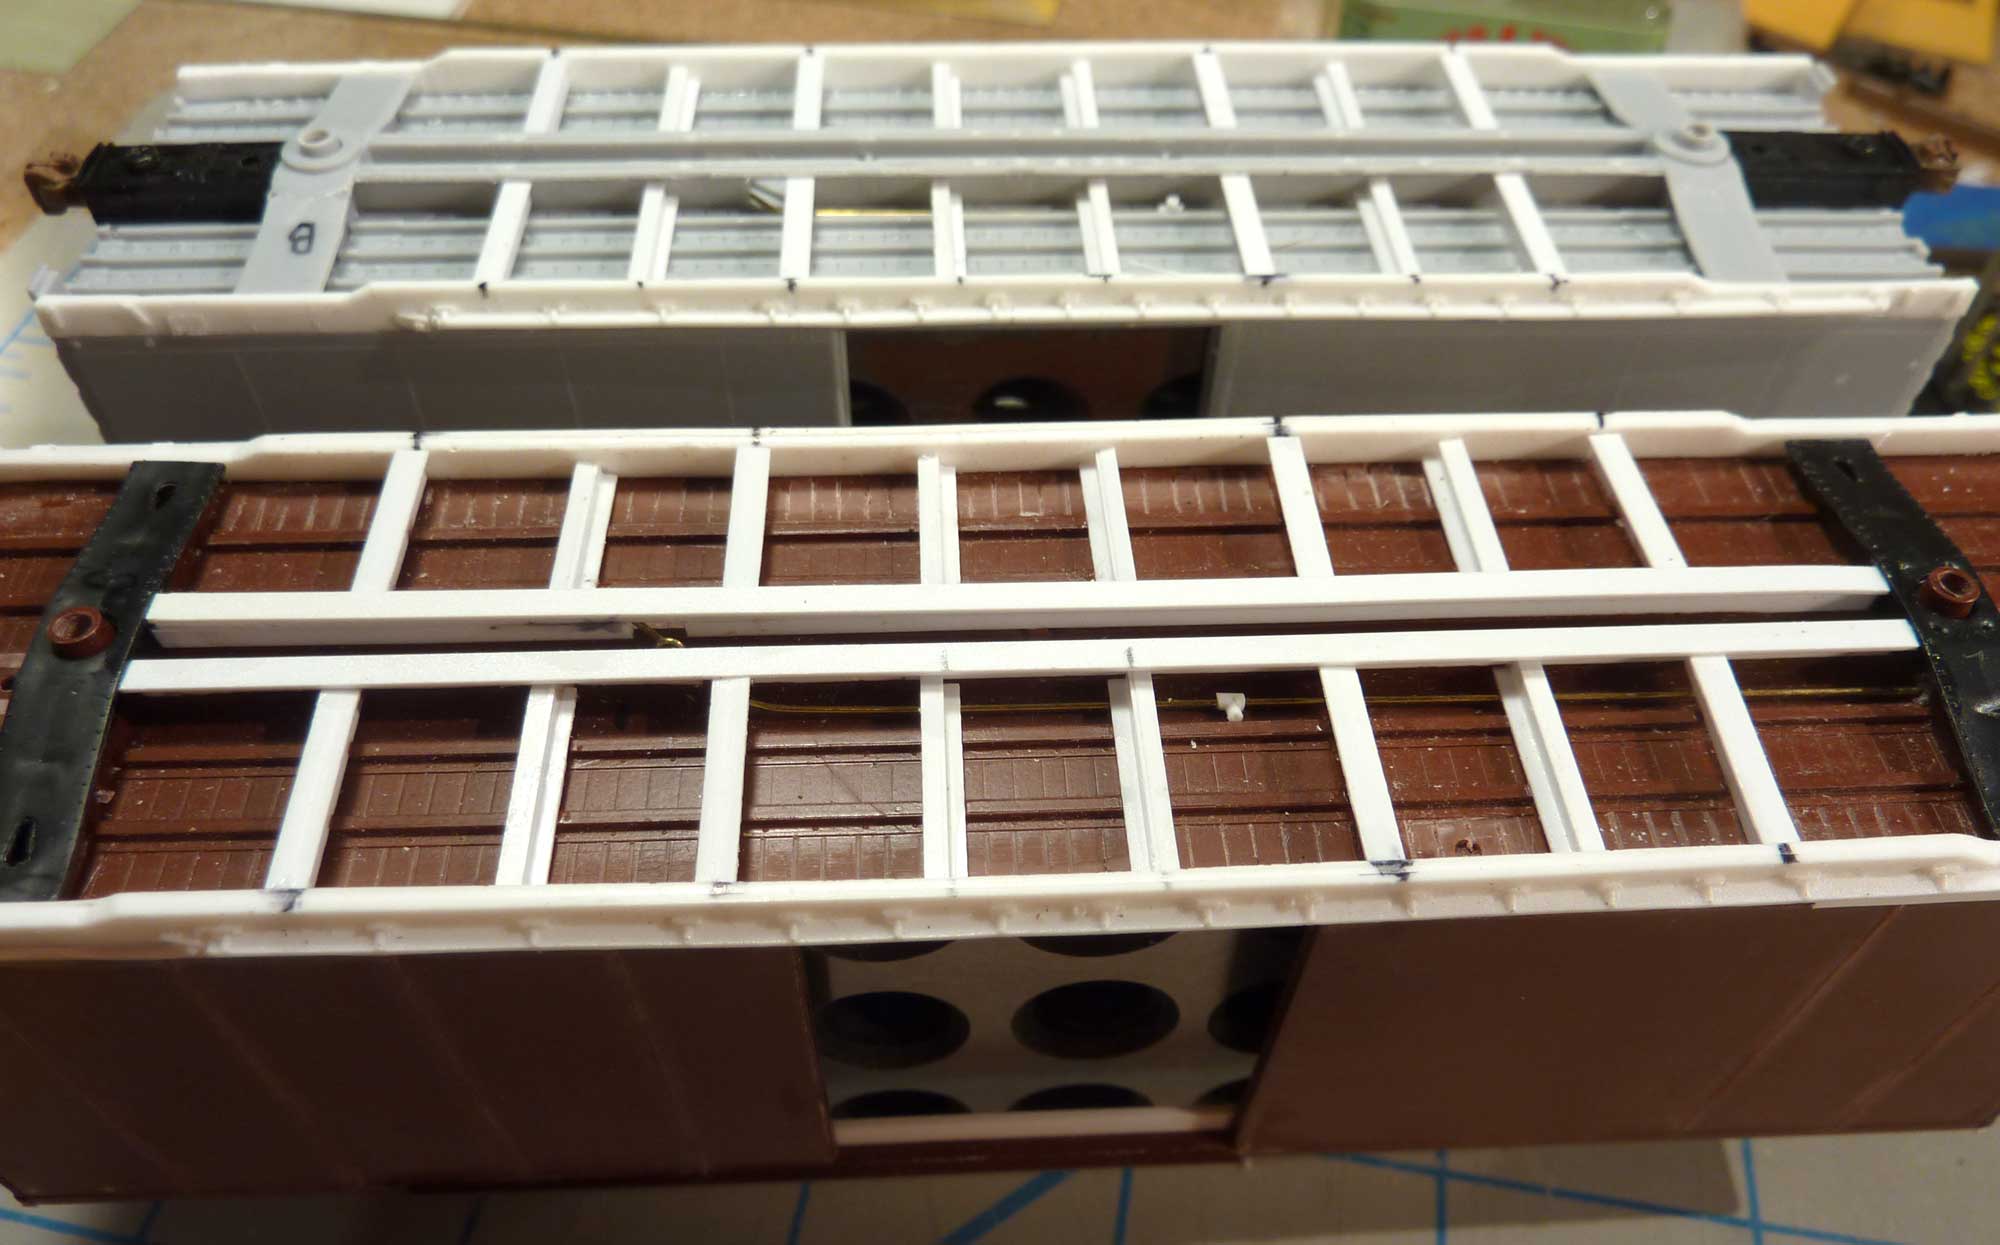
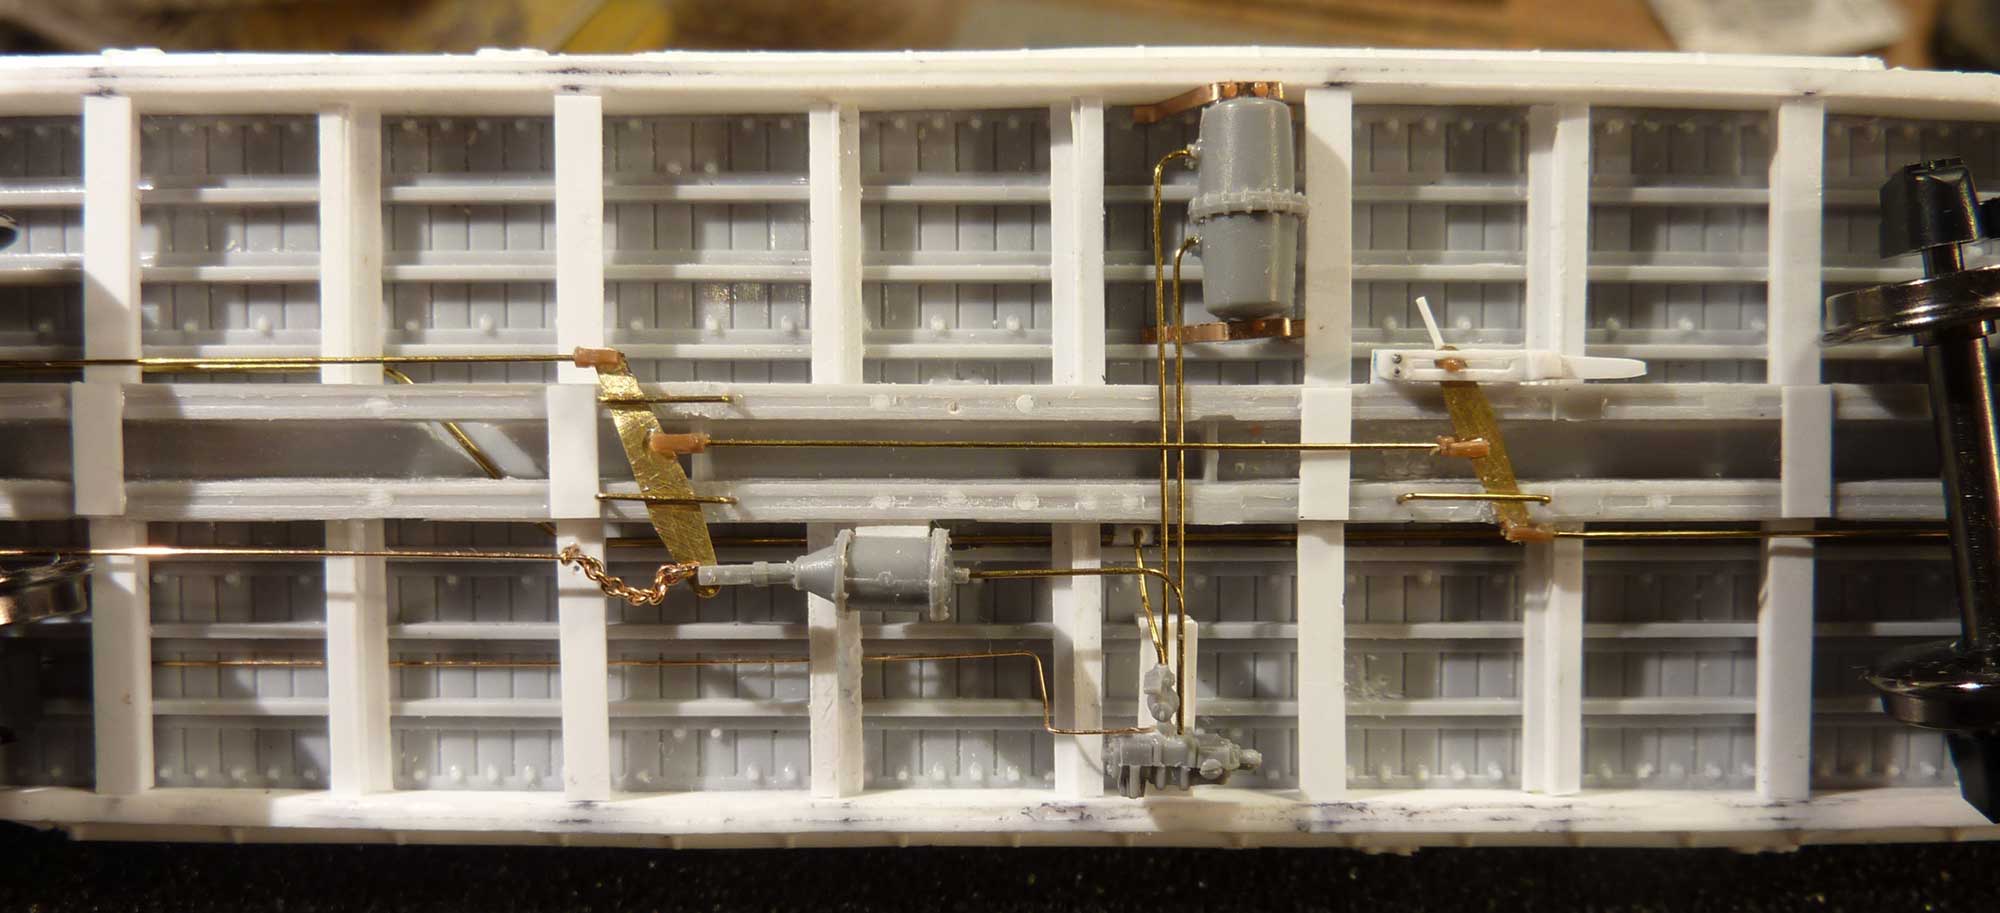
With the doors and side sill in place, it was time to tackle the underframes. Paul Krueger from the Cascade Rail Foundation came through with a General Arrangement Drawing for these cars. Both the Branchline and Intermountain underframes were incorrect for these cars, which meant new underframes needed to be made. I used Evergreen styrene to build new ones as seen in the photos.
The GATC version uses a scratch built universal slack adjustor and the PS-1 version has a scratch built Royal F Type slack adjustor. Tichy Train Group AB brake sets were used for both underframes.
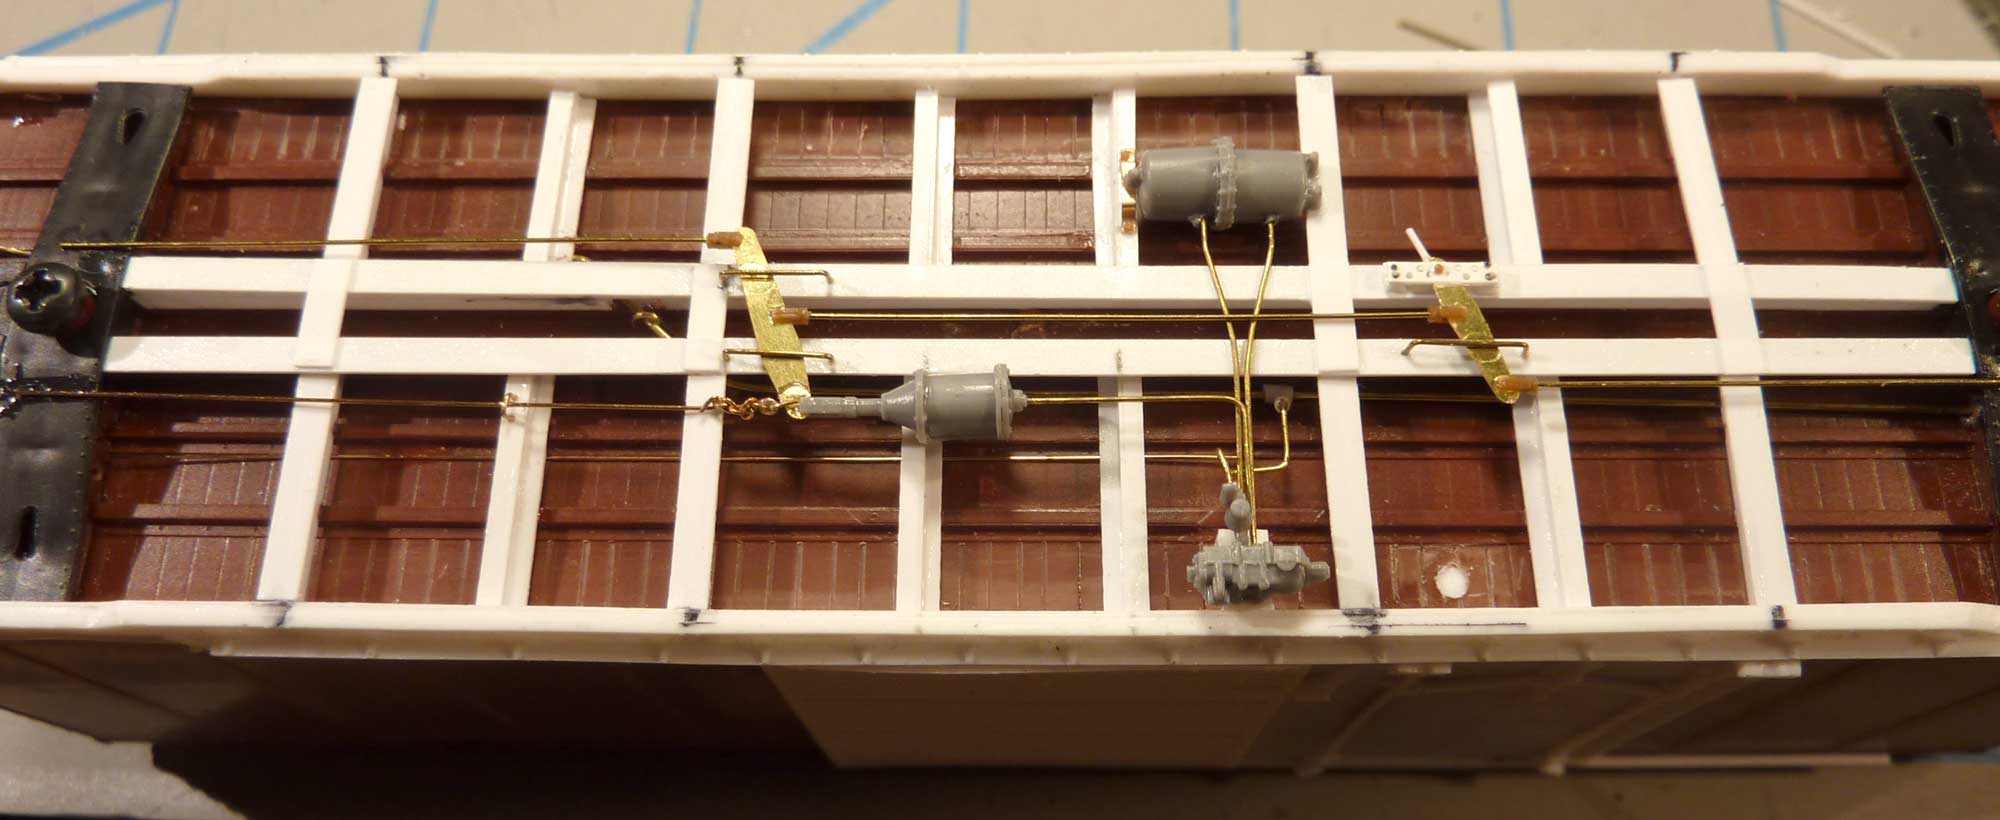
The Moloco air hoses were attached by making a bracket from 0.003-inch brass and drilling a clearance hole in the end for the air hose (0.019-inch).
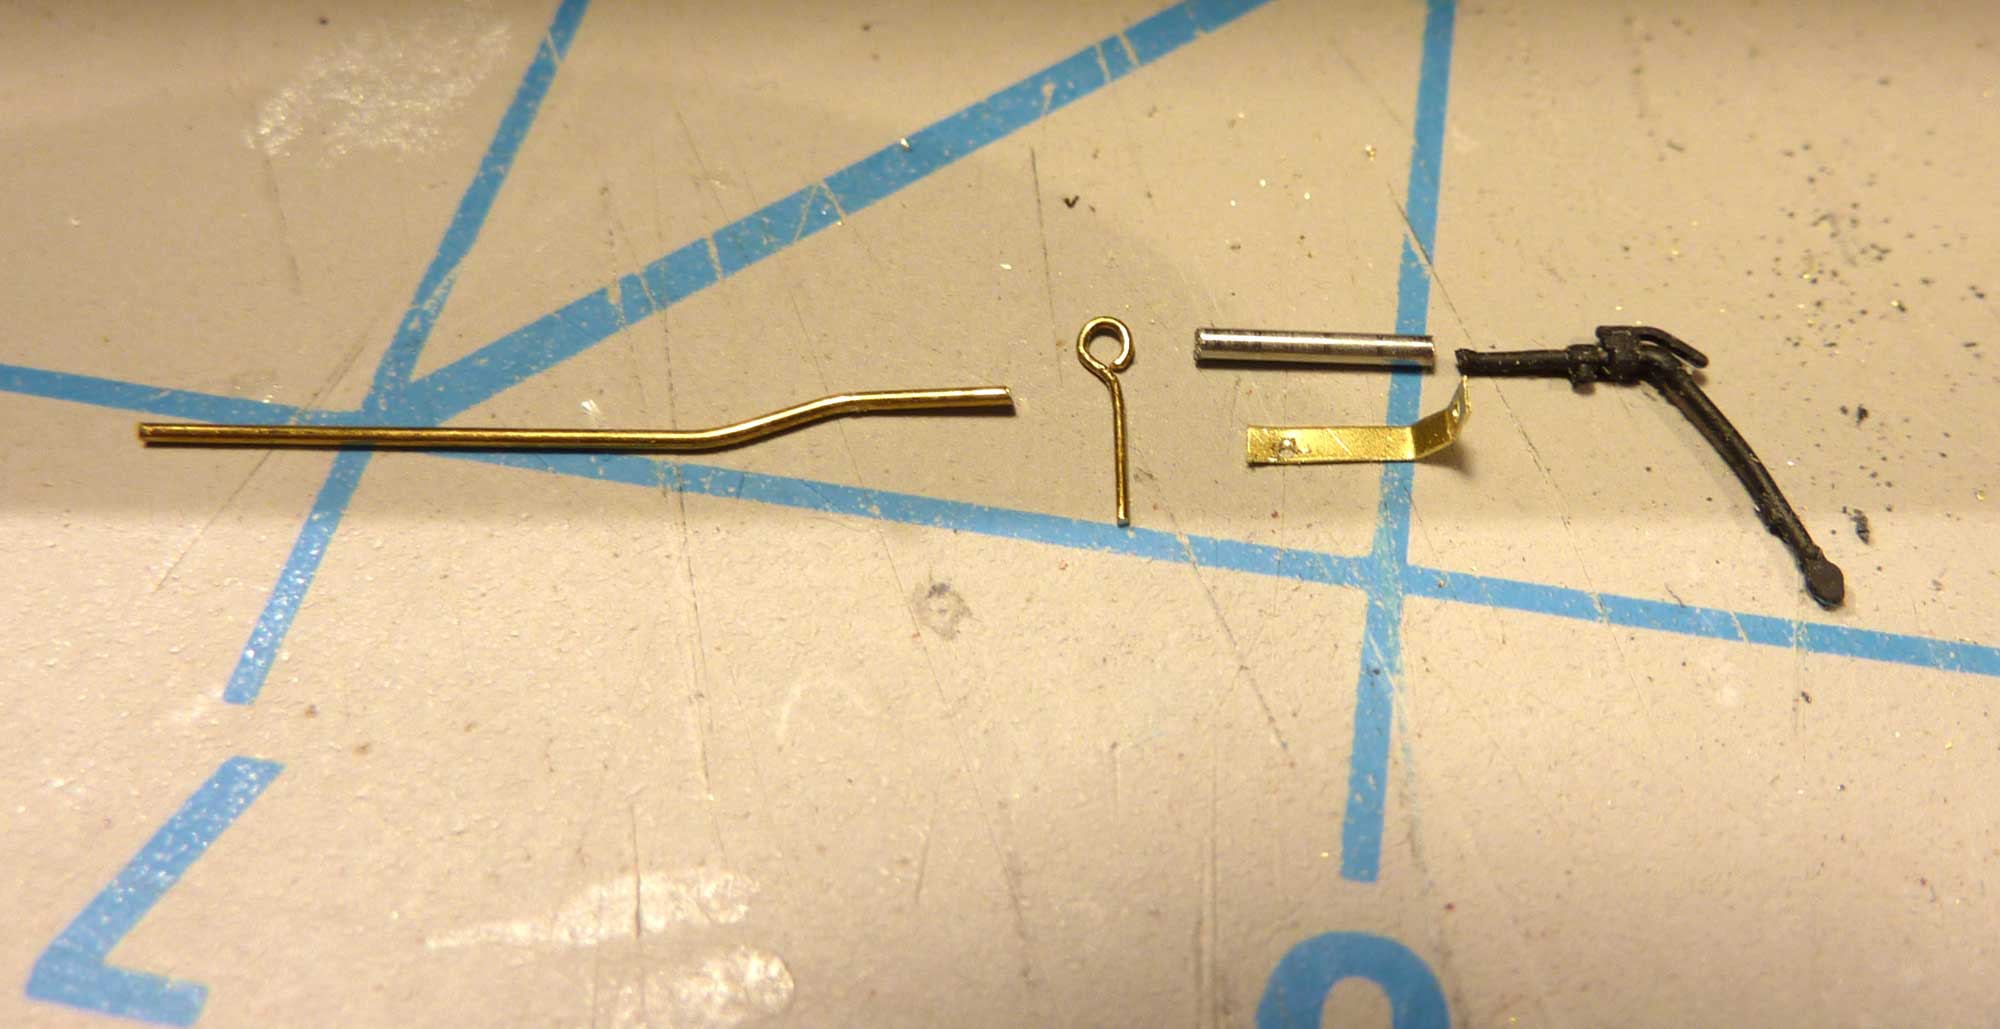
I used a short length of Ngineering 0.025-inch thinwall tubing that fits the end of the air hose on one end and 0.019-inch brass brake line on the other end.
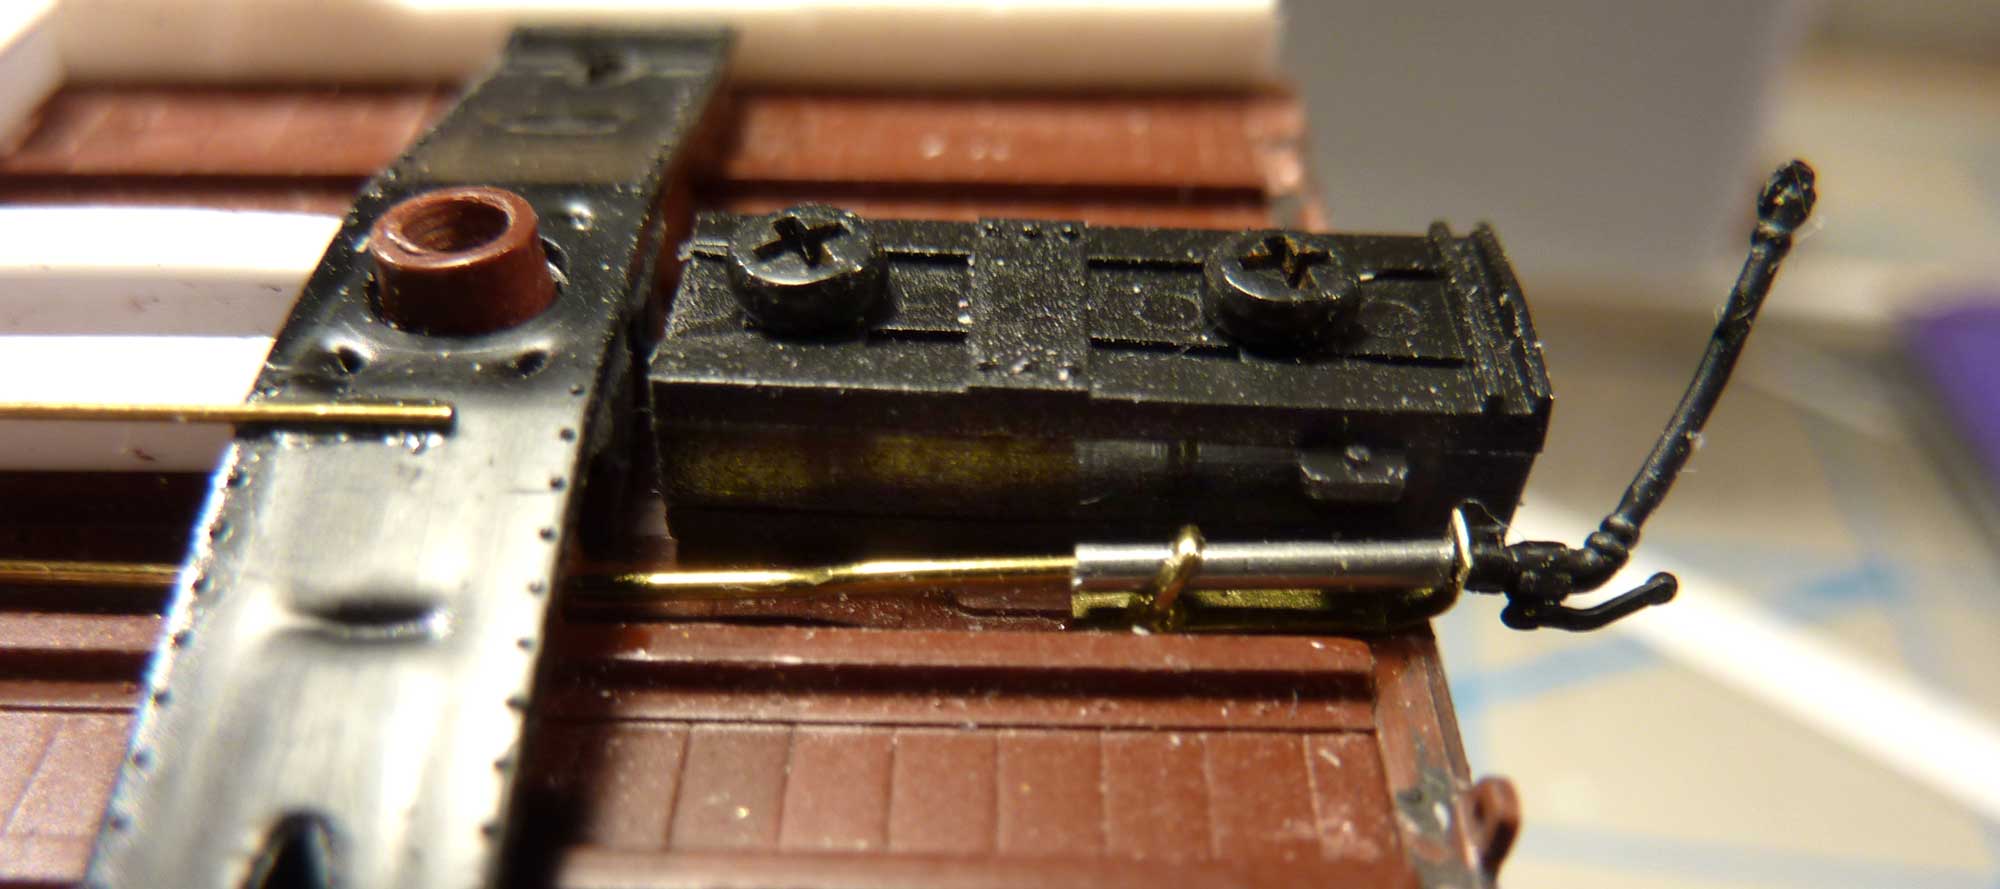
I make an eyelet from 0.010-inch brass about 0.025-inch diameter and put the tubing thru it and insert it into the floor.
I also replaced the roof on the GATC version with a Diagonal Panel overhanging one from Moloco that was shortened to 40-foot. A JLC Micro Saw was used to cut out a section of the Moloco roof. This saw produced such a fine cut that almost no sanding was required to make the splice.
The GATC version also required the rivets on the sides to be removed. I used Archer Transfers Resin Panel Lines decals (set AR88013) to represent the welded seams, as suggested by Tom Madden.
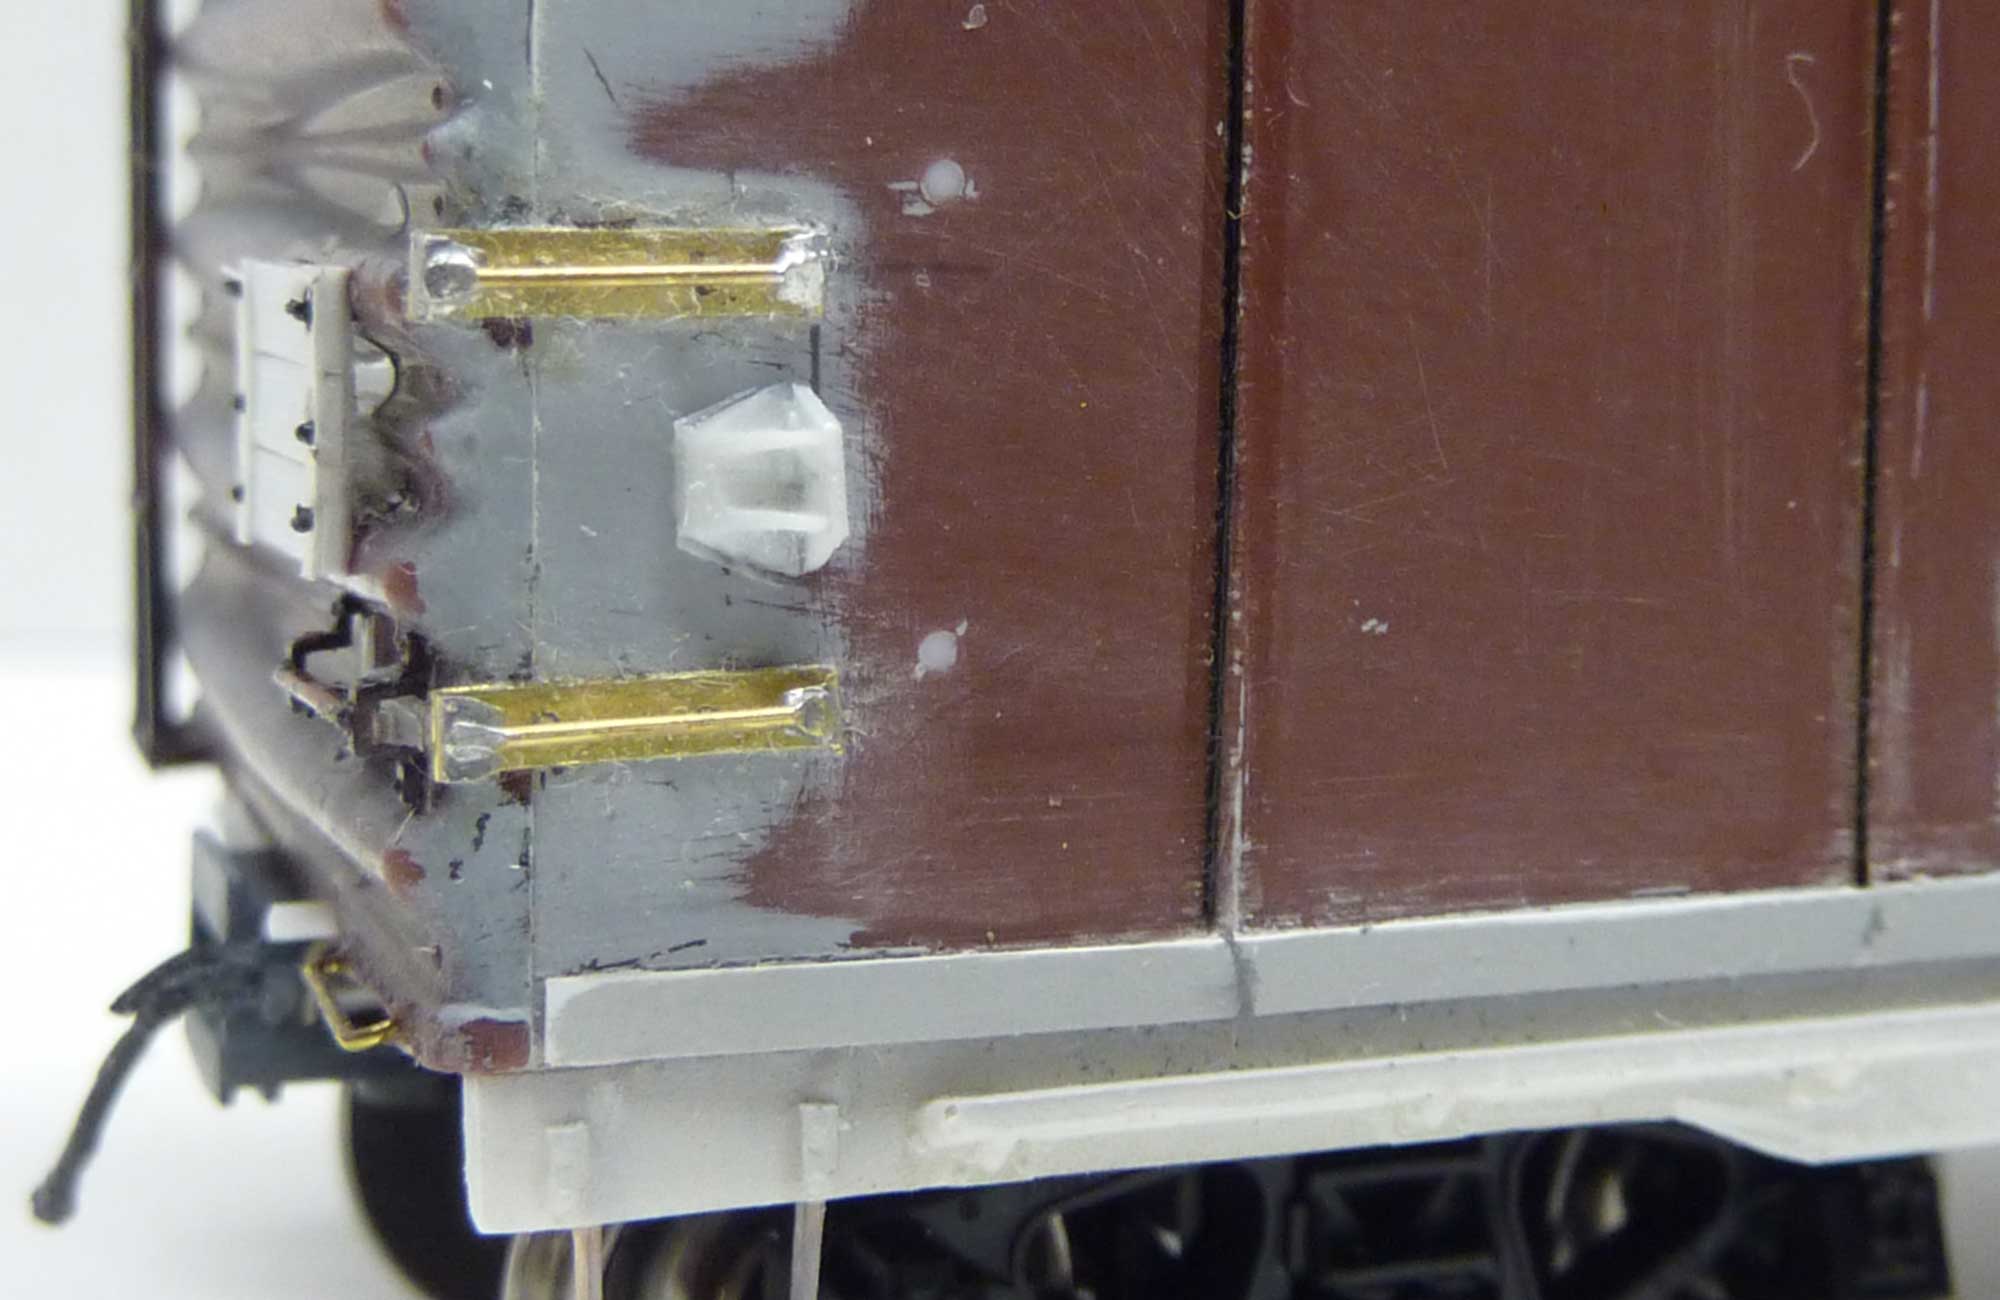
The Milwaukee Road used unique grabs on the left end of the sides. These were different for both the PS-1 and GATC versions. I fashioned these out of 0.003-inch brass cut to 0.060-inch and bent into a Z-shape for the PS-1 and sort of a U-shape for the GATC car. Rungs were fashioned from 0.012-inch brass and had the ends smashed to form a flat spot and then soldered to the 0.003 x 0.060-inch shim brackets. The GATC car is seen in the above image.

On the PS-1 version, Tichy bolt detail was cut off of their ladder rungs and glued per the prototype above the grab iron on the right end. If you look closely you will see that the grab irons actually extend over the end of the car as per the prototype. The GATC version also uses 0.010-inch brass pins for mounting to simulate the mounting.
The tack boards were built from 0.005-inch styrene and shaved Athearn rivets, a method I picked up from Bill Welch in his Xxtreme Modeling presentation. Also the stock ladders on both cars had the stiles thinned a bit as well as the rungs to approximate 0.011~0.012-inch thickness by careful filing with a #6 Swiss Pattern File.
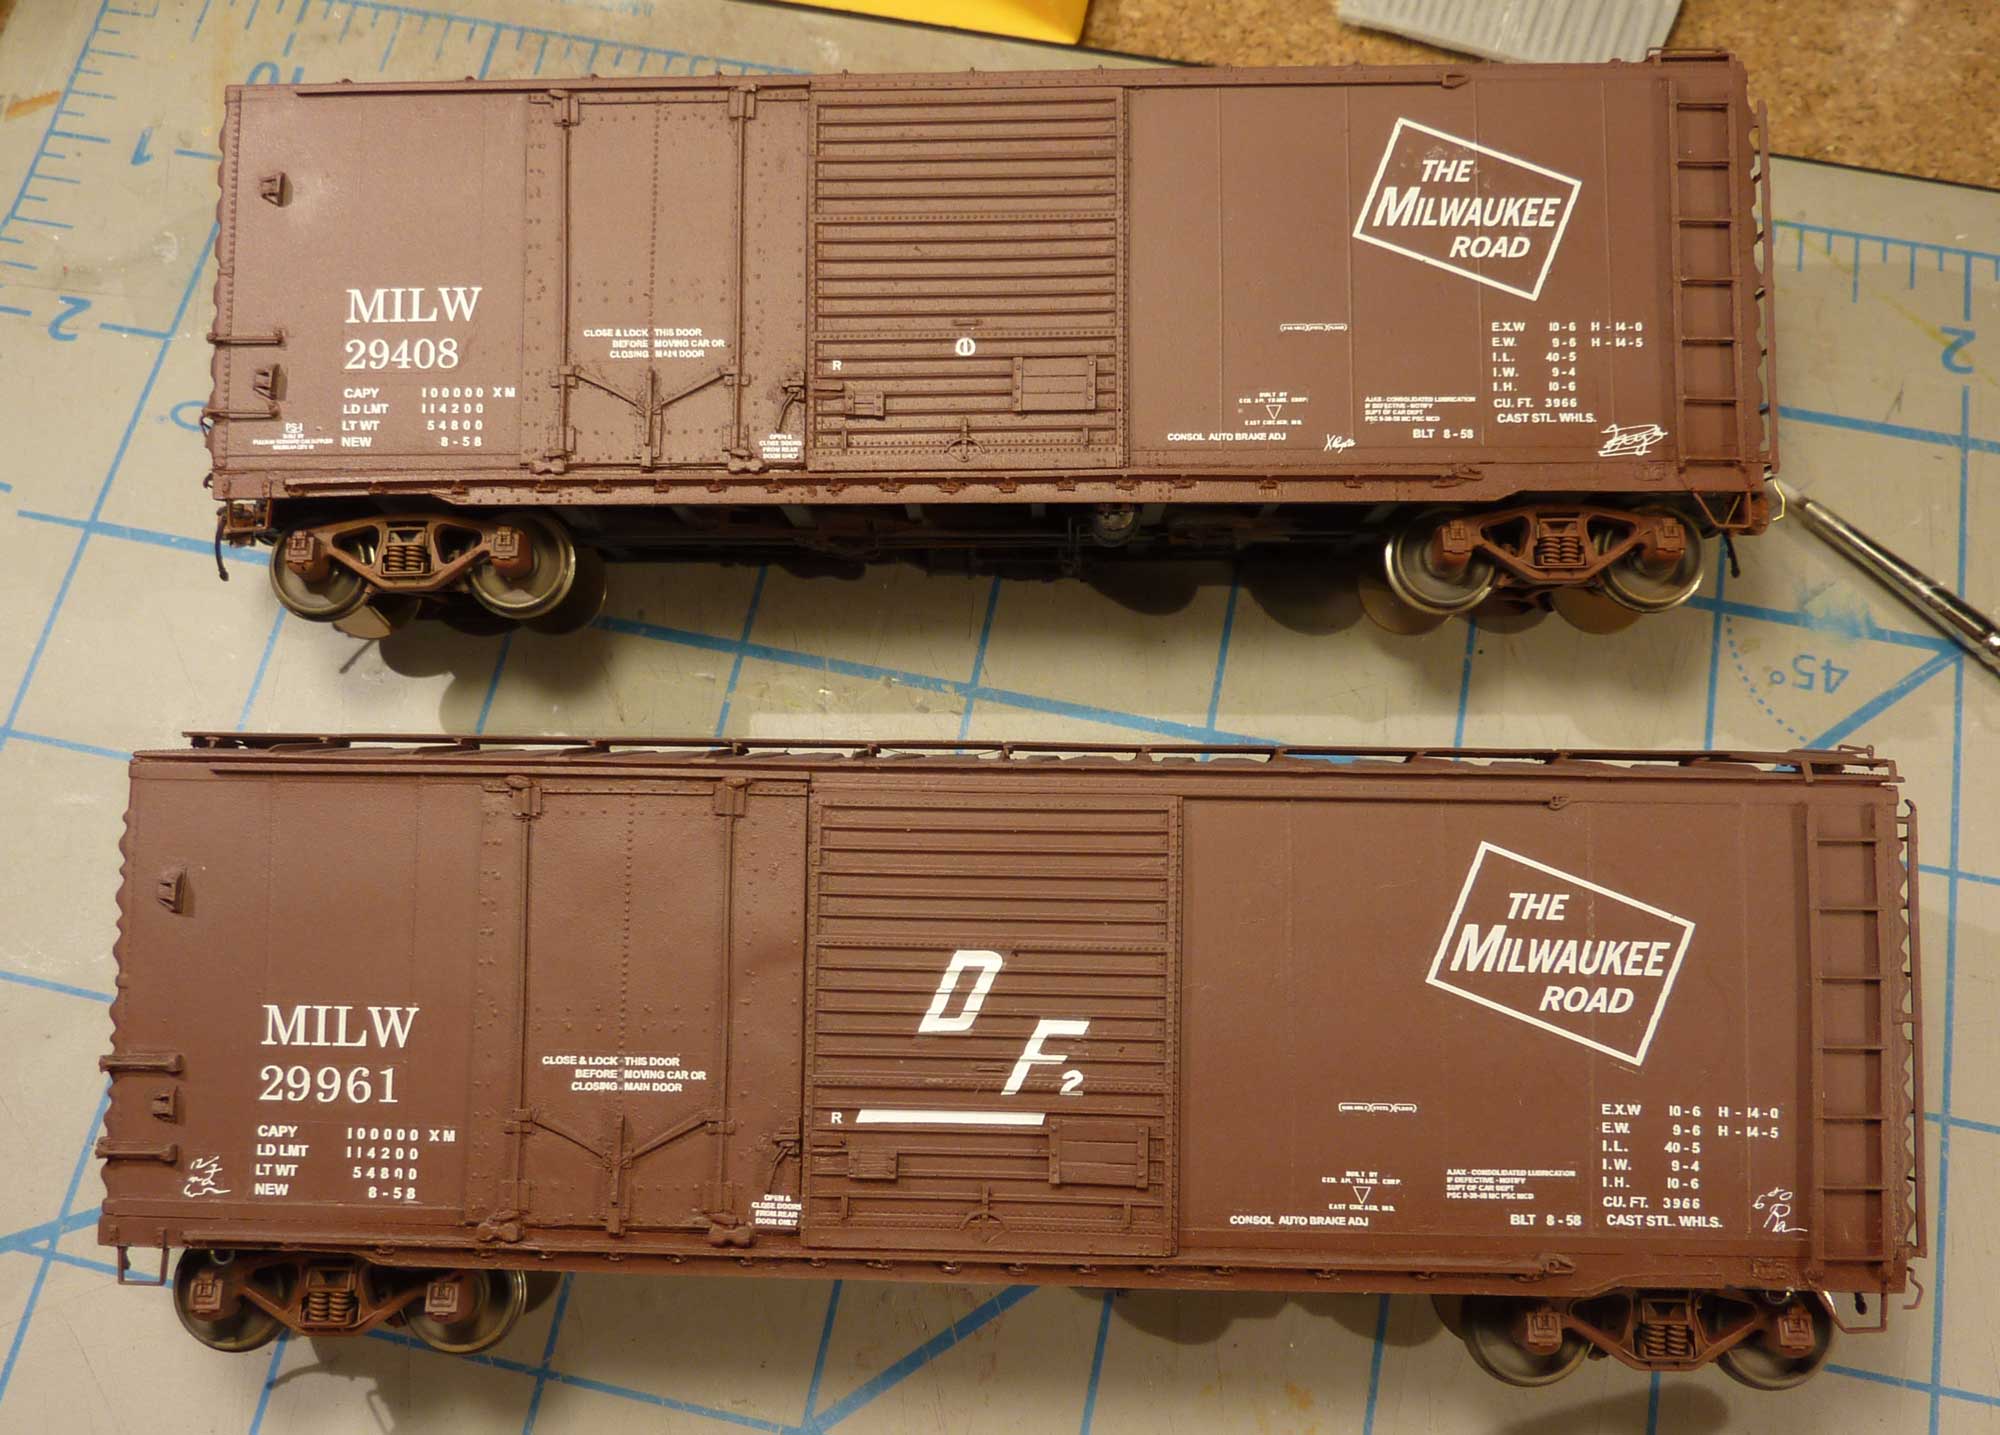
The models were cleaned and primed with Model Master Gray Primer then painted with Tru-Color Milwaukee Road Freight Car Red. I used a Grex airbrush with a 0.5mm tip. Decals were applied and the model coated with Model Masters Flat Clear.
This was a fun project that took me into new directions with the fabrication of new underframes, making scale brass side grabs and brackets and soldering them together. There is also another variation of the PS-1 that is in the works but requires different plug doors.
Parts List
Chad Boas 40-foot Combo Door Kit Milwaukee Road
InterMountain PS-1 8-foot Door
Branchline AAR 8-foot Door (now owned by Atlas)
Moloco Diagonal Panel Roof with overhang
Moloco rubber air hoses
Yarmouth Model Works 40-foot Apex Tri-Lock running board
Yarmouth Model Works Brake Levers
Tichy Train Group AB Brake Set
Tahoe Model Works Barber S2 Tracks with IM code 88 wheels
Sergent Engineering couplers with scale draft gear
Kadee Quality Products Universal brake wheel (GATC)
Kadee Ajax brake wheel (PS-1)
Model Masters gray primer and flat clear coat
Tru-Color Milwaukee Road Freight Car Red
Mask Island Decals
Curt Fortenberry Decal DF2 from high cube sheet (GATC)
Speedwitch Media chalk mark decals
Sunshine decals chalk marks
Evergreen Scale Models styrene
Detail Associates Brass Wire – 0.010, 0.012, 0.015, and 0.019-inch diameters
Ngineering 0.025-inch stainless steel tubing
K&S Precision Metals 0.003-inch Shim Brass
Pan Pastels for weathering
Archer Transfers Panel Lines decals – set AR88013
A-Line 40 links per inch chain
A-Line Steps (reformed and thinned with file)
Final Finishing

Weathering these cars was a concern. As there was so much white lettering, I did not want to obliterate or darken it up too much. I decided on using primarily Pan Pastels for the side to control where and how much to apply and avoid the lettering and logo. My first step was to use Burnt Sienna Tint to lighten or slightly fade the Boxcar Red sides. I used almost a dry brush technique with a soft brush to control the amount of fade. By this I mean, I dipped the brush lightly in the Pan Pastel and then lightly touched it to a paper towel to get off excess. The fade was then gone over with the same dry brush technique using Burnt Sienna Ex Dark, Red Iron Oxide, and Black, or a mixture of all three. The Iron Oxide helps give a look of the start of some rust starting to form.
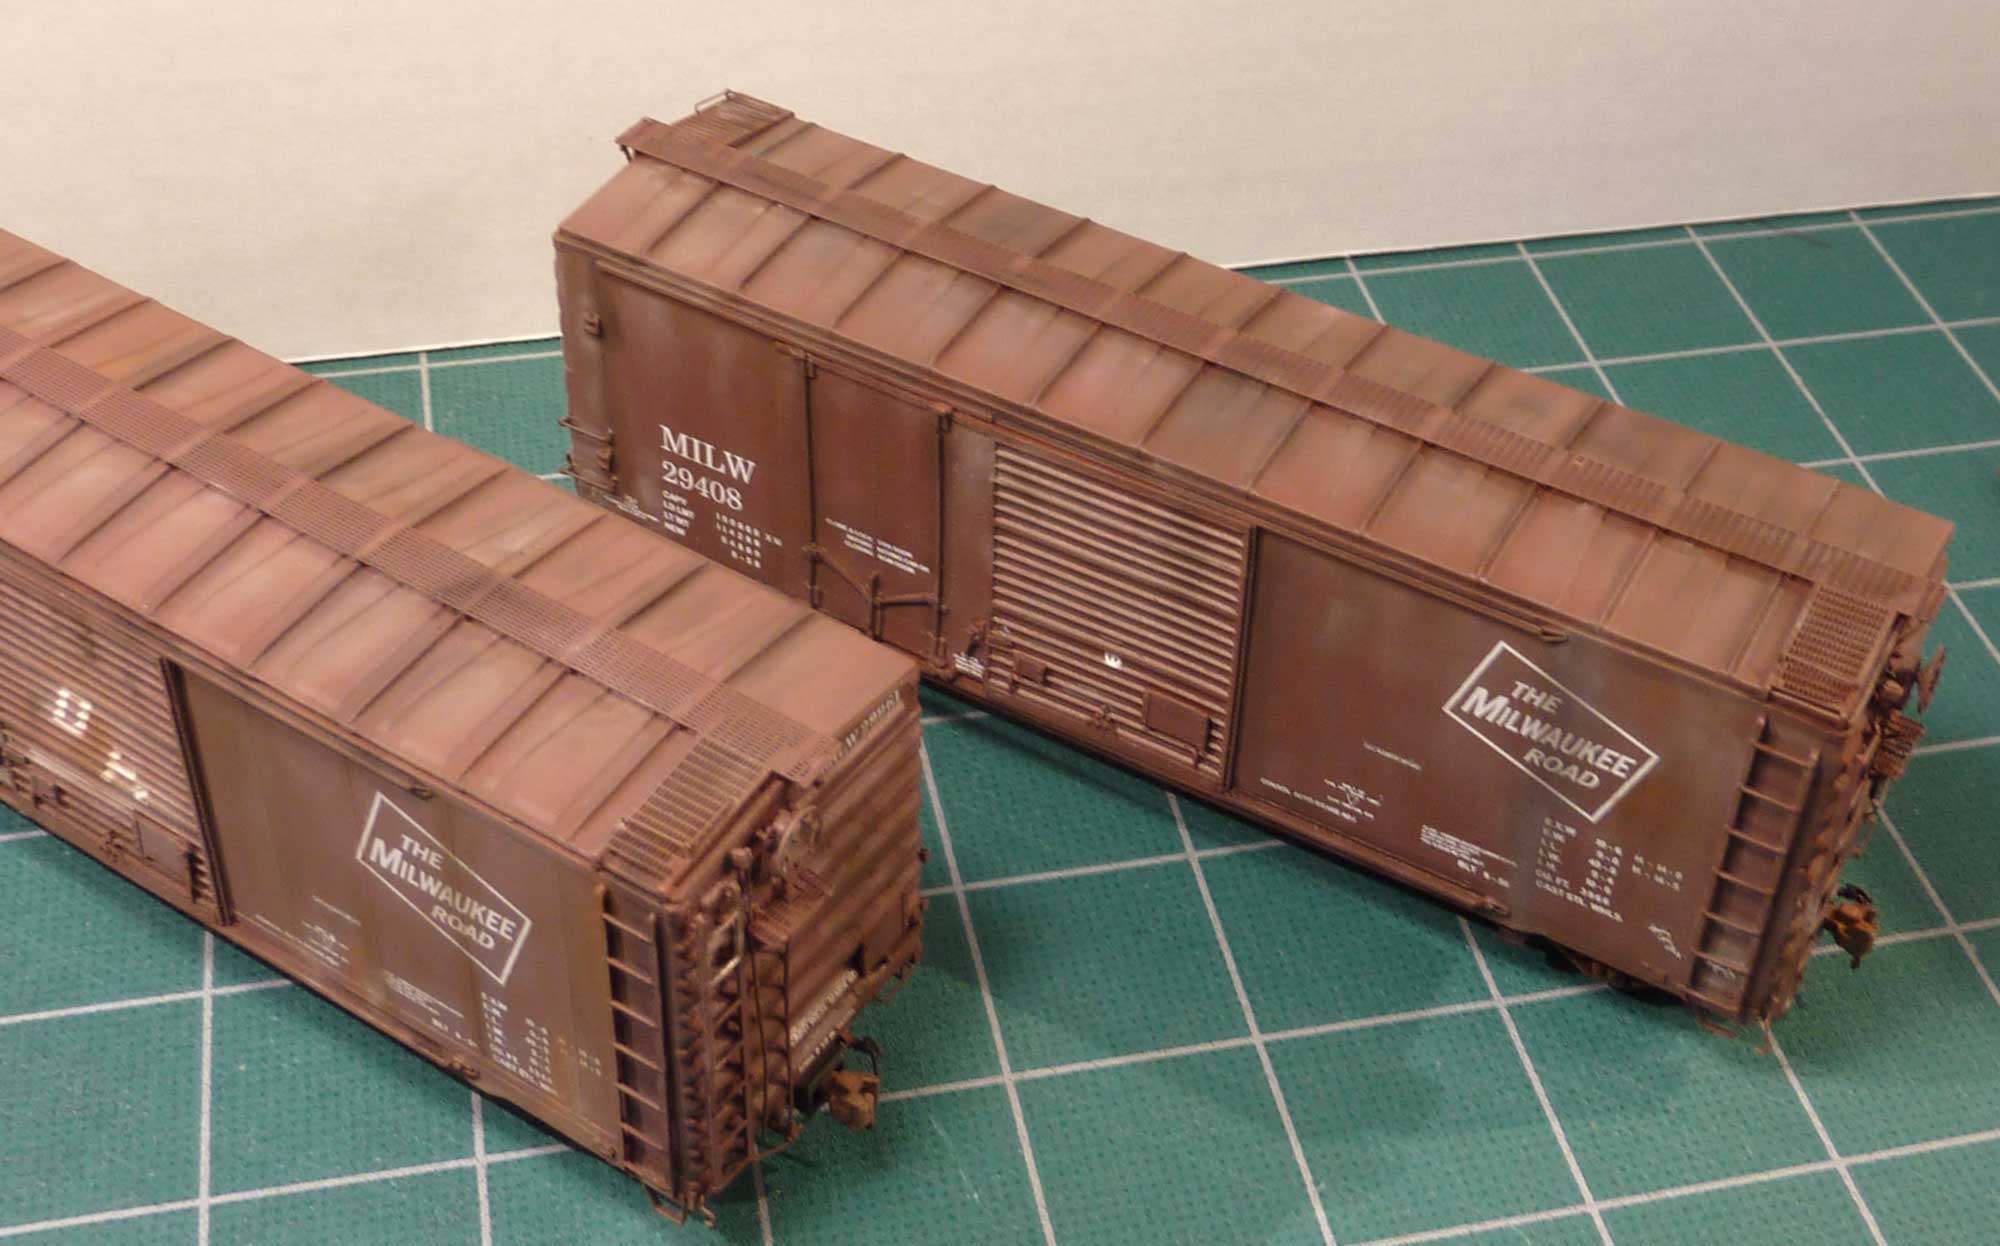
The heavier streaks at the end of the door tracks was done with both black and Burnt Sienna, but this time using a bit more pastel on the brush. What I would do next time is to add some scrape marks from the doors opening and closings as well using some oils and a fine brush and then move to the pastels. The underside was lightly sprayed with Floquil Grimy Black and Pan Pastels were applied, similar to the methods described above.
I’m not sure if I quite pulled off the effect I wanted but this was a start.
Wow! Thanks for sharing your work on these cars, George. There are many great tips and techniques all through this article. We look forward to your next projects!
George references a Bill Welch presentation on Xxtreme Modeling. A PDF of this presentation can be downloaded from the Helpful Links page here on the blog. Scroll down to find the link near the bottom. It’s a large file, so follow the directions noted there for an easy download. We hope to host more of Bill’s presentations on our Helpful links page.
Questions and comments can be posted below. Please follow the instructions so your comment can be posted. All comments are reviewed and approved before they appear. To subscribe to this blog, enter your info for a comment and check the last box to notify of new posts by email. Share the blog link with other model railroaders.
George,
Great modeling and I appreciate the tips of improving the underframe. I have a NP version still languishing to be finished and I will use your article as a guide. Thank you again.
I am adding the link to the General Arrangement Drawing for this car per suggestion by Paul Kruger
the general arrangement drawing on the Cascade Rail Foundation research web site.
http://research.milwelectric.org/Mechanical_Drawings/MILW%2029000-29499%20A-7527%20General%20Arrangement.pdf
George
Thanks for all the kind comments
George
Outstanding Models.
George, fine modeling with fine results.
When I squint these look real. 1959 looks pretty interesting. good baseball year—after finishing in 7th place their first year in LA, Dodgers won their second World Series beating the Pale Hose 4 games to 2. Baseball and modeling!!!
George is clearly an Xxtreme Modeler.
Another grand slam George