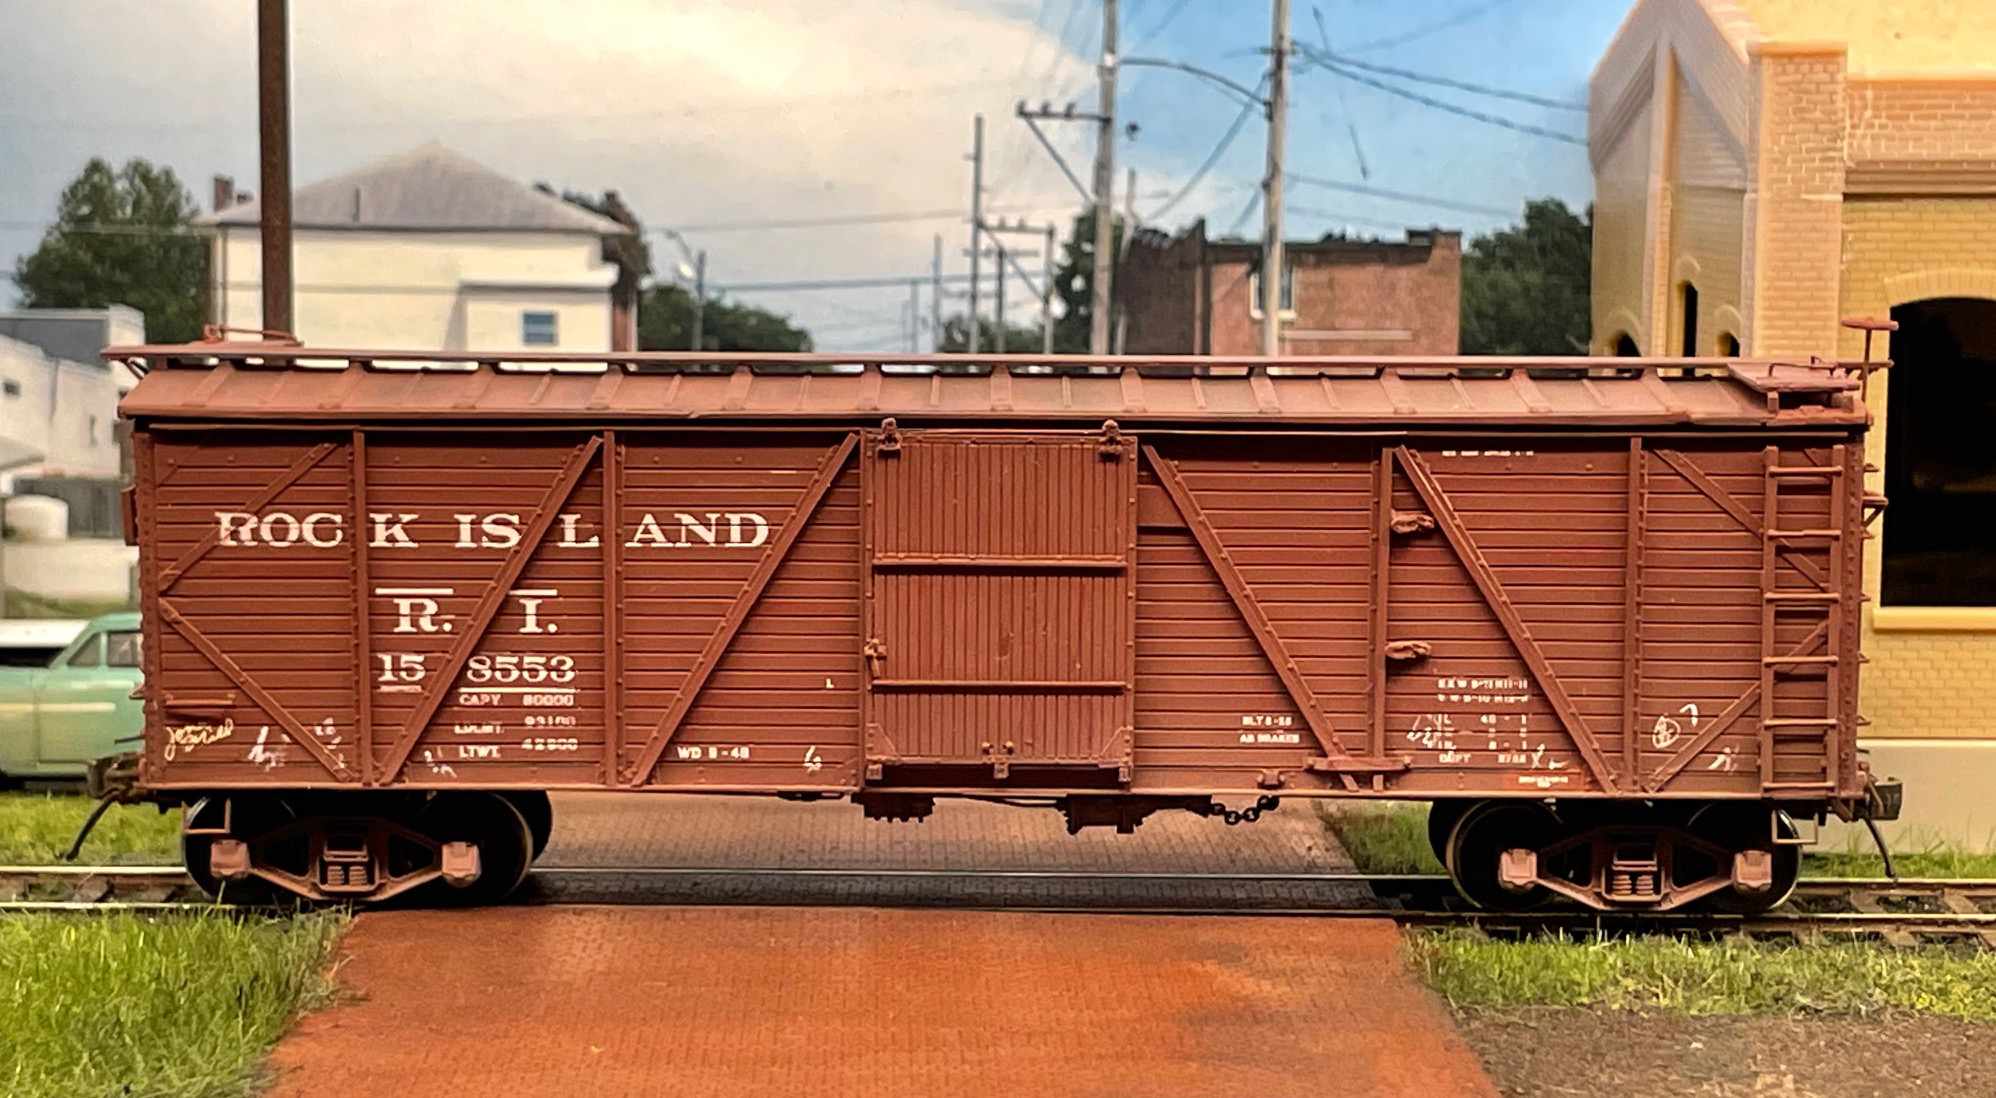
John Golden tackled a neat HO scale box car project recently. He shared the following details and photos for the blog.
Earlier this year I purchased a custom set of HO scale resin freight car parts from Westerfield Models to assemble a unique Rock Island single-sheathed box car. Modification and assembly of the parts is simple and any modeler could create a similar car with a little time and patience.
History
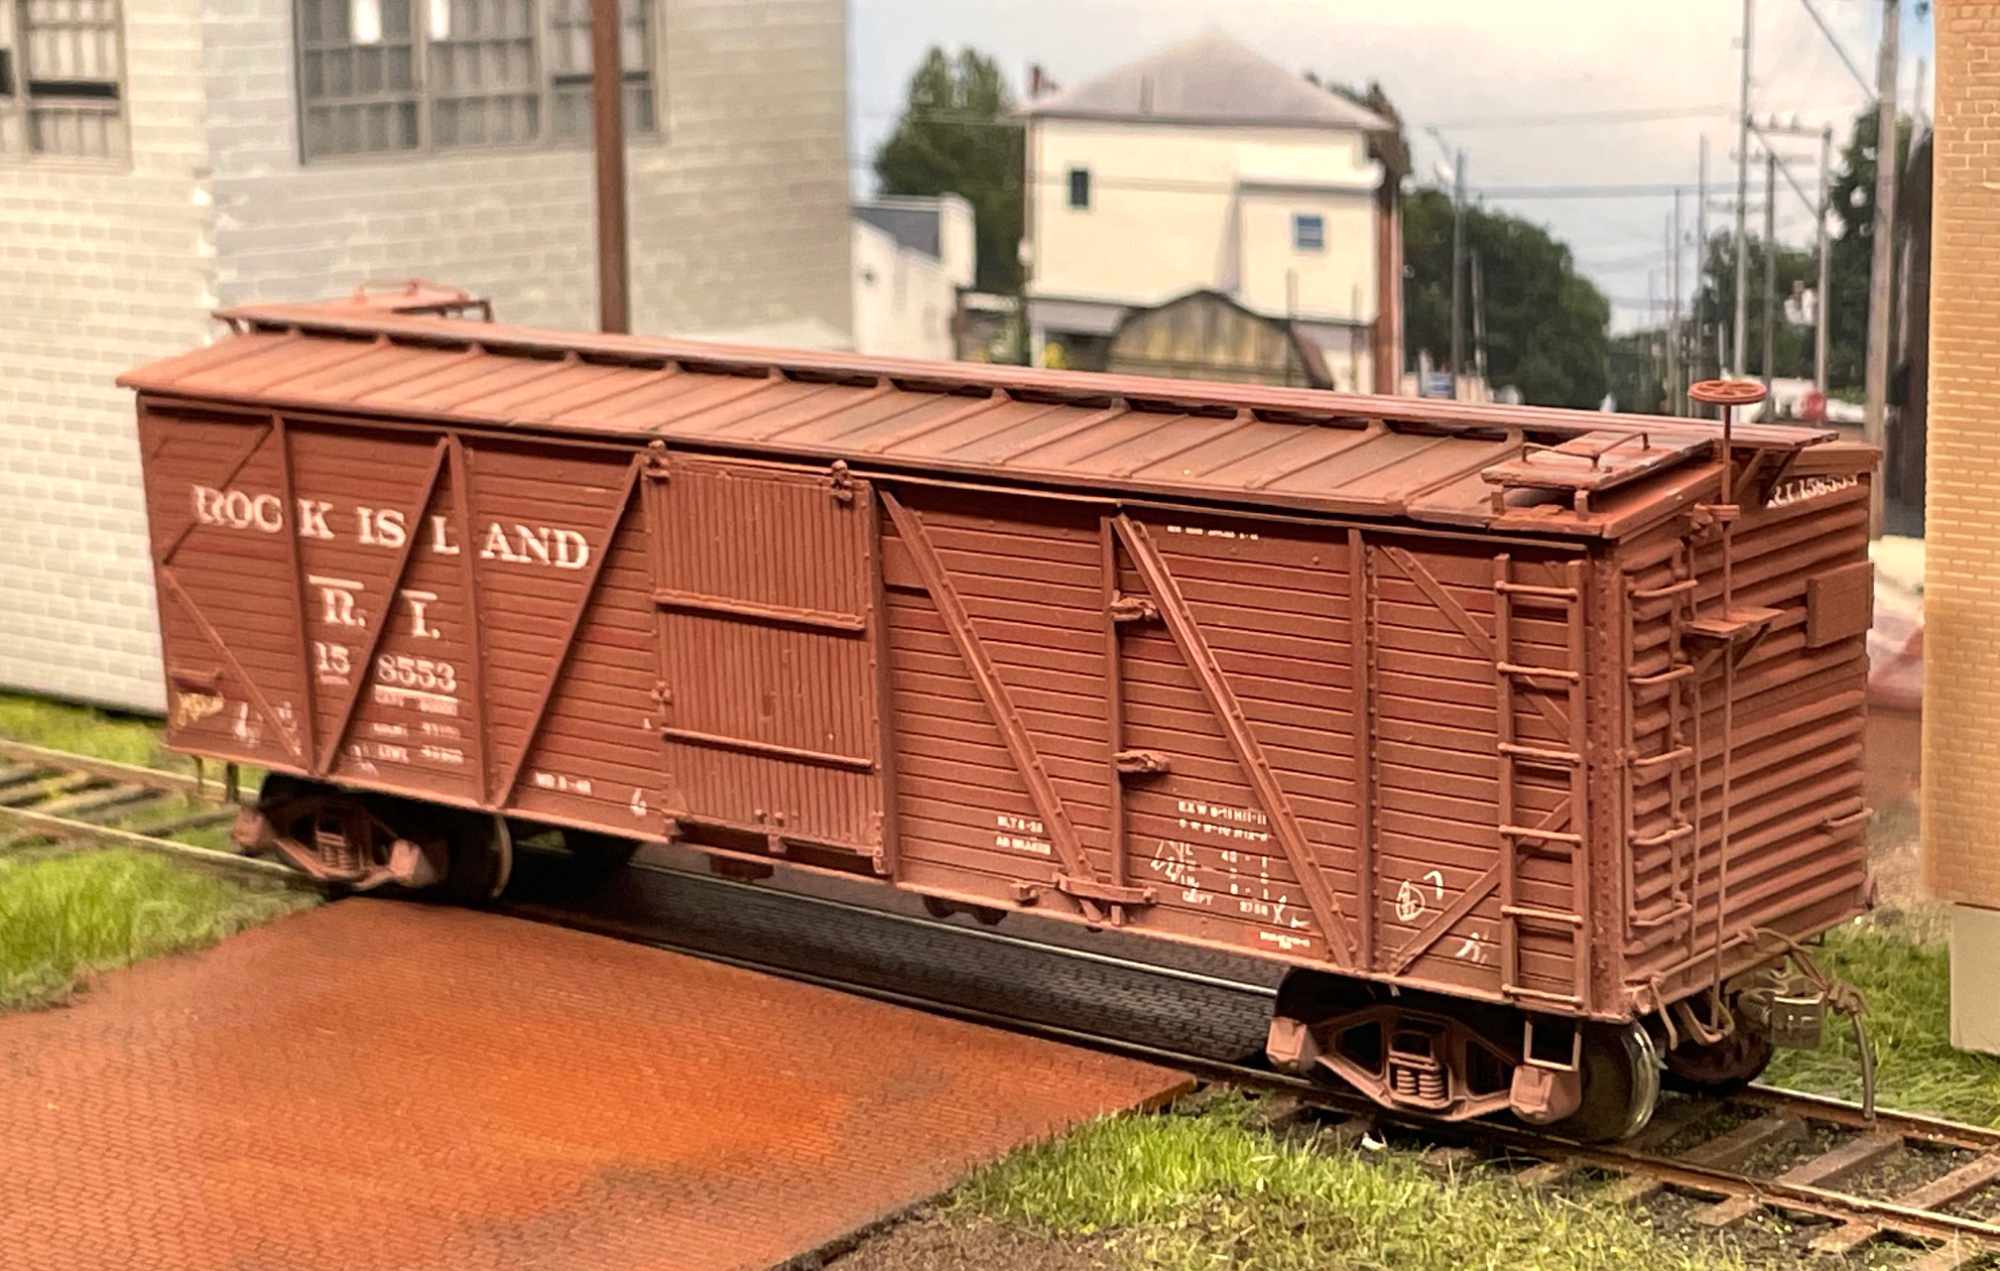
The Chicago, Rock Island & Pacific Railroad acquired 8,700 40-foot composite box cars similar to the Fowler-patent design between 1915 and 1923. I chose to model a car from the 158100-158999 series, which was delivered to the CRI&P by AC&F’s St. Louis plant in 1927. This series of cars were equipped with Hutchins Dry Lading roofs, Murphy 7-7 steel ends, KC brakes with a vertical staff handbrake, and T-section trucks. The cars were painted Rock Island freight car red top to bottom.
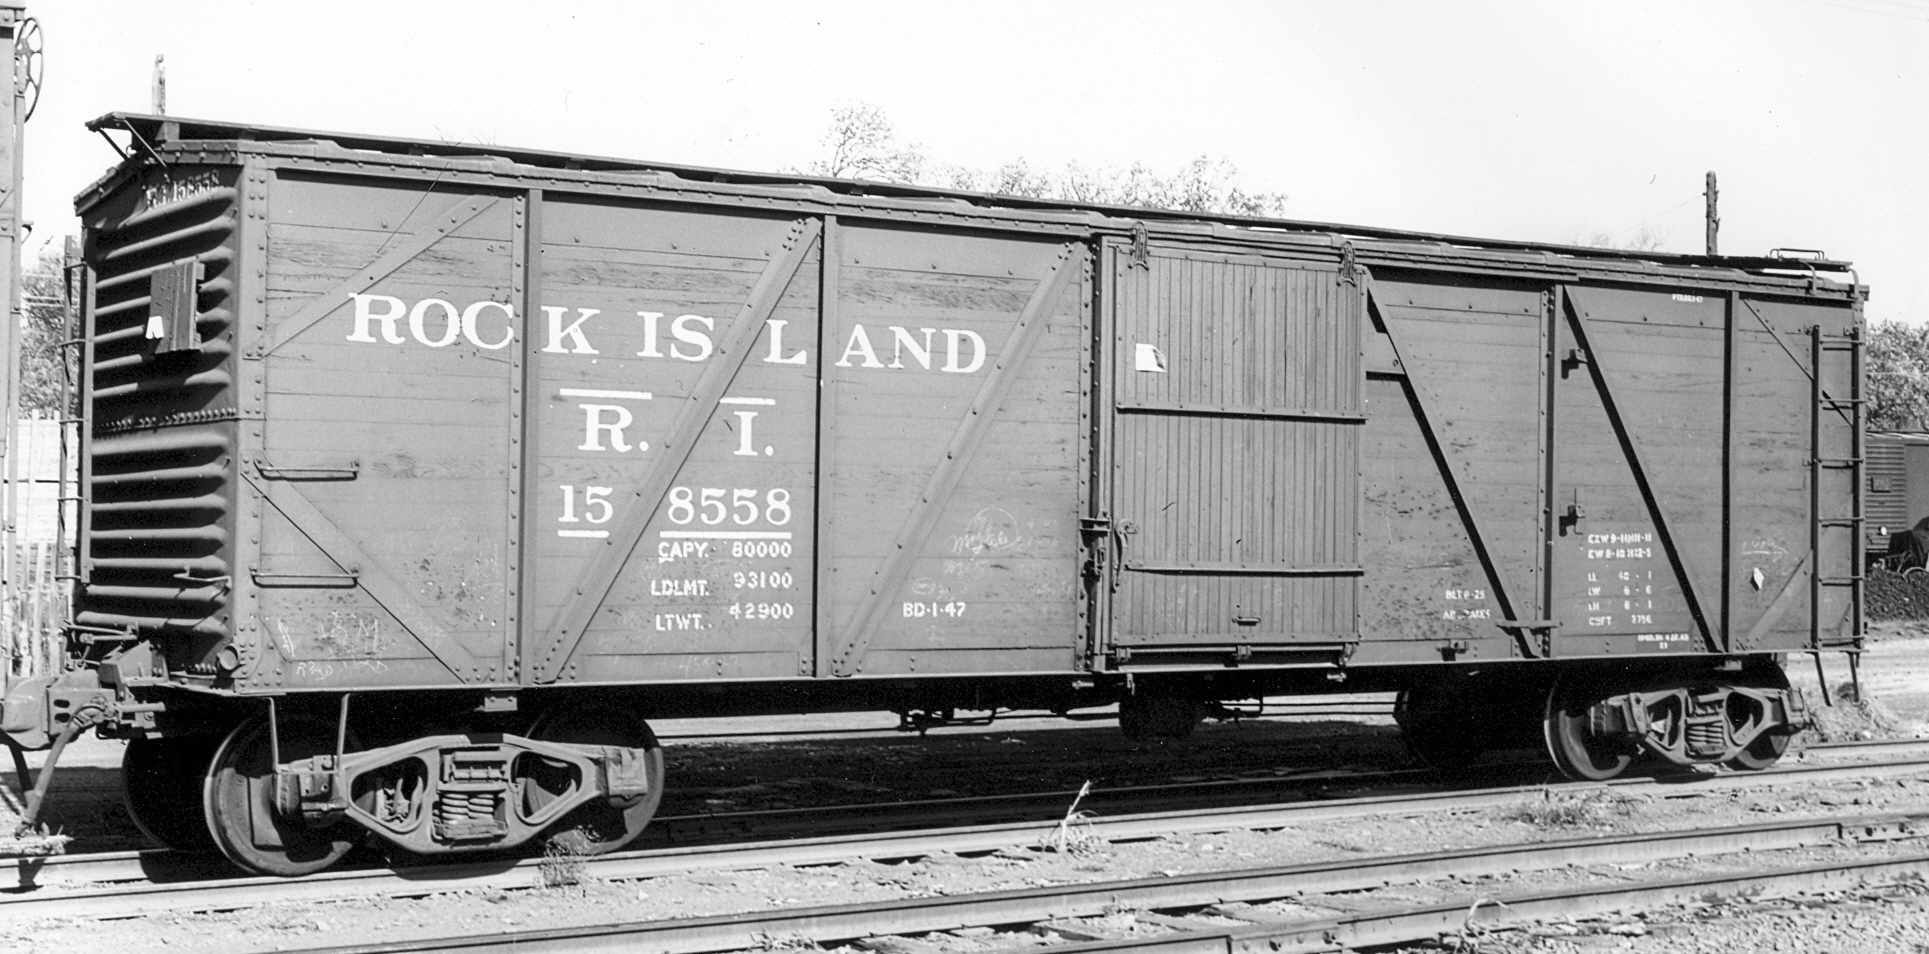
These cars lasted a long time in revenue service, with 963 of the original 1,000-car series still reported in the 1950 ORER. Early 1950 is my chosen modeling era.
The Kit
Last fall I contacted Andrew Dahm at Westerfield Models and asked if he could provide parts to build a 158000-series car. My friend Clark Propst had made a similar model a few months earlier and discussed it on the Proto-Layouts email group, so Andrew was familiar with the request. Andrew and I talked it over and after a few days a package was speeding on its way to my home in Germany.
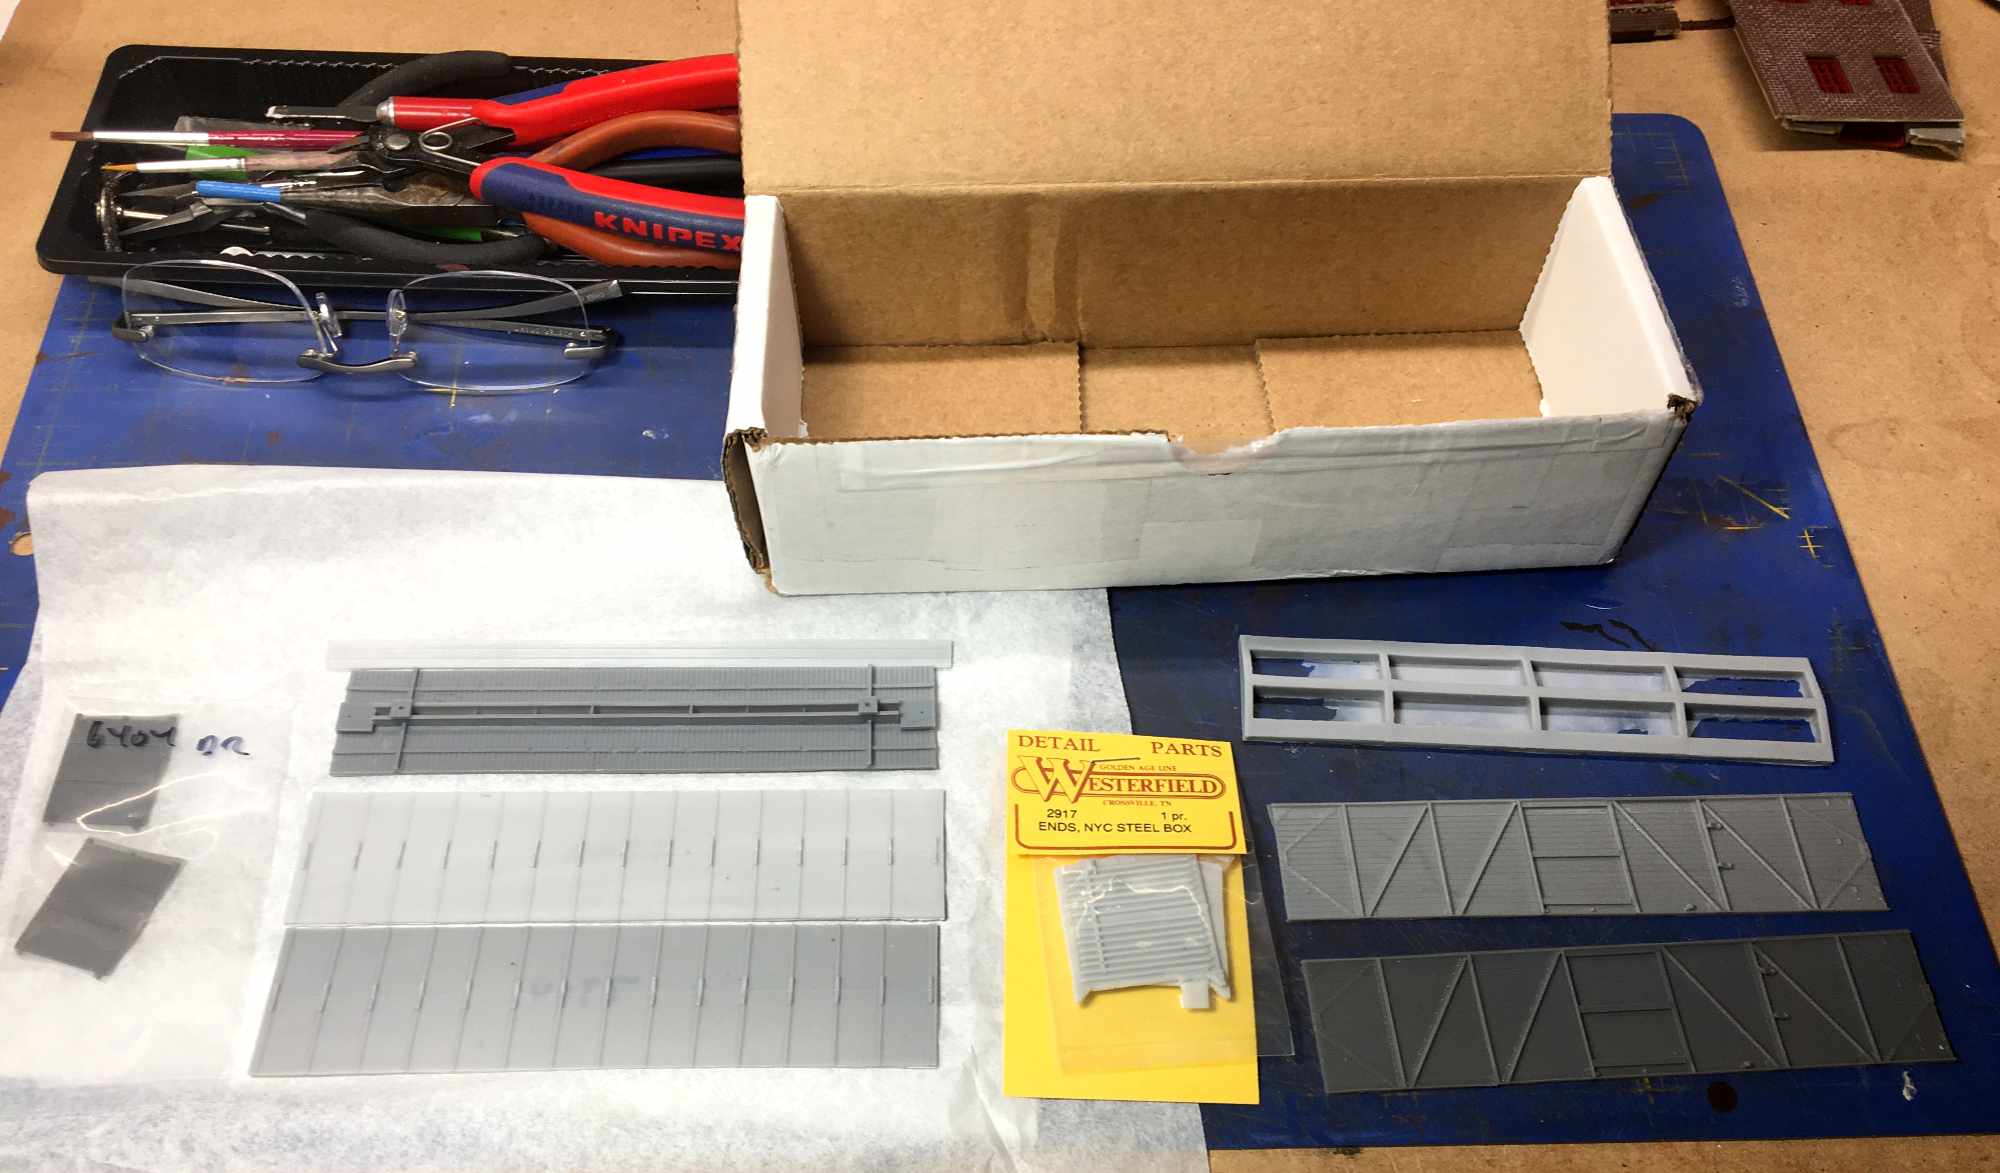
Included in the box were sides, roof, and underframe from Westerfield’s #6400-series Rock Island Fowler box car kit, 7-8 ends from Westerfield’s NYC steel box car kit, part #2907, and a pair of wood doors from the Fowler kit, part #6404.
The main difference between the Westerfield 40-foot Fowler box car model and the prototype 158000-series cars are the ends and roof. Westerfield’s Fowler model has a composite wood/steel end and a Hutchins roof, while the prototype had 7-7 Murphy ends and a Hutchins Dry Lading roof. Modification to the NYC 7-8 ends would be required, and a different roof applied along with some other fine details, but that’s an easy job for any prototype modeler!
Building the Model
I began construction by sanding the major parts to an equal size and cleaning them up for assembly. The 7-8 ends were too short and too thin, so I glued the ends onto 0.030-inch thick Evergreen styrene. The thicker part made it easier to cut and sand to the correct dimensions.
I chose to leave the ends as 7-8 and did not remove the bottom corrugation. I felt the removal would leave too much blank space on the panel. Even though the end is 7-8, it looks right. Getting the look right, even if it’s not quite perfect, is an important part of modeling the prototype.
I removed all the detail from the bottom of the ends, including the cast-on poling pockets I added poling pockets cut off from Tichy USRA box car ends because they seemed closer to the prototype appearance. I also added an additional 0.020-inch thick styrene strip along the bottom sill on the sides and ends that’s so characteristic of Fowler cars.
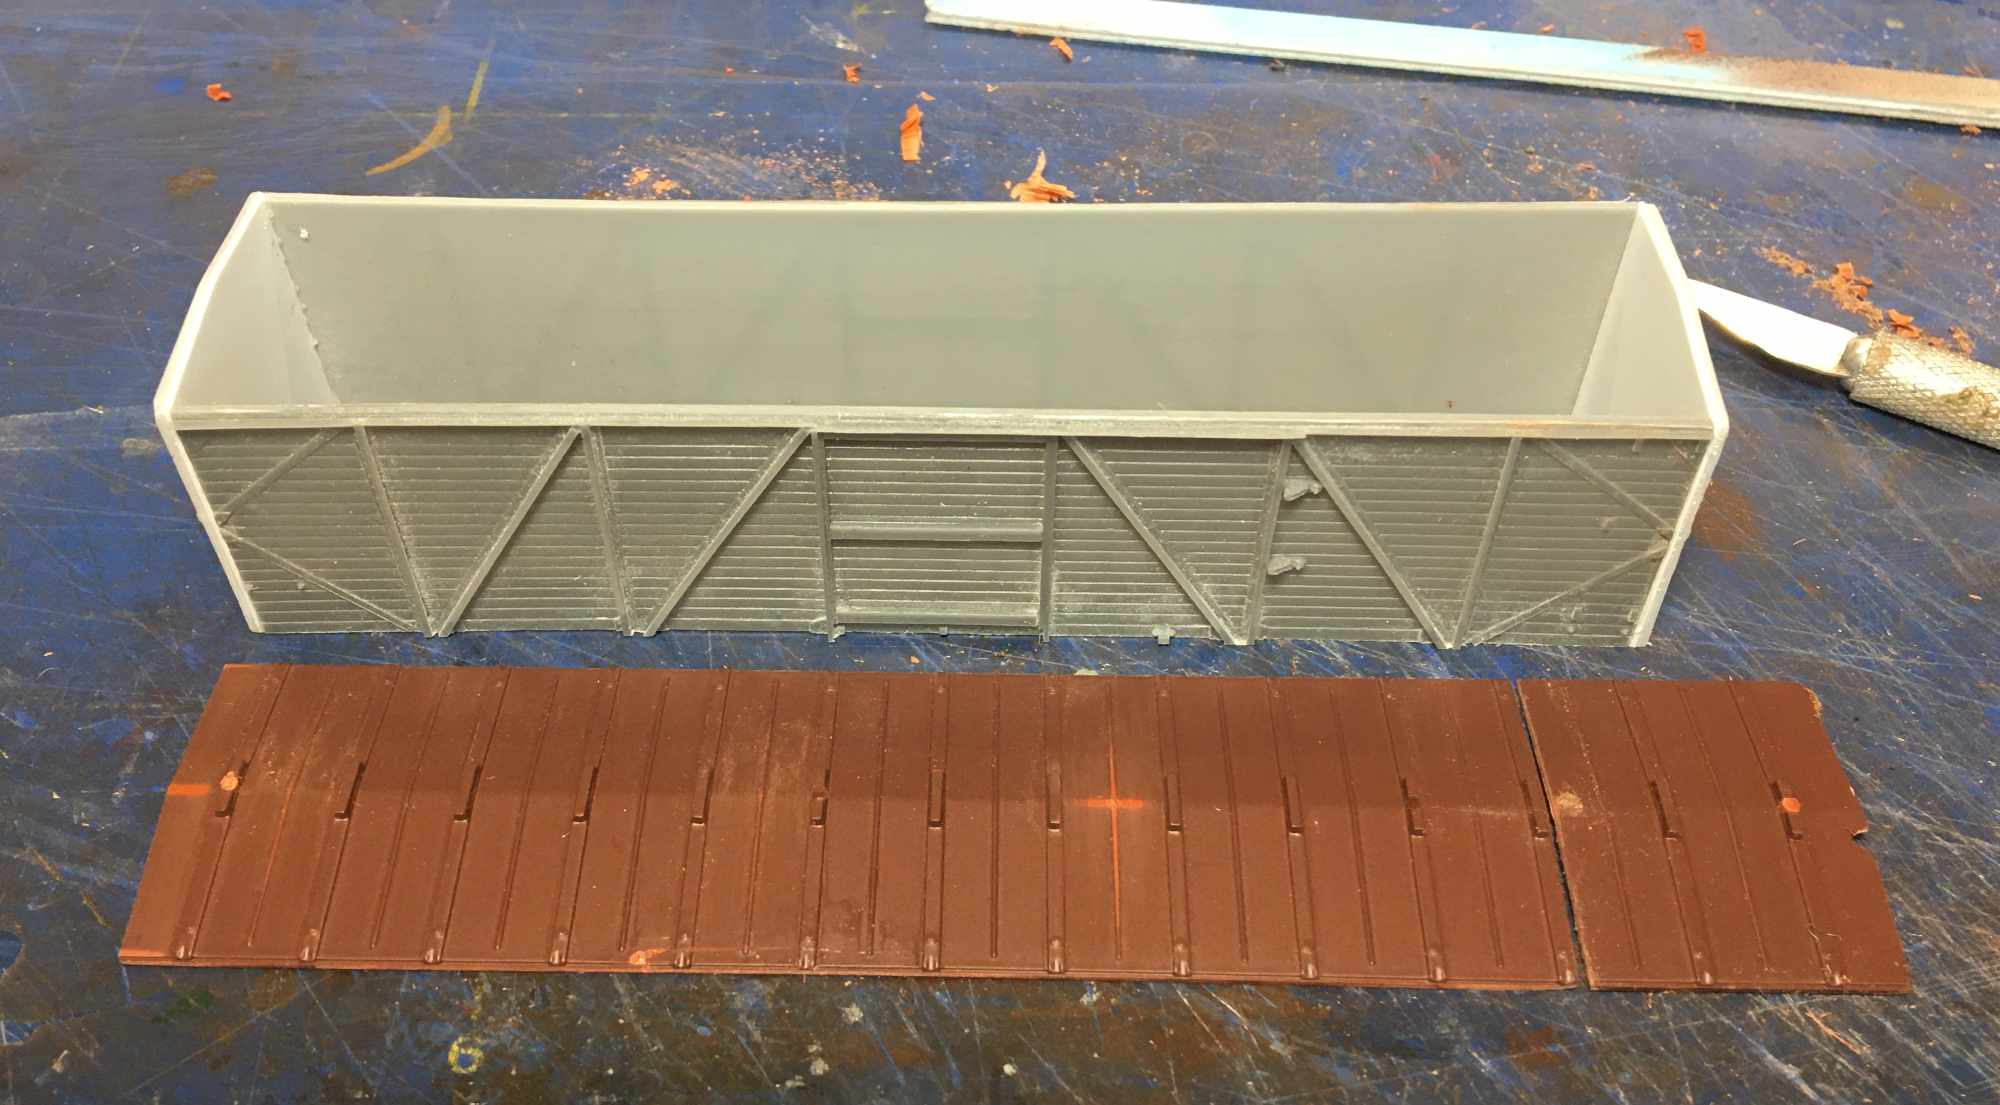
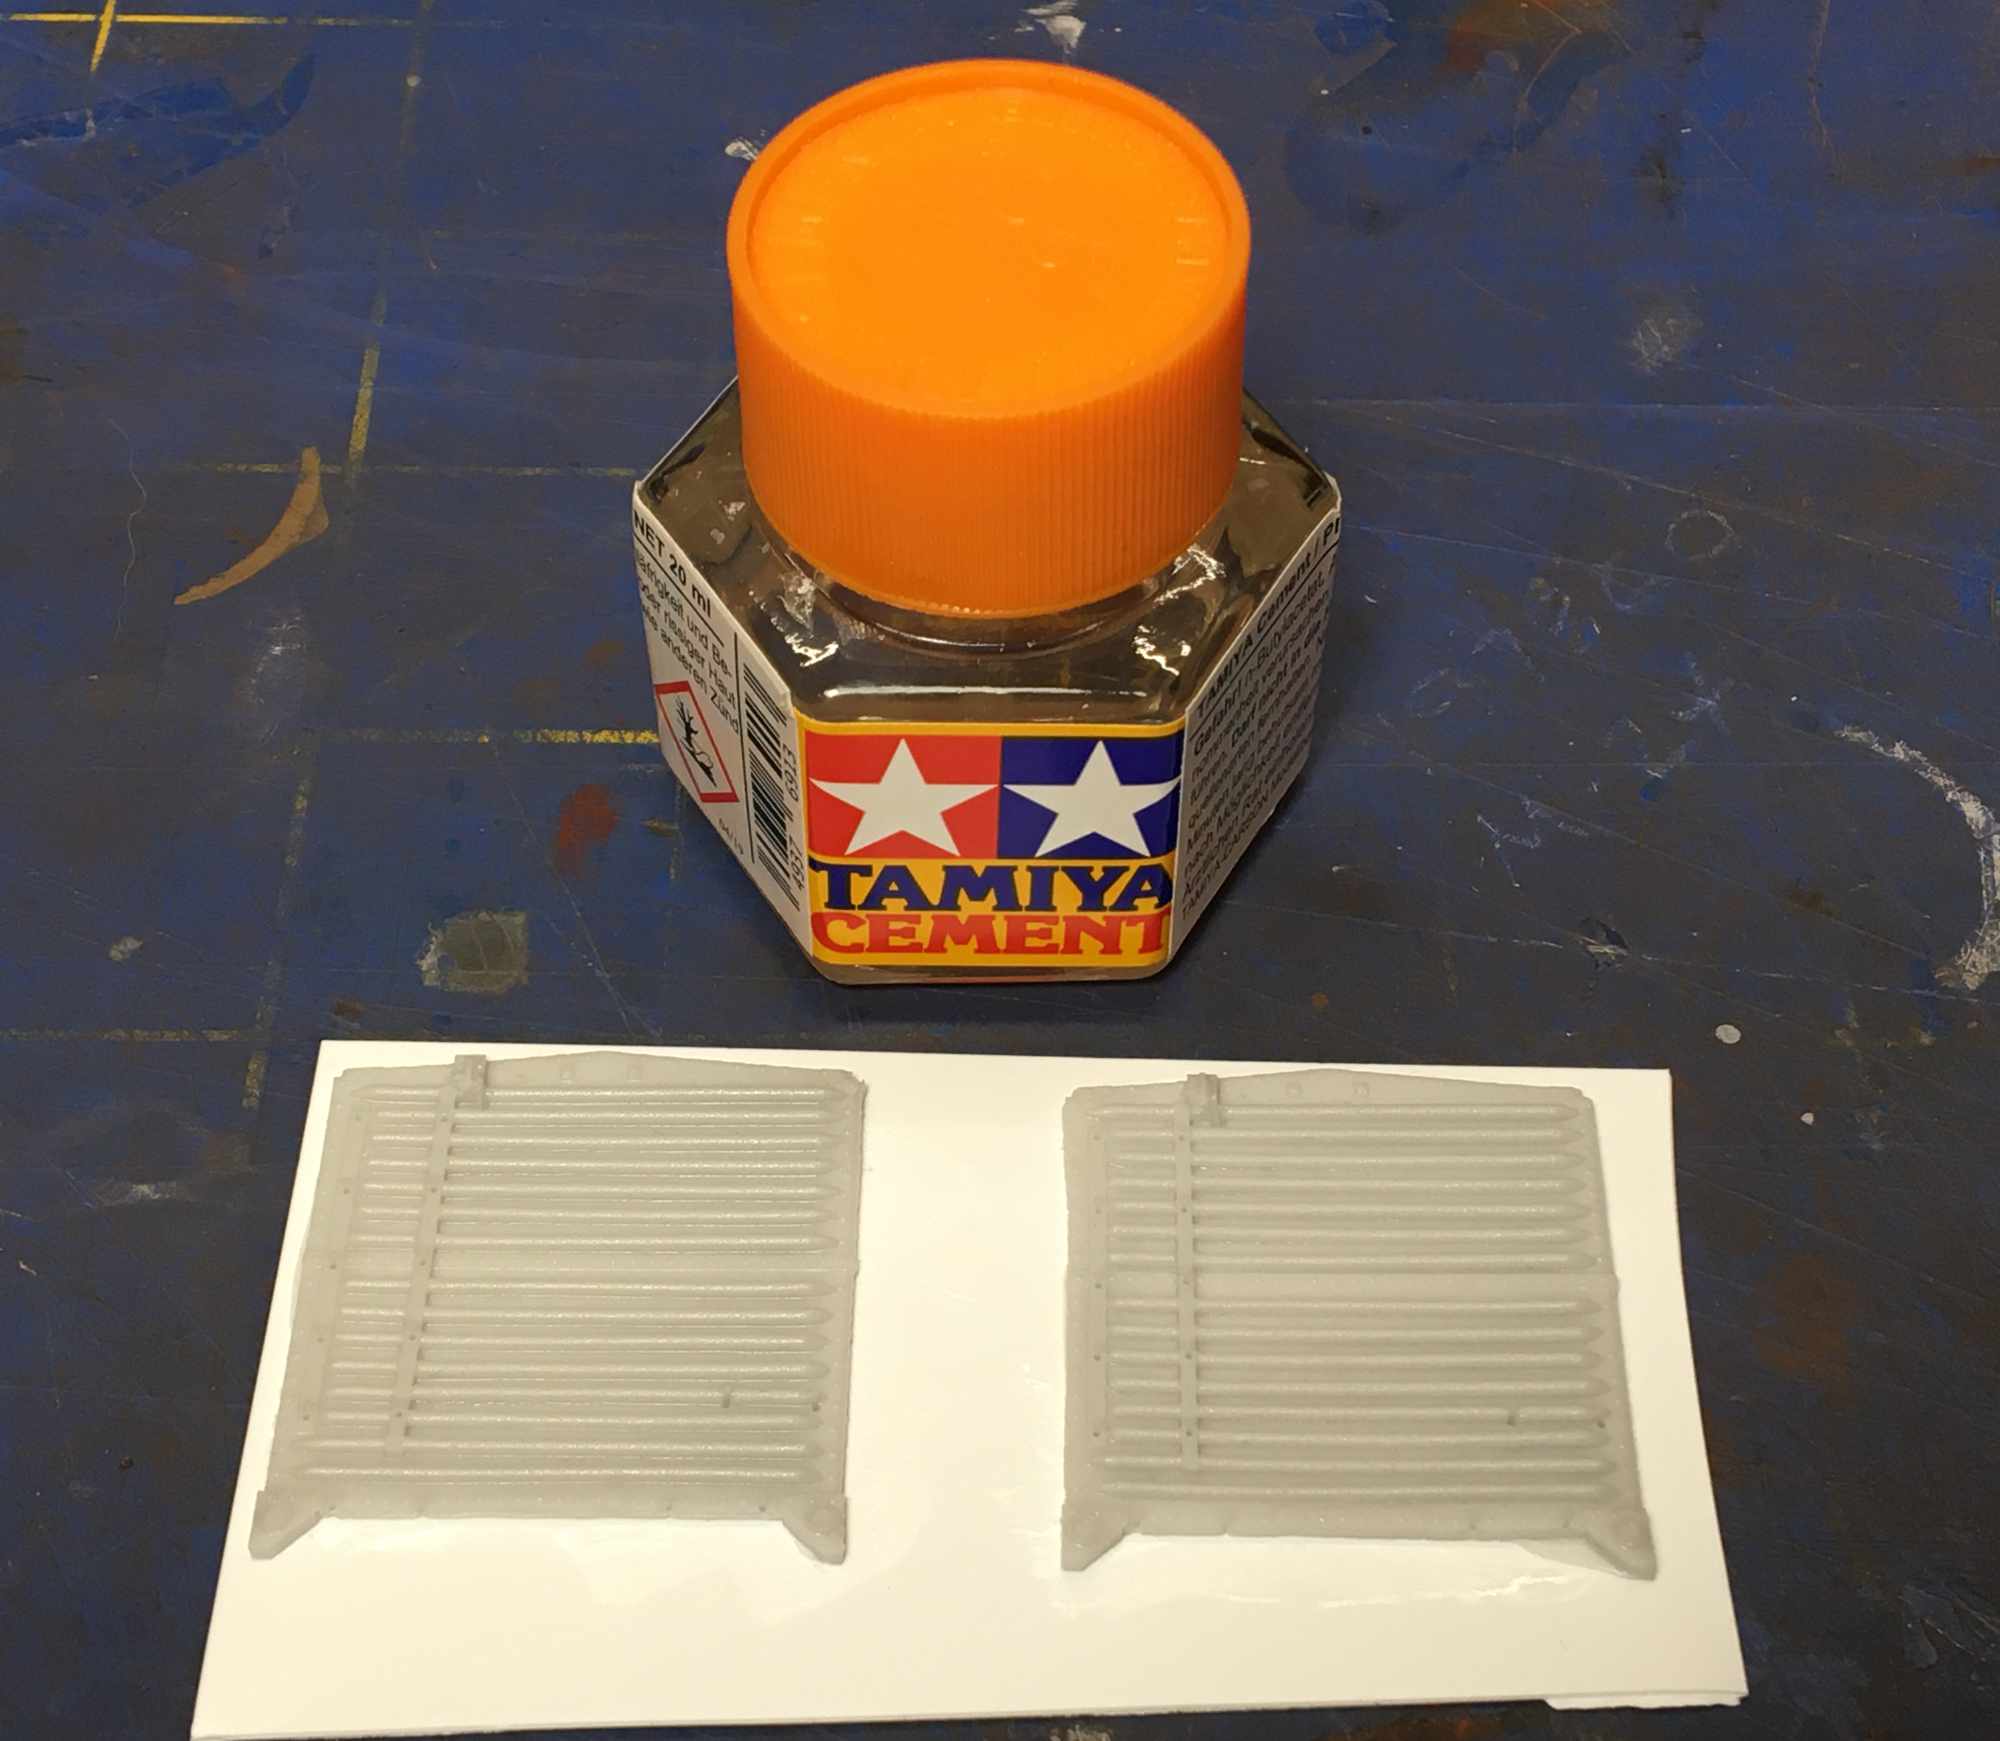
The correct roof for this car is a Hutchins Dry-Lading type. Westerfield Models has the correct roof but I didn’t ask for it. Instead, I removed the roof from a plastic MDC/Roundhouse 50-foot composite box car and modified it to fit.
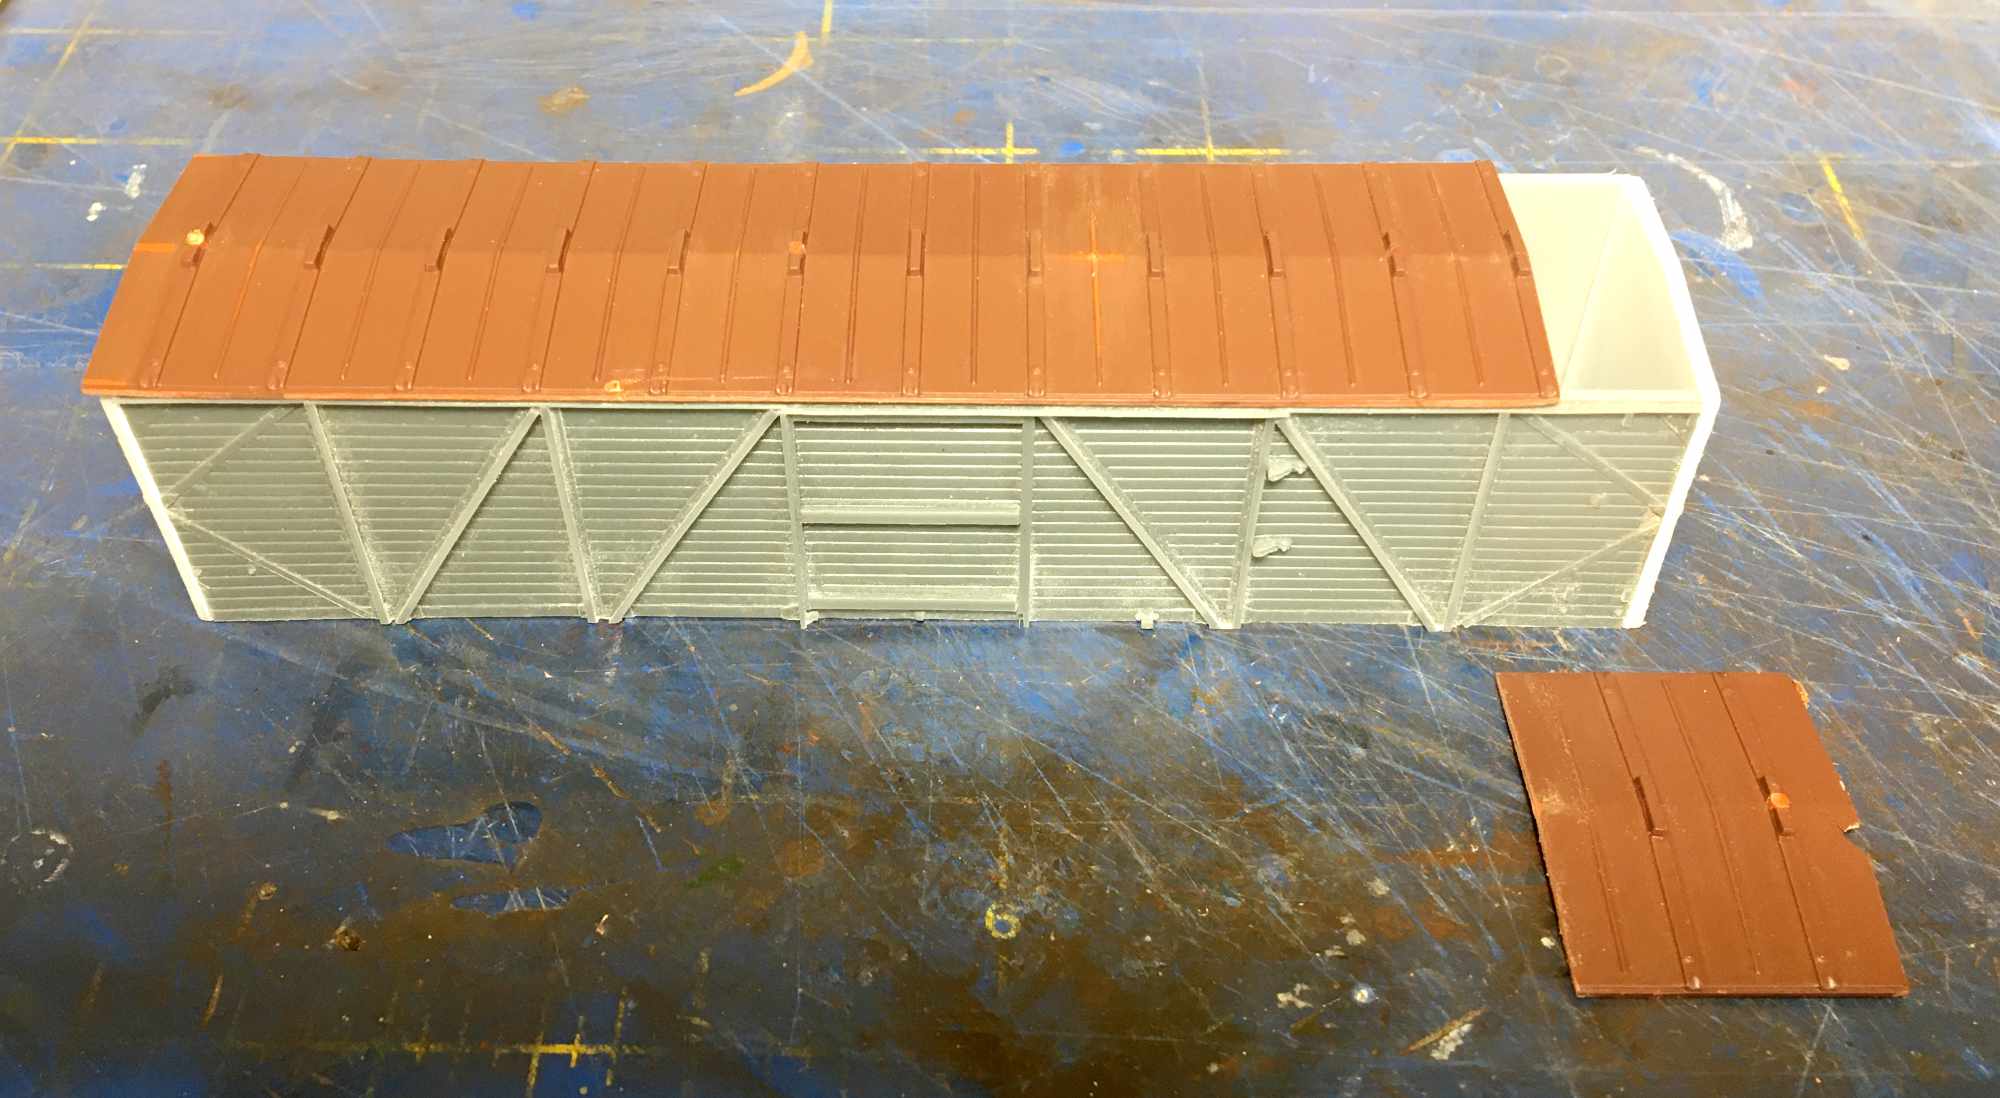
After removing the roof from the MDC model, I trimmed the ends to fit the car body. While trimming, I cracked the roof casting. This forced me to cut the roof into two parts and apply them separately, as seen in the image above. I repaired the cracks with putty and primer after I installed the roof. Note the thicker ends have been fixed to the model so I can get the roof length exactly right.
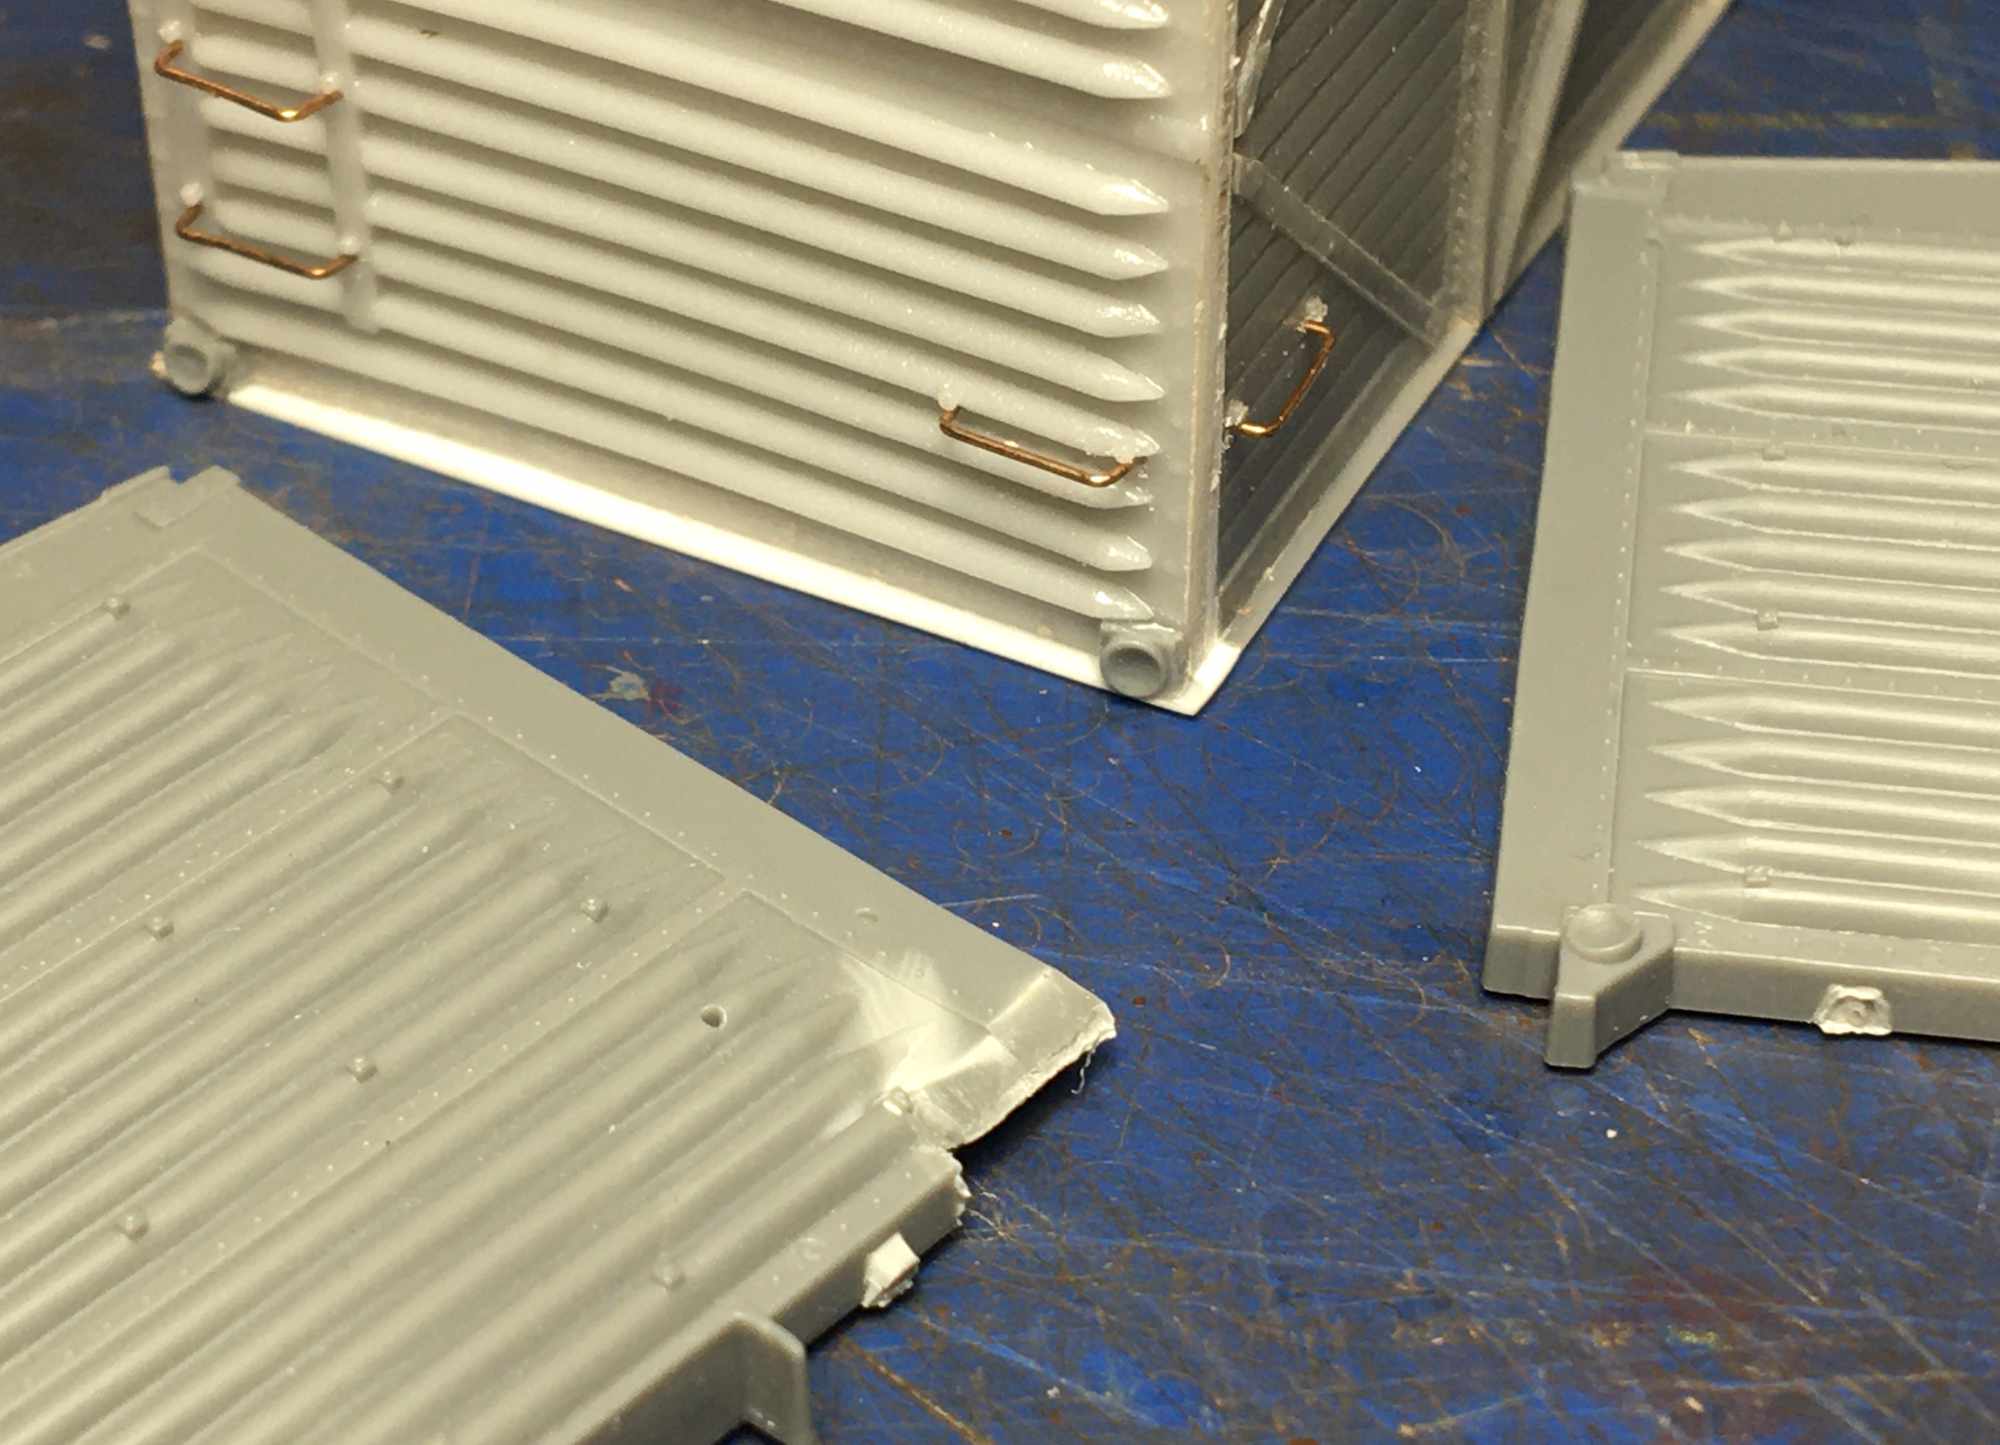
Detailing the car body was easy after completing the modifications. I used Evergreen #8206 styrene strip for running boards. The latitudinal running boards were mounted on Yarmouth Model Works nice brass running board brackets. I also added Kadee #78 coupler pockets, Hi-Tech brass air hose holders, and Yarmouth eyebolts to mount wire uncoupling devices, roof corner grabs, and brake gear around the car body. Yarmouth tank car stirrups were used on the ends. I used Details West seven-rung ladders on the sides and Tichy 18-inch drop-type grabs on the ends. I also applied a door guide on the lower portion of each side made of styrene strip with a few Tichy rivets attached.
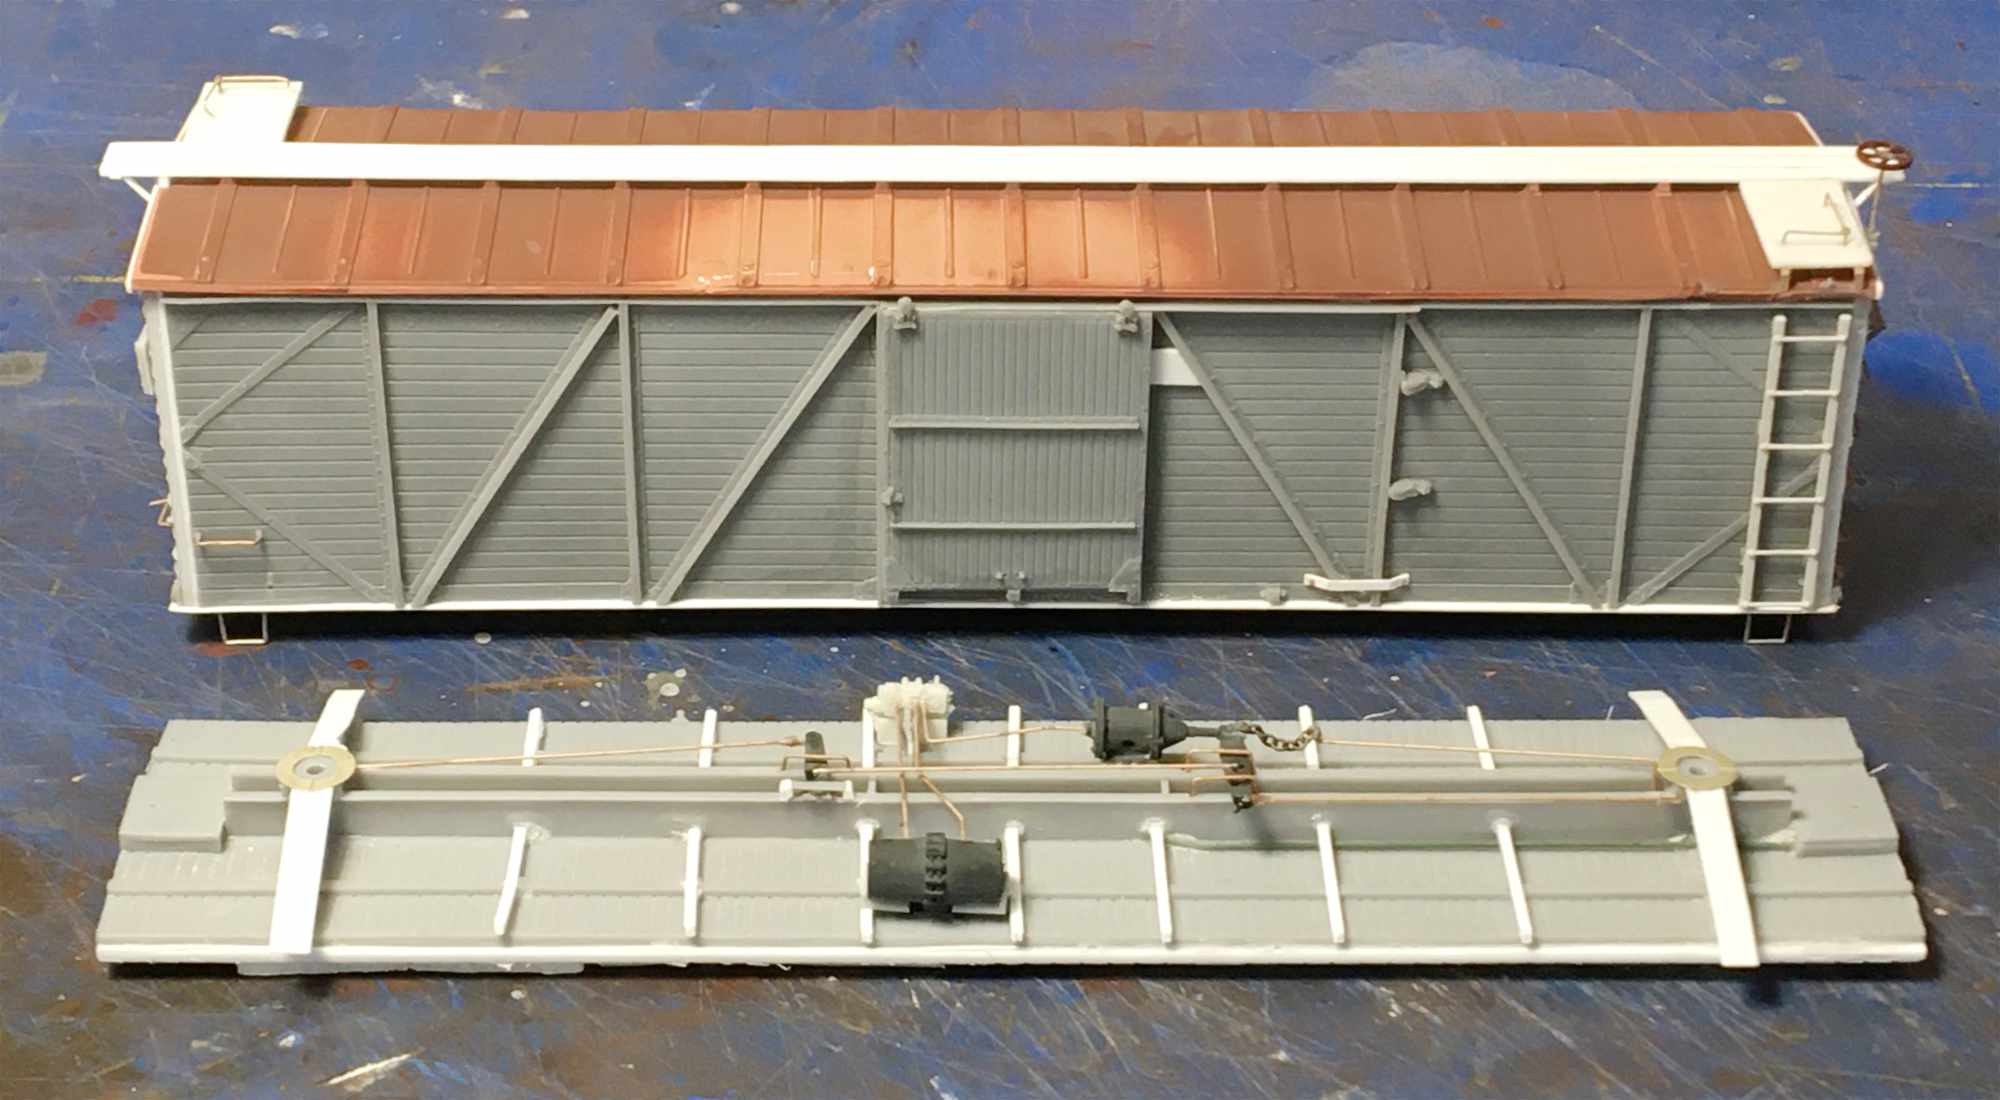
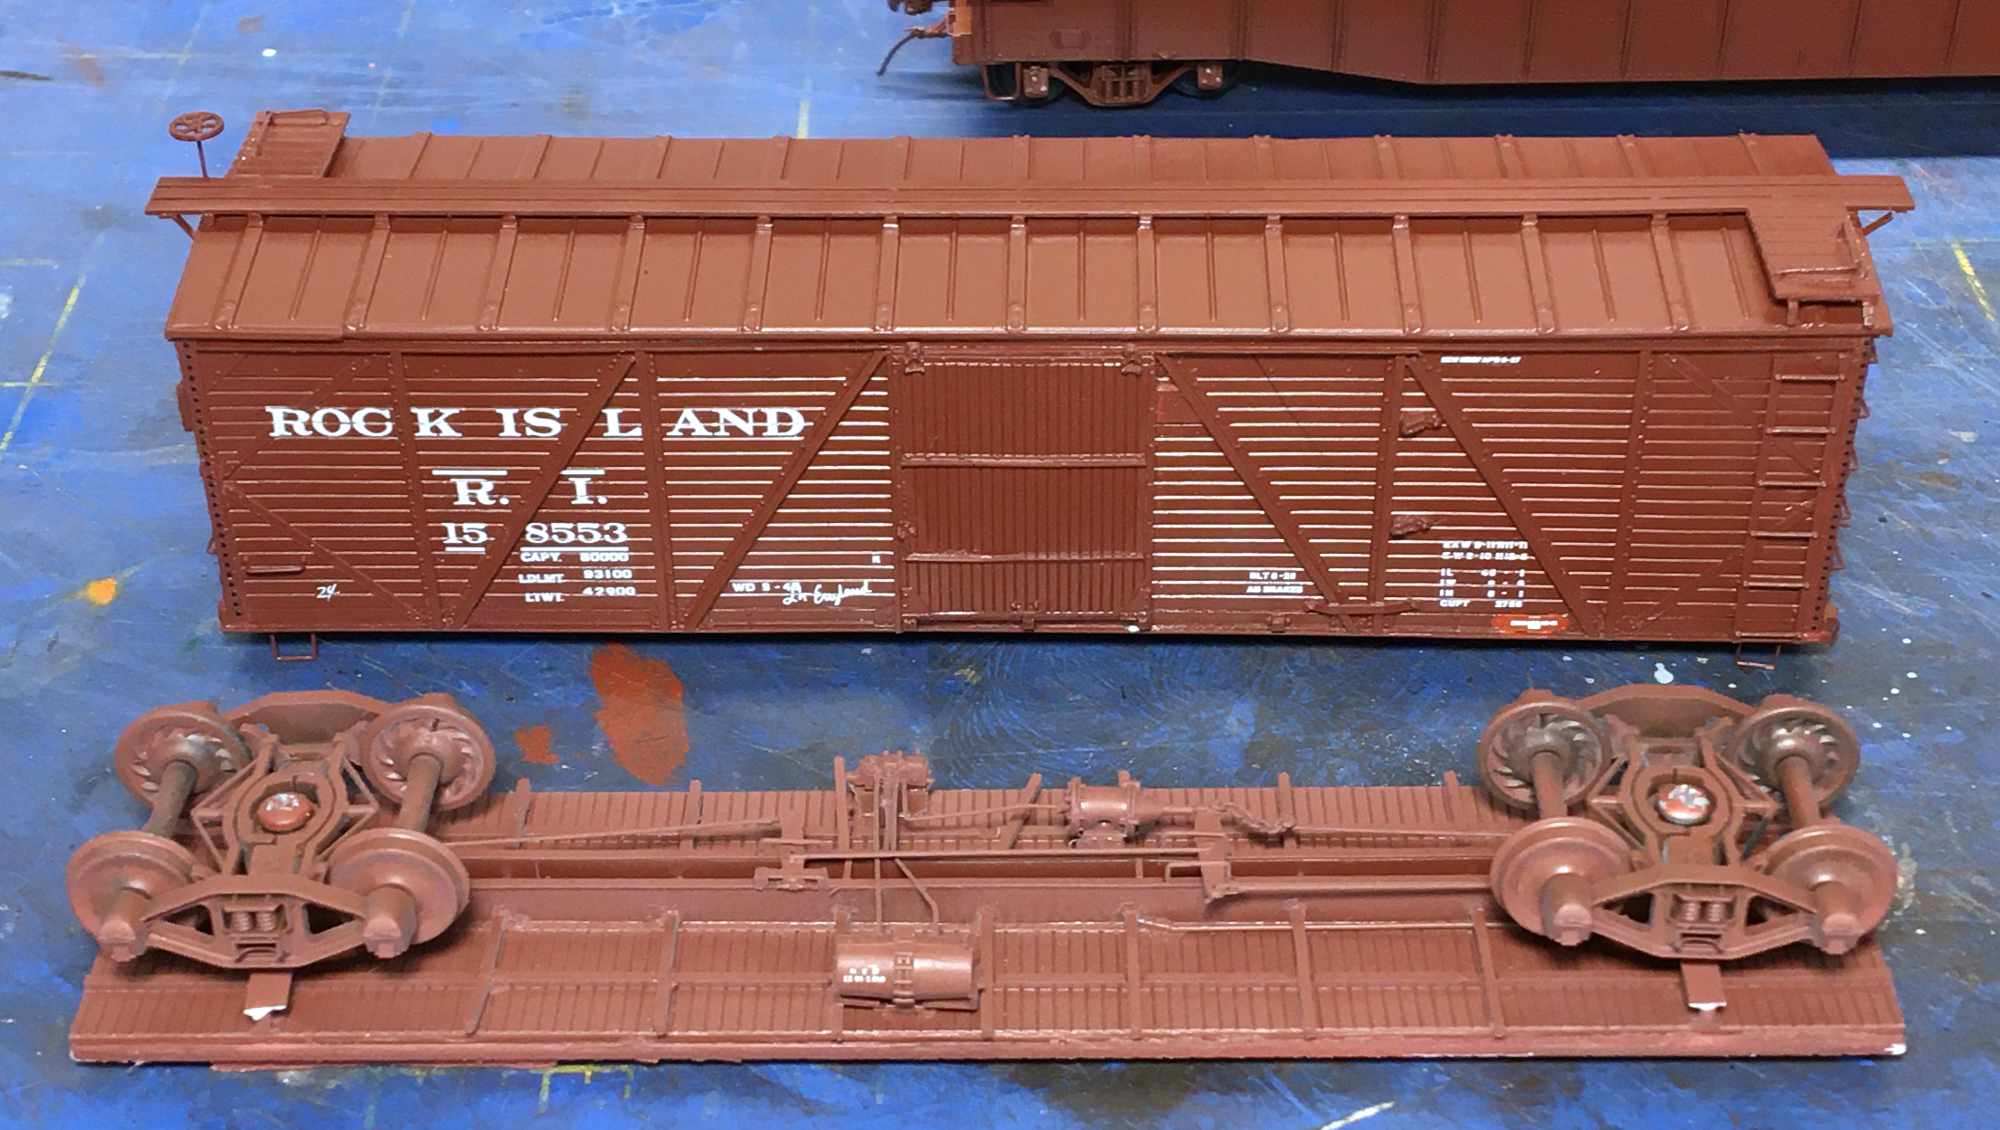
The parts package didn’t include instructions regarding the underframe. I contacted my friend and Rock Island historian Steve Hile for information on the underframe. He didn’t have anything for this project. I copied the underframe on another Westerfield model I finished ten years ago and called it close enough. I included Cal Scale AB brakes to modernize the model, even though Steve said very few of the prototype cars were ever upgraded with AB brakes. Kadee T-section Bettendorf trucks with Kadee semi-scale wheelsets were applied per the prototype.
Finishing the Model
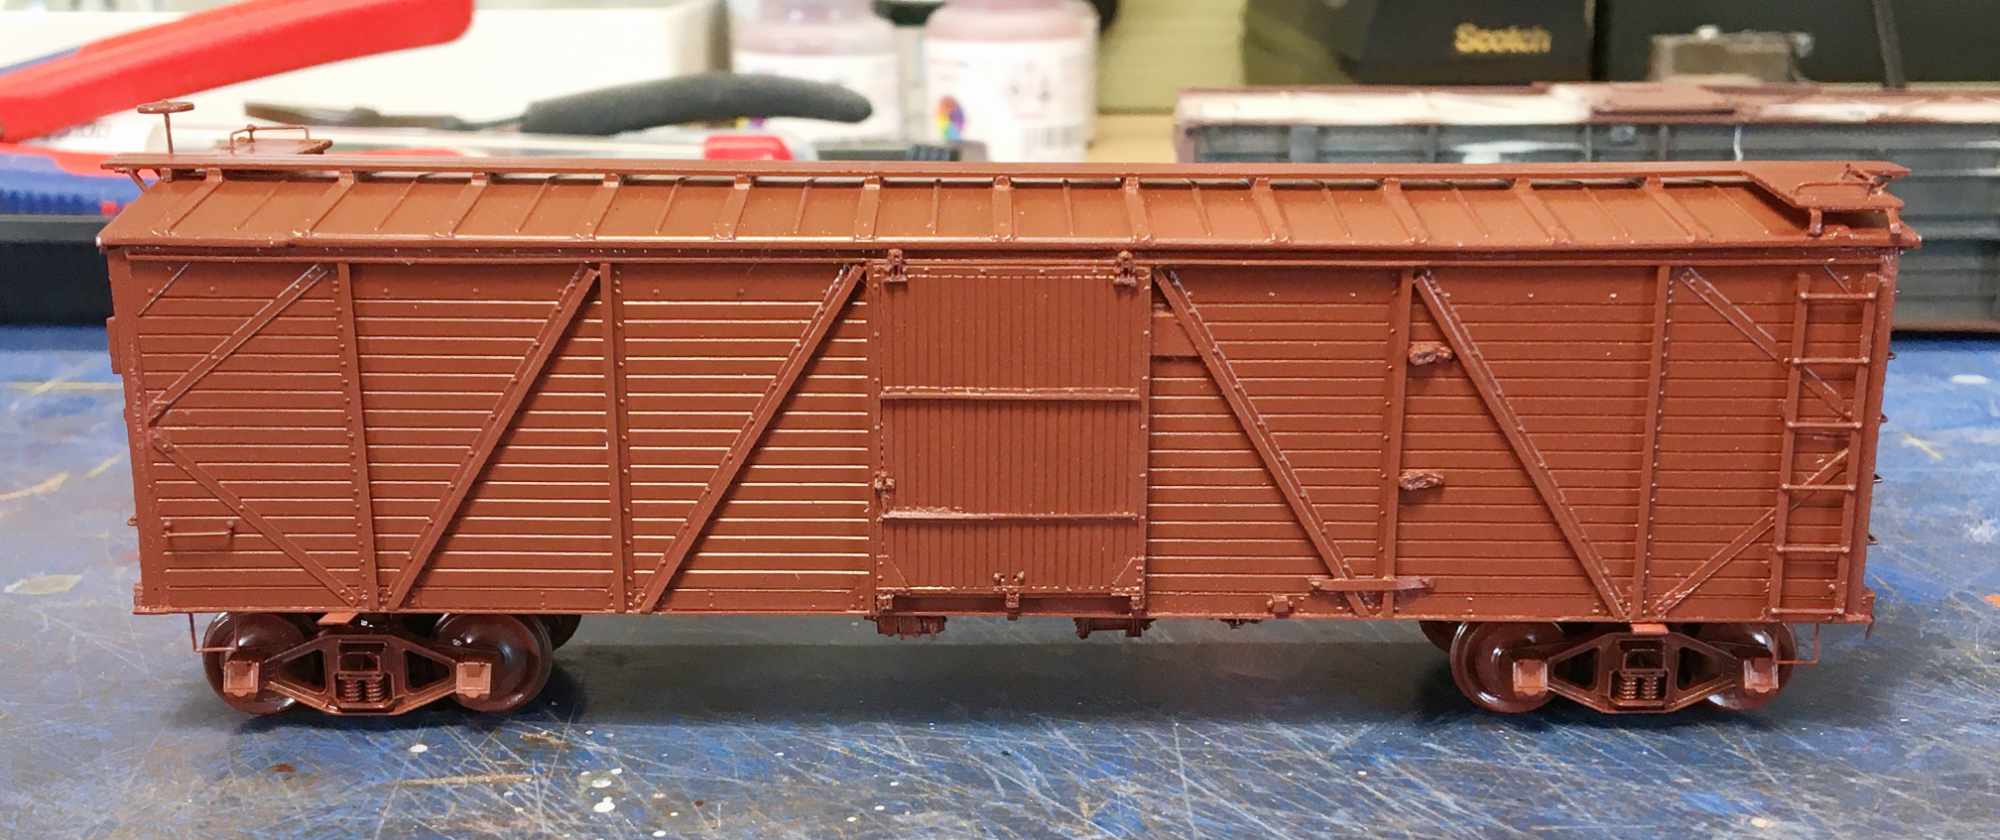
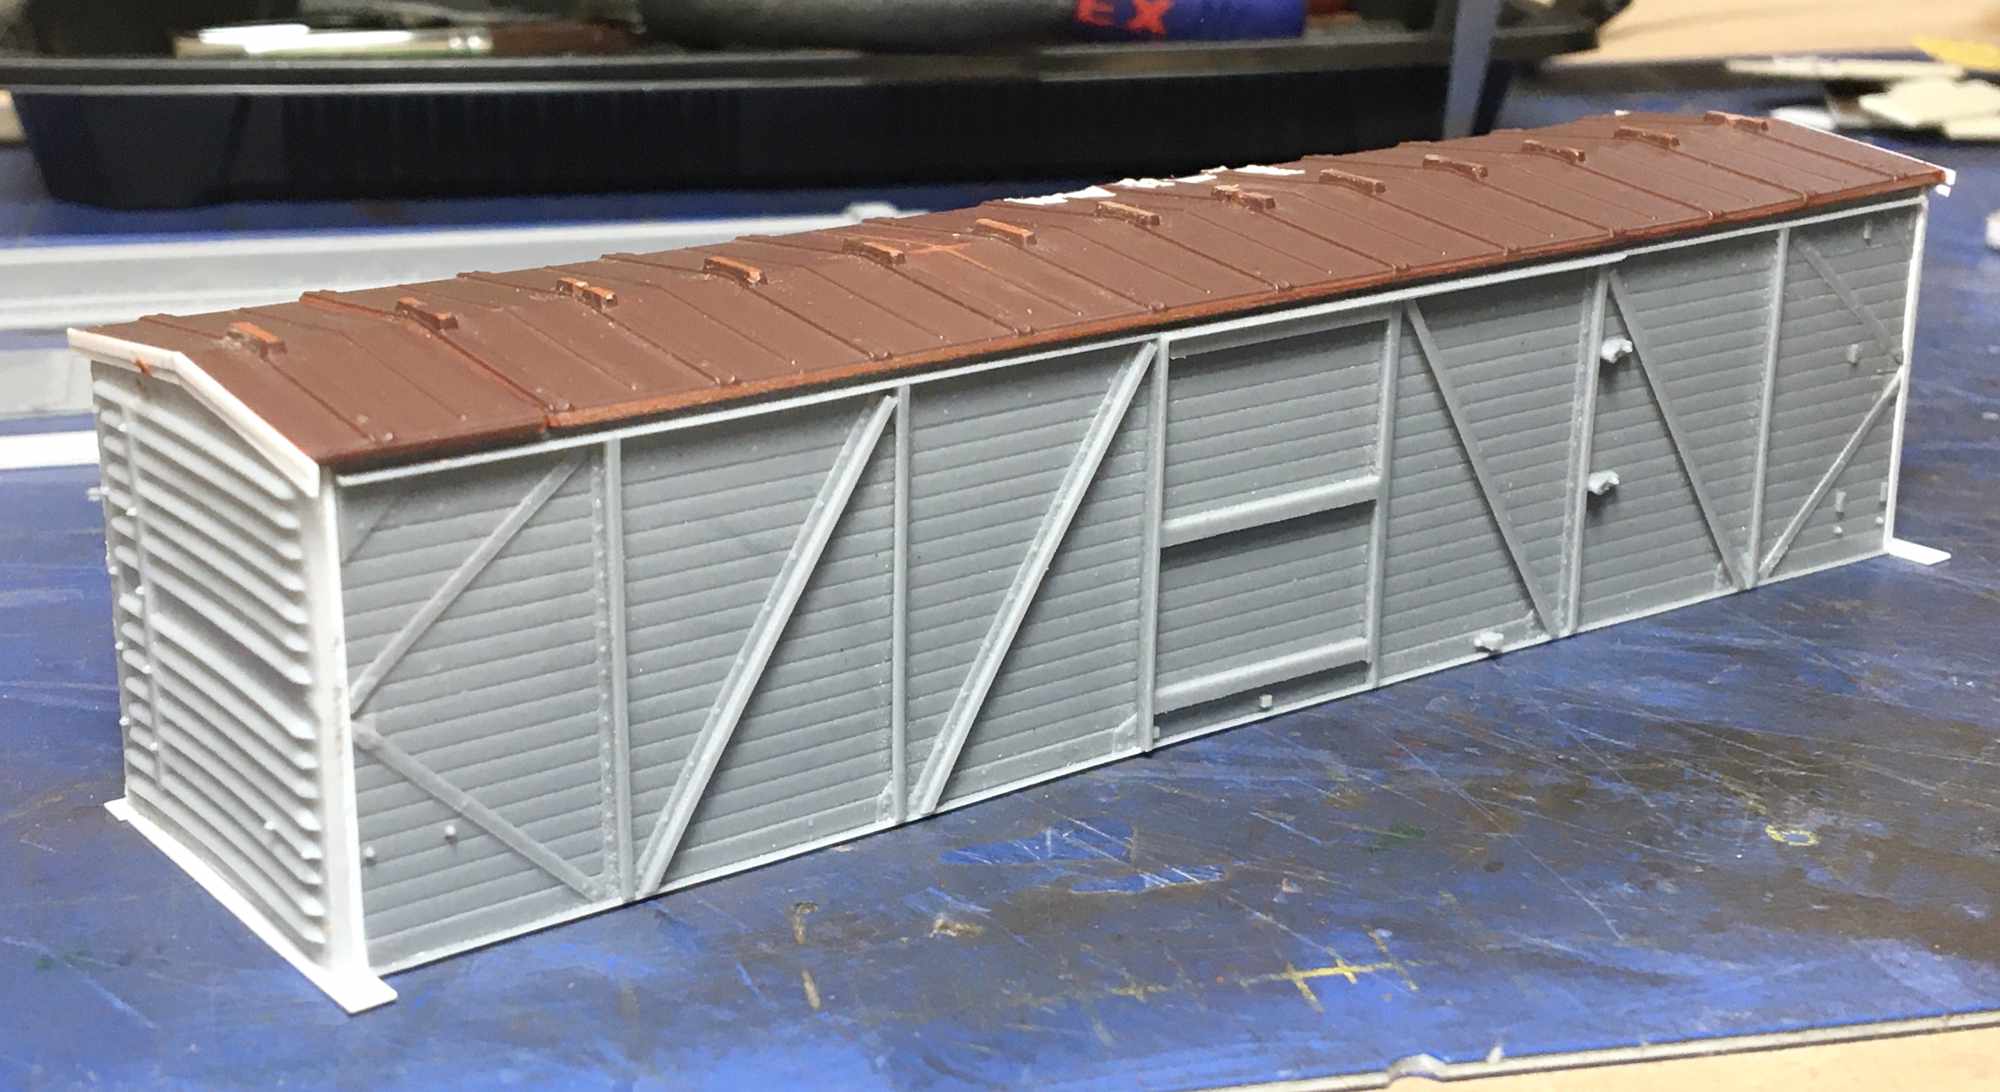
Once construction was complete, I sandblasted the car in my North Coast sandblasting booth, then washed it and let it dry for a couple of days. I painted the entire car body including the trucks with Tru Color Rock Island TCP-197 Rock Island 1930-60’S Freight Car Brown. I thinned the paint with about 30% lacquer thinner. The paint went on beautifully and was completely dry in about an hour.
I used a newly-developed decal set to finish the model. Steve Hile and I teamed up with Mike Hood at K4 Decals to develop a decal set specifically for these cars. Steve provided prototype pictures and data. I provided a few more pictures and then made a sketch-up with numbers, data, and some dimensions. Mike had the decals done in a week, and at our request, he added lettering and data for a few other Rock Island single-sheathed box cars on the same sheet. Thanks Mike!
I decaled the model per my standard practice. I cut the decals on a sheet of glass, as close as possible to the lettering. A thin coat of MicroScale MicroSol was applied on the car body and the decals were laid in position on top of the MicroSol. Once the decals were dry, I popped any bubbles and scribed the decals between rough surfaces like wood sheathing or over certain bulky details to help them to settle. I applied two applications of Walthers Solvaset to settle the decals down.
Once the decals were set to my satisfaction, I applied a shot of Testors Dullcote, thinned to 60%-40% mixture with clean paint thinner. When that was dry I mixed a 50%-50% mixture of Dullcote, lacquer thinner and paint thinner and then added a few drops of the original paint color to make a translucent blend of the original car color. That mixture blends the decals with the original car color and provides an even finish over the entire model.
A note here on mixing Tru-Color with Dullcote. According to the manufacturer, Tru-Color Paint is an acrylic solvent based paint. Testors Dullcote is an enamel. The paints have slightly different properties and don’t mix well. To make these different paints friendly, I first add a small amount of lacquer thinner with Dullcote and mix it well. Lacquer thinner mixes with both the Tru-color paint and Testors Dullcote. It provies the magic to mix there different paint types. Next, I add a few drops of Tru-Color paint to the Dullcote and stir it with a cotton swab. Finally, I add paint thinner and mix to the desired consistency. When the mix looks right, I spray it on a test model and let it dry to check the finish. Glosscote can be added to the mix if the results are too flat.
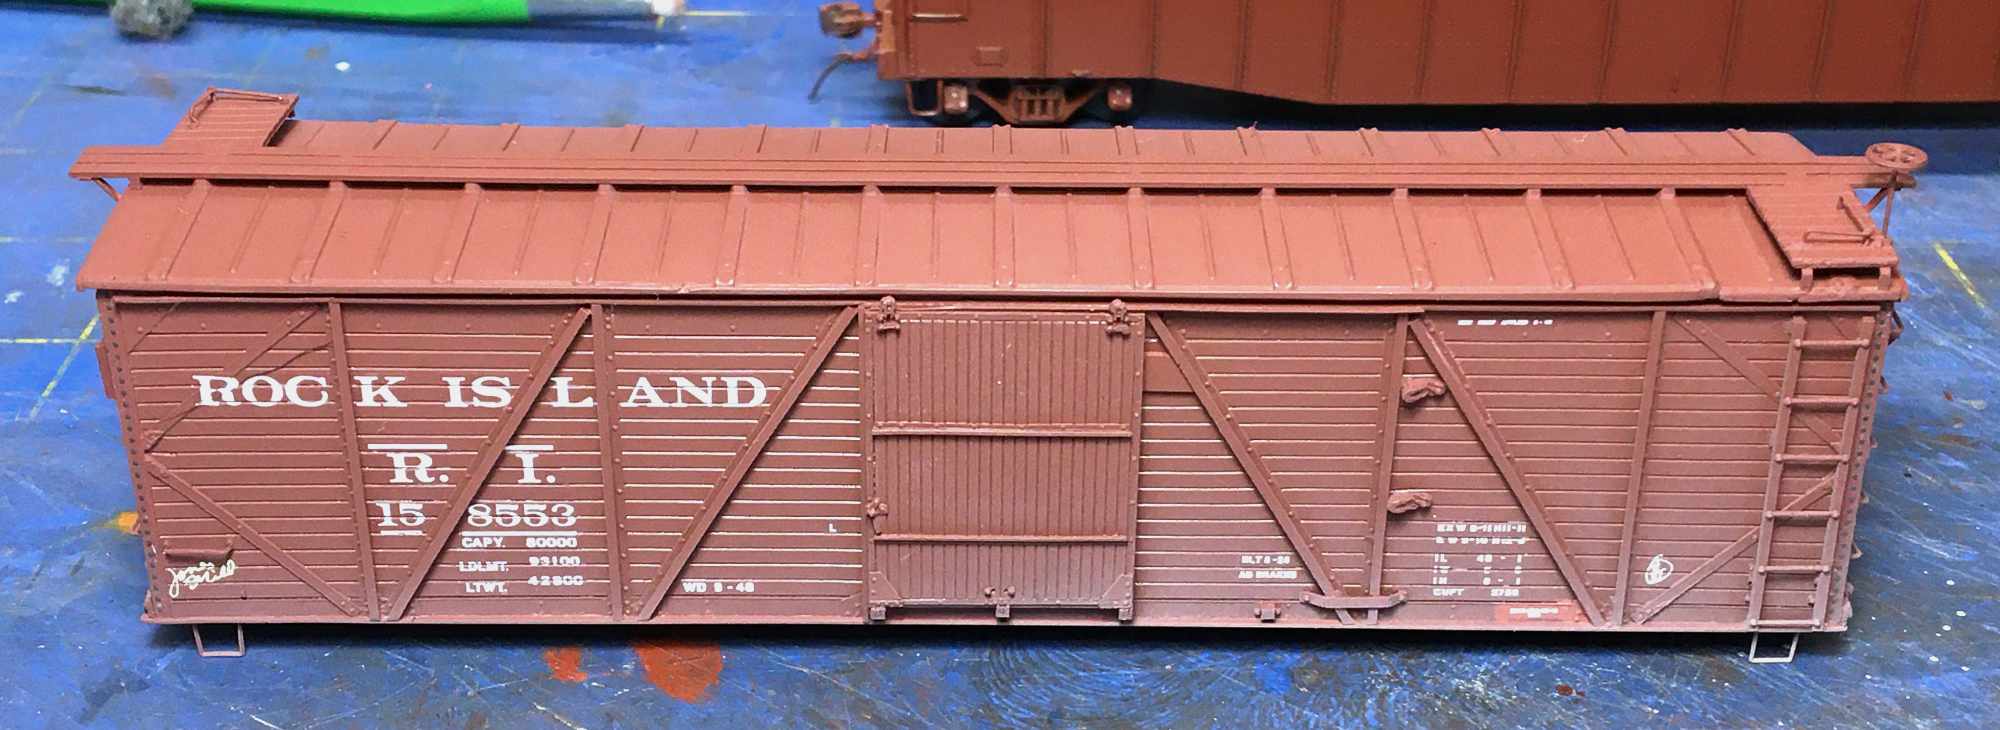
After the finish coat was applied, I weathered the car beginning with the underframe. I airbrushed the underframe, trucks, and the lower sides and ends of the car body with Testors Light Tan mixed with a little black. I used AIM Weathering Powders for detail weathering. Soot Black was used on the wheel faces and Delta Dirt on the corners and lower portion of the ends, trucks and couplers. I also applied a little Soot Black and Brown on the roof to provide contrast. I used red and brown Prismacolor artists pencils to weather a few sheathing boards. Weathering was sealed with a last, very light coat of the translucent Box Car Red blend.
I ran an operations check on the model before putting it into service on the layout. I polished the tread on the wheelsets by spinning the wheels against a wire brush attached to my cordless Dremel drill. I used a wire brush and spun them around 5,000 rpm. That cleaned off all the paint and got them shiny smooth. Next, I checked the coupler height by attaching the trucks and tested the model with a Kadee coupler height gauge. I adjusted the car body height with Kadee red and gray washers. The couplers were also attached and lubricated. With the car complete and layout ready, I declared the project complete and opened a cold Belgian beer to celebrate.
I snapped a few shots of the model on my 7-foot x 17-inch Hermitage Road switching layout. More details on the Hermitage Road project are available on my blog.
Questions and comments can be posted below. Please follow the instructions so your comment can be posted. All comments are reviewed and approved before they appear. To subscribe to this blog, add your email address to the function at the bottom of the right column on the main page. Share the blog link with other model railroaders.
Beauty, John!
Well done. Kudos. Like the finish and enjoyed the read.
John. Thanks for the write up will definitely help when my own Frankenkit hits the workbench
Great job, John. I was so glad to be able to help a little.
John,
Nice build and well detailed instructions. I was curious however when you wrote that you thinned Tru-Color paint with lacquer thinner rather than acetone or Tru-Color thinner itself. Clearly plain old lacquer thinner will work in your hands but I have read where it is problematic.
HI Jim,
Thanks for the kind comments. Yes, absolutely–lacquer thinner works like magic to thin Tru Color. I’ve never used anything else and won’t, because lacquer thinner works great. I also use lacquer thinner exclusively for thinning ScaleCoat. Give it a try with Tru Color–just add a little bit at a time and you’ll get great results.
Incidentally, Tru Color tends to glop up in the bottle if the bottle hasn’t been opened in 9-12 months or more. Add a little laquer thinner in the bottle and shake it up and it’ll be good as new.
John Golden
Great looking car! Thanks for the inspiration.
Nicely done John. Enjoyed your writeup on construction as well.
Thanks for sharing your work
John, excellent car and excellent modeling of a unique car. Thanks for sharing.
Fenton
Very interesting and a very nice build
Nice work John.
Thank you, Christer. Where are you from?